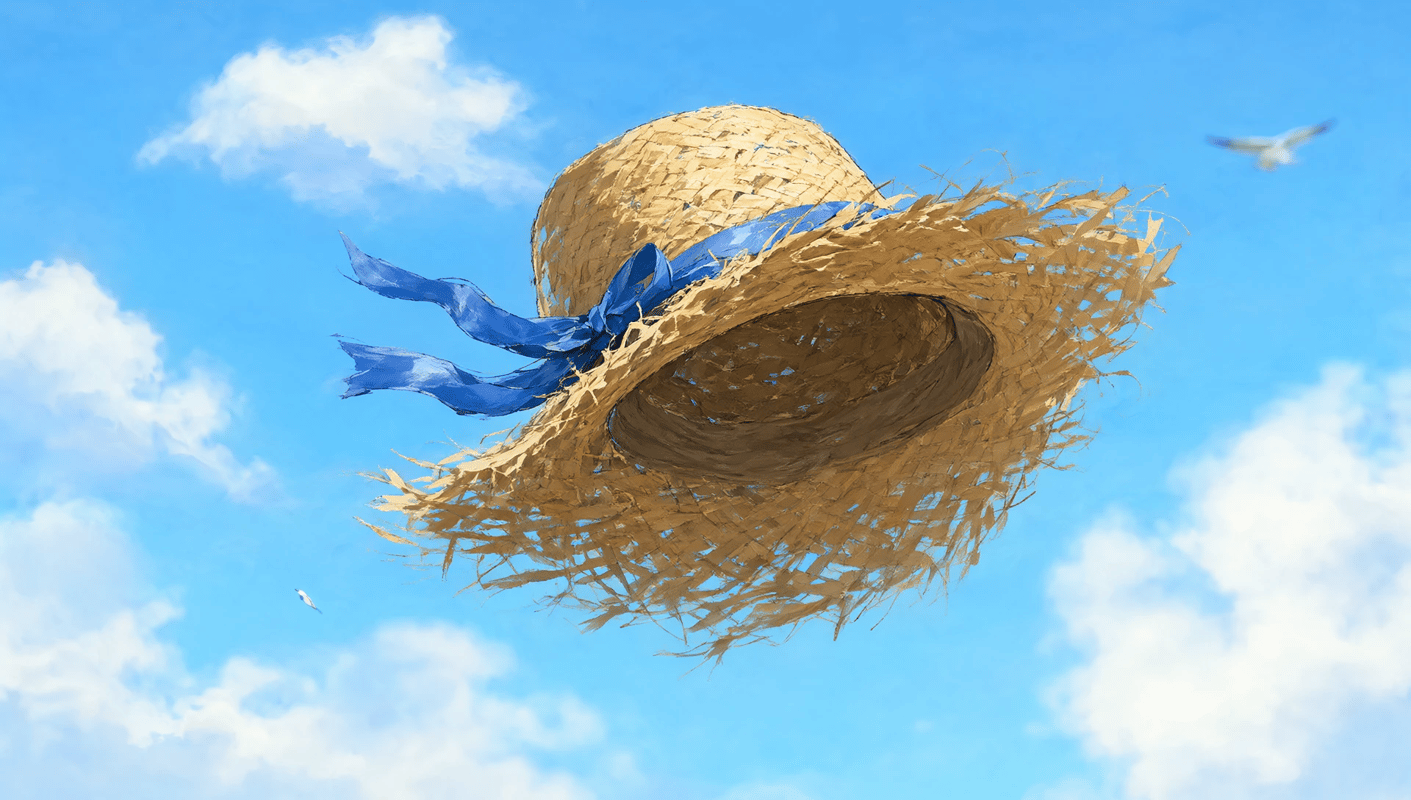
What is Qwen-Image-2.1?
Qwen-Image-2.1 is an open-weight image generation model that combines image generation and editing in a single model.
A closed-source Qwen-Image 2.0 came first, but within the open-weight Qwen-Image family this is the successor to Qwen-Image-2512 and Qwen-Image-Edit-2511.
Previous Qwen-Image models used separate models for generation and editing. Like MiniMax H3, the 2.x architecture feeds both text and reference images into a single DiT, so the same model can handle image generation, editing, and Ref2Image.
It also supports native RGBA output—in other words, transparent images.
The image generation component is a compact 7B model, yet it covers generation, editing, references, and transparency. It is quite a versatile model.
Recommended settings
- Resolution
- 2K (about 4 MP recommended)
- 2048 × 2048 px for 1:1
- Use multiples of 32 for both width and height
- 2K (about 4 MP recommended)
Downloading the models
- diffusion_models
- qwen_image_2.1_int8_convrot.safetensors (7.26 GB)
- text_encoders
- qwen3vl_8b_int8_convrot.safetensors (9.35 GB)
- vae
- qwen_image_2.1_vae_bf16.safetensors (676 MB)
📂ComfyUI/
└── 📂models/
    ├── 📂diffusion_models/
    │   └── qwen_image_2.1_int8_convrot.safetensors
    ├── 📂text_encoders/
    │   └── qwen3vl_8b_int8_convrot.safetensors
    └── 📂vae/
        └── qwen_image_2.1_vae_bf16.safetensors
text2image
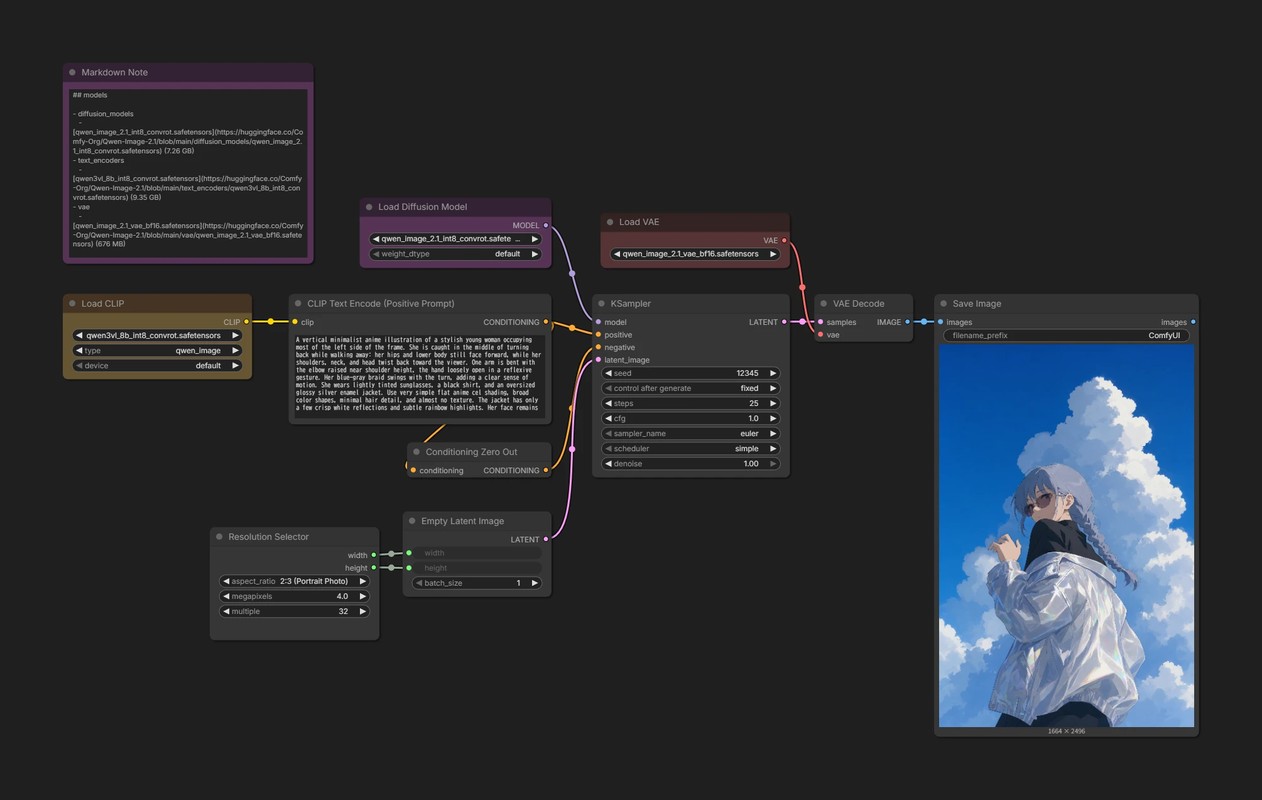
{
  "id": "d8034549-7e0a-40f1-8c2e-de3ffc6f1cae",
  "revision": 0,
  "last_node_id": 72,
  "last_link_id": 159,
  "nodes": [
    {
      "id": 8,
      "type": "VAEDecode",
      "pos": [
        1252.432861328125,
        188.1918182373047
      ],
      "size": [
        157.56002807617188,
        46
      ],
      "flags": {},
      "order": 9,
      "mode": 0,
      "inputs": [
        {
          "name": "samples",
          "type": "LATENT",
          "link": 35
        },
        {
          "name": "vae",
          "type": "VAE",
          "link": 76
        }
      ],
      "outputs": [
        {
          "name": "IMAGE",
          "type": "IMAGE",
          "slot_index": 0,
          "links": [
            101
          ]
        }
      ],
      "properties": {
        "Node name for S&R": "VAEDecode",
        "cnr_id": "comfy-core",
        "ver": "0.3.33"
      }
    },
    {
      "id": 37,
      "type": "UNETLoader",
      "pos": [
        528.8914031982422,
        34.805270385742176
      ],
      "size": [
        305.3782043457031,
        82
      ],
      "flags": {},
      "order": 0,
      "mode": 0,
      "inputs": [],
      "outputs": [
        {
          "name": "MODEL",
          "type": "MODEL",
          "slot_index": 0,
          "links": [
            105
          ]
        }
      ],
      "properties": {
        "Node name for S&R": "UNETLoader",
        "cnr_id": "comfy-core",
        "ver": "0.3.33"
      },
      "widgets_values": [
        "qwen_image_2.1_int8_convrot.safetensors",
        "default"
      ],
      "widgets_values_named": {
        "unet_name": "qwen_image_2.1_int8_convrot.safetensors",
        "weight_dtype": "default"
      },
      "color": "#323",
      "bgcolor": "#535"
    },
    {
      "id": 38,
      "type": "CLIPLoader",
      "pos": [
        56.288665771484375,
        187.93908374218398
      ],
      "size": [
        301.3524169921875,
        106
      ],
      "flags": {},
      "order": 1,
      "mode": 0,
      "inputs": [],
      "outputs": [
        {
          "name": "CLIP",
          "type": "CLIP",
          "slot_index": 0,
          "links": [
            74
          ]
        }
      ],
      "properties": {
        "Node name for S&R": "CLIPLoader",
        "cnr_id": "comfy-core",
        "ver": "0.3.33"
      },
      "widgets_values": [
        "qwen3vl_8b_int8_convrot.safetensors",
        "qwen_image",
        "default"
      ],
      "widgets_values_named": {
        "clip_name": "qwen3vl_8b_int8_convrot.safetensors",
        "type": "qwen_image",
        "device": "default"
      },
      "color": "#432",
      "bgcolor": "#653"
    },
    {
      "id": 62,
      "type": "EmptyLatentImage",
      "pos": [
        597.2696075439453,
        533.9984804443335
      ],
      "size": [
        237,
        106
      ],
      "flags": {},
      "order": 6,
      "mode": 0,
      "inputs": [
        {
          "name": "width",
          "type": "INT",
          "widget": {
            "name": "width"
          },
          "link": 149
        },
        {
          "name": "height",
          "type": "INT",
          "widget": {
            "name": "height"
          },
          "link": 150
        }
      ],
      "outputs": [
        {
          "name": "LATENT",
          "type": "LATENT",
          "links": [
            148
          ]
        }
      ],
      "properties": {
        "Node name for S&R": "EmptyLatentImage",
        "cnr_id": "comfy-core",
        "ver": "0.26.0"
      },
      "widgets_values": [
        512,
        512,
        1
      ],
      "widgets_values_named": {
        "width": 512,
        "height": 512,
        "batch_size": 1
      }
    },
    {
      "id": 3,
      "type": "KSampler",
      "pos": [
        898.7548217773438,
        188.1918182373047
      ],
      "size": [
        315,
        262
      ],
      "flags": {},
      "order": 8,
      "mode": 0,
      "inputs": [
        {
          "name": "model",
          "type": "MODEL",
          "link": 105
        },
        {
          "name": "positive",
          "type": "CONDITIONING",
          "link": 152
        },
        {
          "name": "negative",
          "type": "CONDITIONING",
          "link": 153
        },
        {
          "name": "latent_image",
          "type": "LATENT",
          "link": 148
        }
      ],
      "outputs": [
        {
          "name": "LATENT",
          "type": "LATENT",
          "slot_index": 0,
          "links": [
            35
          ]
        }
      ],
      "properties": {
        "Node name for S&R": "KSampler",
        "cnr_id": "comfy-core",
        "ver": "0.3.33"
      },
      "widgets_values": [
        12345,
        "fixed",
        25,
        1,
        "euler",
        "simple",
        1
      ],
      "widgets_values_named": {
        "seed": 12345,
        "control_after_generate": "fixed",
        "steps": 25,
        "cfg": 1,
        "sampler_name": "euler",
        "scheduler": "simple",
        "denoise": 1
      }
    },
    {
      "id": 60,
      "type": "ResolutionSelector",
      "pos": [
        290.29125126341165,
        559.1854465782014
      ],
      "size": [
        270,
        150
      ],
      "flags": {},
      "order": 2,
      "mode": 0,
      "inputs": [],
      "outputs": [
        {
          "name": "width",
          "type": "INT",
          "links": [
            149
          ]
        },
        {
          "name": "height",
          "type": "INT",
          "links": [
            150
          ]
        }
      ],
      "properties": {
        "Node name for S&R": "ResolutionSelector",
        "cnr_id": "comfy-core",
        "ver": "0.25.0"
      },
      "widgets_values": [
        "2:3 (Portrait Photo)",
        4,
        32
      ],
      "widgets_values_named": {
        "aspect_ratio": "2:3 (Portrait Photo)",
        "megapixels": 4,
        "multiple": 32
      }
    },
    {
      "id": 6,
      "type": "CLIPTextEncode",
      "pos": [
        415.7513025457208,
        187.93908374218398
      ],
      "size": [
        418.5183049982245,
        177.7917699892659
      ],
      "flags": {},
      "order": 5,
      "mode": 0,
      "inputs": [
        {
          "name": "clip",
          "type": "CLIP",
          "link": 74
        }
      ],
      "outputs": [
        {
          "name": "CONDITIONING",
          "type": "CONDITIONING",
          "slot_index": 0,
          "links": [
            113,
            152
          ]
        }
      ],
      "title": "CLIP Text Encode (Positive Prompt)",
      "properties": {
        "Node name for S&R": "CLIPTextEncode",
        "cnr_id": "comfy-core",
        "ver": "0.3.33"
      },
      "widgets_values": [
        "A vertical minimalist anime illustration of a stylish young woman occupying most of the left side of the frame. She is caught in the middle of turning back while walking away: her hips and lower body still face forward, while her shoulders, neck, and head twist back toward the viewer. One arm is bent with the elbow raised near shoulder height, the hand loosely open in a reflexive gesture. Her blue-gray braid swings with the turn, adding a clear sense of motion. She wears lightly tinted sunglasses, a black shirt, and an oversized glossy silver enamel jacket. Use very simple flat anime cel shading, broad color shapes, minimal hair detail, and almost no texture. The jacket has only a few crisp white reflections and subtle rainbow highlights. Her face remains clearly readable, with only a soft shadow passing diagonally across part of her face and body. The background is a vivid deep-blue gradient sky with large, irregular towering cumulonimbus clouds, loosely painted in bold simple shapes. The clouds have dramatic uneven silhouettes, bright sunlit tops, and deep blue-gray shadowed undersides. Keep the woman large and close in the foreground while leaving enough open sky around her for the clouds to feel expansive."
      ],
      "widgets_values_named": {
        "text": "A vertical minimalist anime illustration of a stylish young woman occupying most of the left side of the frame. She is caught in the middle of turning back while walking away: her hips and lower body still face forward, while her shoulders, neck, and head twist back toward the viewer. One arm is bent with the elbow raised near shoulder height, the hand loosely open in a reflexive gesture. Her blue-gray braid swings with the turn, adding a clear sense of motion. She wears lightly tinted sunglasses, a black shirt, and an oversized glossy silver enamel jacket. Use very simple flat anime cel shading, broad color shapes, minimal hair detail, and almost no texture. The jacket has only a few crisp white reflections and subtle rainbow highlights. Her face remains clearly readable, with only a soft shadow passing diagonally across part of her face and body. The background is a vivid deep-blue gradient sky with large, irregular towering cumulonimbus clouds, loosely painted in bold simple shapes. The clouds have dramatic uneven silhouettes, bright sunlit tops, and deep blue-gray shadowed undersides. Keep the woman large and close in the foreground while leaving enough open sky around her for the clouds to feel expansive."
      }
    },
    {
      "id": 56,
      "type": "SaveImage",
      "pos": [
        1443.3798111474612,
        188.1918182373047
      ],
      "size": [
        421.58314311044455,
        674.573510348422
      ],
      "flags": {},
      "order": 10,
      "mode": 0,
      "inputs": [
        {
          "name": "images",
          "type": "IMAGE",
          "link": 101
        }
      ],
      "outputs": [
        {
          "name": "images",
          "type": "IMAGE",
          "links": null
        }
      ],
      "properties": {
        "cnr_id": "comfy-core",
        "ver": "0.3.75"
      },
      "widgets_values": [
        "ComfyUI"
      ],
      "widgets_values_named": {
        "filename_prefix": "ComfyUI"
      }
    },
    {
      "id": 55,
      "type": "MarkdownNote",
      "pos": [
        56.288665771484375,
        -179.6421198702247
      ],
      "size": [
        399.21729431373655,
        289.666254907403
      ],
      "flags": {},
      "order": 3,
      "mode": 0,
      "inputs": [],
      "outputs": [],
      "properties": {},
      "widgets_values": [
        "## models\n\n- diffusion_models\n  - [qwen_image_2.1_int8_convrot.safetensors](https://huggingface.co/Comfy-Org/Qwen-Image-2.1/blob/main/diffusion_models/qwen_image_2.1_int8_convrot.safetensors) (7.26 GB)\n- text_encoders\n  - [qwen3vl_8b_int8_convrot.safetensors](https://huggingface.co/Comfy-Org/Qwen-Image-2.1/blob/main/text_encoders/qwen3vl_8b_int8_convrot.safetensors) (9.35 GB)\n- vae\n  - [qwen_image_2.1_vae_bf16.safetensors](https://huggingface.co/Comfy-Org/Qwen-Image-2.1/blob/main/vae/qwen_image_2.1_vae_bf16.safetensors) (676 MB)\n\n```text\n📂ComfyUI/\n└── 📂models/\n    ├── 📂diffusion_models/\n    │   └── qwen_image_2.1_int8_convrot.safetensors \n    ├── 📂text_encoders/\n    │   └── qwen3vl_8b_int8_convrot.safetensors \n    └── 📂vae/\n        └── qwen_image_2.1_vae_bf16.safetensors \n```"
      ],
      "widgets_values_named": {
        "text": "## models\n\n- diffusion_models\n  - [qwen_image_2.1_int8_convrot.safetensors](https://huggingface.co/Comfy-Org/Qwen-Image-2.1/blob/main/diffusion_models/qwen_image_2.1_int8_convrot.safetensors) (7.26 GB)\n- text_encoders\n  - [qwen3vl_8b_int8_convrot.safetensors](https://huggingface.co/Comfy-Org/Qwen-Image-2.1/blob/main/text_encoders/qwen3vl_8b_int8_convrot.safetensors) (9.35 GB)\n- vae\n  - [qwen_image_2.1_vae_bf16.safetensors](https://huggingface.co/Comfy-Org/Qwen-Image-2.1/blob/main/vae/qwen_image_2.1_vae_bf16.safetensors) (676 MB)\n\n```text\n📂ComfyUI/\n└── 📂models/\n    ├── 📂diffusion_models/\n    │   └── qwen_image_2.1_int8_convrot.safetensors \n    ├── 📂text_encoders/\n    │   └── qwen3vl_8b_int8_convrot.safetensors \n    └── 📂vae/\n        └── qwen_image_2.1_vae_bf16.safetensors \n```"
      },
      "color": "#323",
      "bgcolor": "#535"
    },
    {
      "id": 39,
      "type": "VAELoader",
      "pos": [
        912.4024047851562,
        58.805270385742176
      ],
      "size": [
        301.3524169921875,
        58
      ],
      "flags": {},
      "order": 4,
      "mode": 0,
      "inputs": [],
      "outputs": [
        {
          "name": "VAE",
          "type": "VAE",
          "slot_index": 0,
          "links": [
            76
          ]
        }
      ],
      "properties": {
        "Node name for S&R": "VAELoader",
        "cnr_id": "comfy-core",
        "ver": "0.3.33"
      },
      "widgets_values": [
        "qwen_image_2.1_vae_bf16.safetensors"
      ],
      "widgets_values_named": {
        "vae_name": "qwen_image_2.1_vae_bf16.safetensors"
      },
      "color": "#322",
      "bgcolor": "#533"
    },
    {
      "id": 63,
      "type": "ConditioningZeroOut",
      "pos": [
        604.1803306150726,
        424.13739436061894
      ],
      "size": [
        230.08927692887266,
        26
      ],
      "flags": {},
      "order": 7,
      "mode": 0,
      "inputs": [
        {
          "name": "conditioning",
          "type": "CONDITIONING",
          "link": 113
        }
      ],
      "outputs": [
        {
          "name": "CONDITIONING",
          "type": "CONDITIONING",
          "links": [
            153
          ]
        }
      ],
      "properties": {
        "Node name for S&R": "ConditioningZeroOut"
      }
    }
  ],
  "links": [
    [
      35,
      3,
      0,
      8,
      0,
      "LATENT"
    ],
    [
      74,
      38,
      0,
      6,
      0,
      "CLIP"
    ],
    [
      76,
      39,
      0,
      8,
      1,
      "VAE"
    ],
    [
      101,
      8,
      0,
      56,
      0,
      "IMAGE"
    ],
    [
      105,
      37,
      0,
      3,
      0,
      "MODEL"
    ],
    [
      113,
      6,
      0,
      63,
      0,
      "CONDITIONING"
    ],
    [
      148,
      62,
      0,
      3,
      3,
      "LATENT"
    ],
    [
      149,
      60,
      0,
      62,
      0,
      "INT"
    ],
    [
      150,
      60,
      1,
      62,
      1,
      "INT"
    ],
    [
      152,
      6,
      0,
      3,
      1,
      "CONDITIONING"
    ],
    [
      153,
      63,
      0,
      3,
      2,
      "CONDITIONING"
    ]
  ],
  "groups": [],
  "config": {},
  "extra": {
    "ds": {
      "scale": 0.573085533011688,
      "offset": [
        718.0355988610712,
        482.23550109284804
      ]
    },
    "frontendVersion": "1.53.6",
    "VHS_latentpreview": false,
    "VHS_latentpreviewrate": 0,
    "VHS_MetadataImage": true,
    "VHS_KeepIntermediate": true
  },
  "version": 0.4
}
CFG: 1.0- The official workflow does not use CFG, but it may be worth raising it slightly to try a Negative Prompt
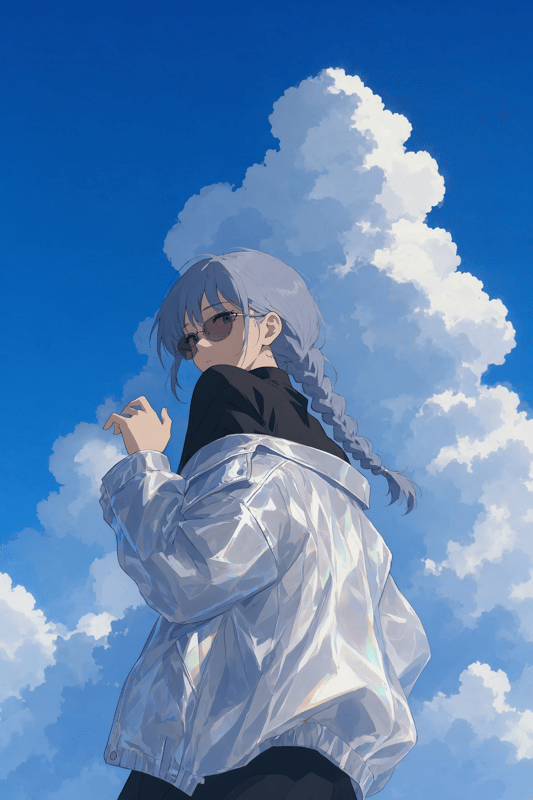
For better or worse, the Seed makes a very large difference. Changing the resolution also changes the image substantially, so try a variety of resolutions and Seeds.
Output example
Ref2Image
This workflow combines reference images to create a new image.
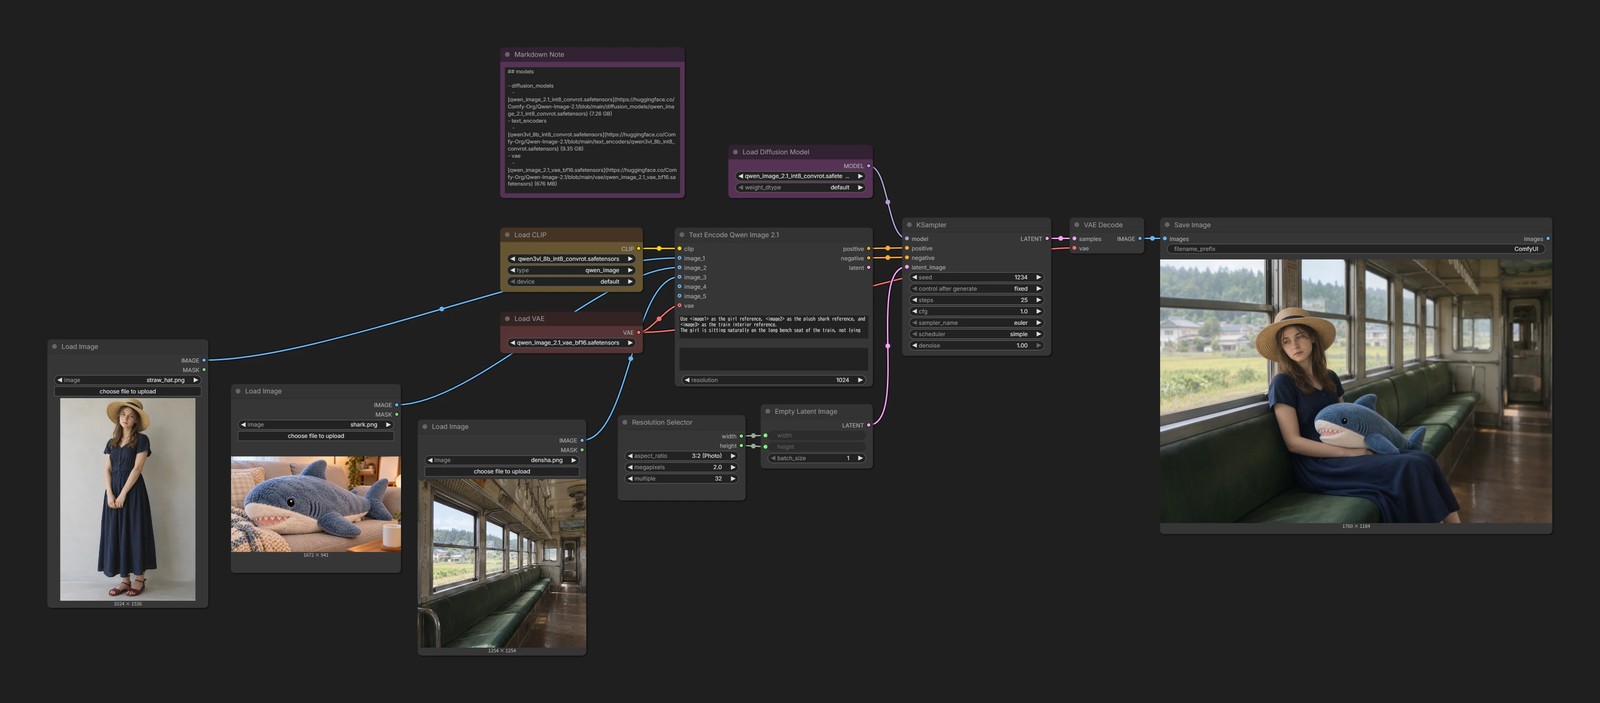
{
"id": "179e9c66-d274-4857-bcd9-34408448057b",
"revision": 0,
"last_node_id": 76,
"last_link_id": 170,
"nodes": [
{
"id": 8,
"type": "VAEDecode",
"pos": [
1252.432861328125,
188.1918182373047
],
"size": [
157.56002807617188,
46
],
"flags": {},
"order": 11,
"mode": 0,
"inputs": [
{
"name": "samples",
"type": "LATENT",
"link": 35
},
{
"name": "vae",
"type": "VAE",
"link": 76
}
],
"outputs": [
{
"name": "IMAGE",
"type": "IMAGE",
"slot_index": 0,
"links": [
101
]
}
],
"properties": {
"Node name for S&R": "VAEDecode",
"cnr_id": "comfy-core",
"ver": "0.3.33"
}
},
{
"id": 37,
"type": "UNETLoader",
"pos": [
531.6217956542969,
34.805270385742176
],
"size": [
305.3782043457031,
82
],
"flags": {},
"order": 0,
"mode": 0,
"inputs": [],
"outputs": [
{
"name": "MODEL",
"type": "MODEL",
"slot_index": 0,
"links": [
170
]
}
],
"properties": {
"Node name for S&R": "UNETLoader",
"cnr_id": "comfy-core",
"ver": "0.3.33"
},
"widgets_values": [
"qwen_image_2.1_int8_convrot.safetensors",
"default"
],
"widgets_values_named": {
"unet_name": "qwen_image_2.1_int8_convrot.safetensors",
"weight_dtype": "default"
},
"color": "#323",
"bgcolor": "#535"
},
{
"id": 38,
"type": "CLIPLoader",
"pos": [
49.87187153979269,
209.35653307788294
],
"size": [
301.3524169921875,
106
],
"flags": {},
"order": 1,
"mode": 0,
"inputs": [],
"outputs": [
{
"name": "CLIP",
"type": "CLIP",
"slot_index": 0,
"links": [
115
]
}
],
"properties": {
"Node name for S&R": "CLIPLoader",
"cnr_id": "comfy-core",
"ver": "0.3.33"
},
"widgets_values": [
"qwen3vl_8b_int8_convrot.safetensors",
"qwen_image",
"default"
],
"widgets_values_named": {
"clip_name": "qwen3vl_8b_int8_convrot.safetensors",
"type": "qwen_image",
"device": "default"
},
"color": "#432",
"bgcolor": "#653"
},
{
"id": 62,
"type": "EmptyLatentImage",
"pos": [
600,
582.327293849093
],
"size": [
237,
106
],
"flags": {},
"order": 8,
"mode": 0,
"inputs": [
{
"name": "width",
"type": "INT",
"widget": {
"name": "width"
},
"link": 162
},
{
"name": "height",
"type": "INT",
"widget": {
"name": "height"
},
"link": 163
}
],
"outputs": [
{
"name": "LATENT",
"type": "LATENT",
"links": [
148
]
}
],
"properties": {
"Node name for S&R": "EmptyLatentImage",
"cnr_id": "comfy-core",
"ver": "0.26.0"
},
"widgets_values": [
512,
512,
1
],
"widgets_values_named": {
"width": 512,
"height": 512,
"batch_size": 1
}
},
{
"id": 3,
"type": "KSampler",
"pos": [
898.7548217773438,
188.1918182373047
],
"size": [
315,
262
],
"flags": {},
"order": 10,
"mode": 0,
"inputs": [
{
"name": "model",
"type": "MODEL",
"link": 170
},
{
"name": "positive",
"type": "CONDITIONING",
"link": 157
},
{
"name": "negative",
"type": "CONDITIONING",
"link": 158
},
{
"name": "latent_image",
"type": "LATENT",
"link": 148
}
],
"outputs": [
{
"name": "LATENT",
"type": "LATENT",
"slot_index": 0,
"links": [
35
]
}
],
"properties": {
"Node name for S&R": "KSampler",
"cnr_id": "comfy-core",
"ver": "0.3.33"
},
"widgets_values": [
1234,
"fixed",
25,
1,
"euler",
"simple",
1
],
"widgets_values_named": {
"seed": 1234,
"control_after_generate": "fixed",
"steps": 25,
"cfg": 1,
"sampler_name": "euler",
"scheduler": "simple",
"denoise": 1
}
},
{
"id": 56,
"type": "SaveImage",
"pos": [
1443.3798111474612,
188.1918182373047
],
"size": [
828.4570568413153,
638.4712083438695
],
"flags": {},
"order": 12,
"mode": 0,
"inputs": [
{
"name": "images",
"type": "IMAGE",
"link": 101
}
],
"outputs": [
{
"name": "images",
"type": "IMAGE",
"links": null
}
],
"properties": {
"cnr_id": "comfy-core",
"ver": "0.3.75"
},
"widgets_values": [
"ComfyUI"
],
"widgets_values_named": {
"filename_prefix": "ComfyUI"
}
},
{
"id": 55,
"type": "MarkdownNote",
"pos": [
49.87187153979269,
-171.34464343616293
],
"size": [
389.61380077225,
288.1499138219051
],
"flags": {},
"order": 2,
"mode": 0,
"inputs": [],
"outputs": [],
"properties": {},
"widgets_values": [
"## models\n\n- diffusion_models\n - [qwen_image_2.1_int8_convrot.safetensors](https://huggingface.co/Comfy-Org/Qwen-Image-2.1/blob/main/diffusion_models/qwen_image_2.1_int8_convrot.safetensors) (7.26 GB)\n- text_encoders\n - [qwen3vl_8b_int8_convrot.safetensors](https://huggingface.co/Comfy-Org/Qwen-Image-2.1/blob/main/text_encoders/qwen3vl_8b_int8_convrot.safetensors) (9.35 GB)\n- vae\n - [qwen_image_2.1_vae_bf16.safetensors](https://huggingface.co/Comfy-Org/Qwen-Image-2.1/blob/main/vae/qwen_image_2.1_vae_bf16.safetensors) (676 MB)\n\n```text\n📂ComfyUI/\n└── 📂models/\n ├── 📂diffusion_models/\n │ └── qwen_image_2.1_int8_convrot.safetensors \n ├── 📂text_encoders/\n │ └── qwen3vl_8b_int8_convrot.safetensors \n └── 📂vae/\n └── qwen_image_2.1_vae_bf16.safetensors \n```"
],
"widgets_values_named": {
"text": "## models\n\n- diffusion_models\n - [qwen_image_2.1_int8_convrot.safetensors](https://huggingface.co/Comfy-Org/Qwen-Image-2.1/blob/main/diffusion_models/qwen_image_2.1_int8_convrot.safetensors) (7.26 GB)\n- text_encoders\n - [qwen3vl_8b_int8_convrot.safetensors](https://huggingface.co/Comfy-Org/Qwen-Image-2.1/blob/main/text_encoders/qwen3vl_8b_int8_convrot.safetensors) (9.35 GB)\n- vae\n - [qwen_image_2.1_vae_bf16.safetensors](https://huggingface.co/Comfy-Org/Qwen-Image-2.1/blob/main/vae/qwen_image_2.1_vae_bf16.safetensors) (676 MB)\n\n```text\n📂ComfyUI/\n└── 📂models/\n ├── 📂diffusion_models/\n │ └── qwen_image_2.1_int8_convrot.safetensors \n ├── 📂text_encoders/\n │ └── qwen3vl_8b_int8_convrot.safetensors \n └── 📂vae/\n └── qwen_image_2.1_vae_bf16.safetensors \n```"
},
"color": "#323",
"bgcolor": "#535"
},
{
"id": 39,
"type": "VAELoader",
"pos": [
49.87187153979269,
386.79138870487407
],
"size": [
301.3524169921875,
58
],
"flags": {},
"order": 3,
"mode": 0,
"inputs": [],
"outputs": [
{
"name": "VAE",
"type": "VAE",
"slot_index": 0,
"links": [
76,
159
]
}
],
"properties": {
"Node name for S&R": "VAELoader",
"cnr_id": "comfy-core",
"ver": "0.3.33"
},
"widgets_values": [
"qwen_image_2.1_vae_bf16.safetensors"
],
"widgets_values_named": {
"vae_name": "qwen_image_2.1_vae_bf16.safetensors"
},
"color": "#322",
"bgcolor": "#533"
},
{
"id": 64,
"type": "TextEncodeQwenImage21",
"pos": [
418.4816950017755,
209.35653307788294
],
"size": [
418.5183049982245,
306
],
"flags": {},
"order": 9,
"mode": 0,
"inputs": [
{
"name": "clip",
"type": "CLIP",
"link": 115
},
{
"name": "images.image_1",
"shape": 7,
"type": "IMAGE",
"link": 166
},
{
"name": "images.image_2",
"shape": 7,
"type": "IMAGE",
"link": 165
},
{
"name": "images.image_3",
"shape": 7,
"type": "IMAGE",
"link": 167
},
{
"name": "images.image_4",
"shape": 7,
"type": "IMAGE",
"link": null
},
{
"name": "images.image_5",
"shape": 7,
"type": "IMAGE",
"link": null
},
{
"name": "vae",
"shape": 7,
"type": "VAE",
"link": 159
}
],
"outputs": [
{
"name": "positive",
"type": "CONDITIONING",
"links": [
157
]
},
{
"name": "negative",
"type": "CONDITIONING",
"links": [
158
]
},
{
"name": "latent",
"type": "LATENT",
"links": null
}
],
"properties": {
"Node name for S&R": "TextEncodeQwenImage21"
},
"widgets_values": [
"Use <image1> as the girl reference, <image2> as the plush shark reference, and <image3> as the train interior reference.\nThe girl is sitting naturally on the long bench seat of the train, not lying or stretching along the seat.\nShe sits like a normal passenger on a side bench: her hips rest on the seat cushion, her back leans lightly against the backrest, her knees point forward, and her lower legs go down toward the floor.\nHer body is slightly angled toward the window side, and her head droops sleepily.\nShe loosely holds the plush shark from <image2> on her lap and against her stomach.\nShe looks drowsy and relaxed, as if she is quietly nodding off during the ride.\nUse a closer composition focused on her face and upper body.\nThe train interior remains visible, but the background is softly blurred with shallow depth of field.\nThe scene feels peaceful, soft, and cozy.",
"",
1024
],
"widgets_values_named": {
"prompt": "Use <image1> as the girl reference, <image2> as the plush shark reference, and <image3> as the train interior reference.\nThe girl is sitting naturally on the long bench seat of the train, not lying or stretching along the seat.\nShe sits like a normal passenger on a side bench: her hips rest on the seat cushion, her back leans lightly against the backrest, her knees point forward, and her lower legs go down toward the floor.\nHer body is slightly angled toward the window side, and her head droops sleepily.\nShe loosely holds the plush shark from <image2> on her lap and against her stomach.\nShe looks drowsy and relaxed, as if she is quietly nodding off during the ride.\nUse a closer composition focused on her face and upper body.\nThe train interior remains visible, but the background is softly blurred with shallow depth of field.\nThe scene feels peaceful, soft, and cozy.",
"negative_prompt": "",
"resolution": 1024
}
},
{
"id": 65,
"type": "LoadImage",
"pos": [
-124.37766029140397,
614.9092344171308
],
"size": [
356.04630725715367,
468.42910900621905
],
"flags": {},
"order": 4,
"mode": 0,
"inputs": [],
"outputs": [
{
"name": "IMAGE",
"type": "IMAGE",
"links": [
167
]
},
{
"name": "MASK",
"type": "MASK",
"links": null
}
],
"properties": {
"Node name for S&R": "LoadImage"
},
"widgets_values": [
"densha.png",
"image"
],
"widgets_values_named": {
"image": "densha.png",
"upload": "image"
}
},
{
"id": 73,
"type": "ResolutionSelector",
"pos": [
298.0452682548206,
605.7203578308751
],
"size": [
270,
150
],
"flags": {},
"order": 5,
"mode": 0,
"inputs": [],
"outputs": [
{
"name": "width",
"type": "INT",
"links": [
162
]
},
{
"name": "height",
"type": "INT",
"links": [
163
]
}
],
"properties": {
"Node name for S&R": "ResolutionSelector",
"cnr_id": "comfy-core",
"ver": "0.25.0"
},
"widgets_values": [
"3:2 (Photo)",
2,
32
],
"widgets_values_named": {
"aspect_ratio": "3:2 (Photo)",
"megapixels": 2,
"multiple": 32
}
},
{
"id": 74,
"type": "LoadImage",
"pos": [
-906.582932898895,
445.39859649850456
],
"size": [
339.9797985016487,
537.2479895446995
],
"flags": {},
"order": 6,
"mode": 0,
"inputs": [],
"outputs": [
{
"name": "IMAGE",
"type": "IMAGE",
"links": [
166
]
},
{
"name": "MASK",
"type": "MASK",
"links": []
}
],
"properties": {
"Node name for S&R": "LoadImage"
},
"widgets_values": [
"straw_hat.png",
"image"
],
"widgets_values_named": {
"image": "straw_hat.png",
"upload": "image"
}
},
{
"id": 75,
"type": "LoadImage",
"pos": [
-518.7472916938443,
539.8106089450907
],
"size": [
359.01551006770615,
369.0992040445244
],
"flags": {},
"order": 7,
"mode": 0,
"inputs": [],
"outputs": [
{
"name": "IMAGE",
"type": "IMAGE",
"links": [
165
]
},
{
"name": "MASK",
"type": "MASK",
"links": []
}
],
"properties": {
"Node name for S&R": "LoadImage"
},
"widgets_values": [
"shark.png",
"image"
],
"widgets_values_named": {
"image": "shark.png",
"upload": "image"
}
}
],
"links": [
[
35,
3,
0,
8,
0,
"LATENT"
],
[
76,
39,
0,
8,
1,
"VAE"
],
[
101,
8,
0,
56,
0,
"IMAGE"
],
[
148,
62,
0,
3,
3,
"LATENT"
],
[
157,
64,
0,
3,
1,
"CONDITIONING"
],
[
158,
64,
1,
3,
2,
"CONDITIONING"
],
[
162,
73,
0,
62,
0,
"INT"
],
[
163,
73,
1,
62,
1,
"INT"
],
[
115,
38,
0,
64,
0,
"CLIP"
],
[
166,
74,
0,
64,
1,
"IMAGE"
],
[
165,
75,
0,
64,
2,
"IMAGE"
],
[
167,
65,
0,
64,
3,
"IMAGE"
],
[
159,
39,
0,
64,
6,
"VAE"
],
[
170,
37,
0,
3,
0,
"MODEL"
]
],
"groups": [],
"config": {},
"extra": {
"ds": {
"scale": 1.015255979947733,
"offset": [
169.22950729221702,
234.7817116826322
]
},
"frontendVersion": "1.53.6",
"VHS_latentpreview": false,
"VHS_latentpreviewrate": 0,
"VHS_MetadataImage": true,
"VHS_KeepIntermediate": true
},
"version": 0.4
}
- Accepts up to 10 reference images
- Specify which images to use in the prompt, such as “the woman from
<image1>is sitting in the location from<image2>.”
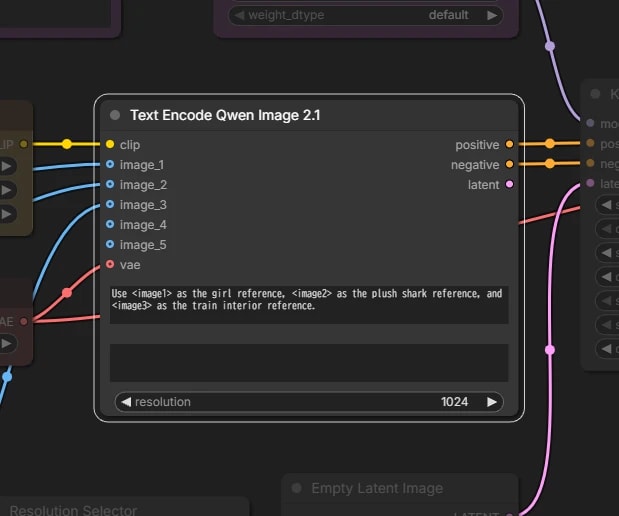
Text Encode Qwen Image 2.1
Enter the reference images and prompt here.
resolution- Reference images are resized to about 1 MP while preserving their aspect ratio before being passed to the model
latentoutput- This is an empty latent based on the size of the first image, but its dimensions are rounded internally. I do not use it in my workflow because I want the output to match the input image dimensions exactly
Output example

Image editing
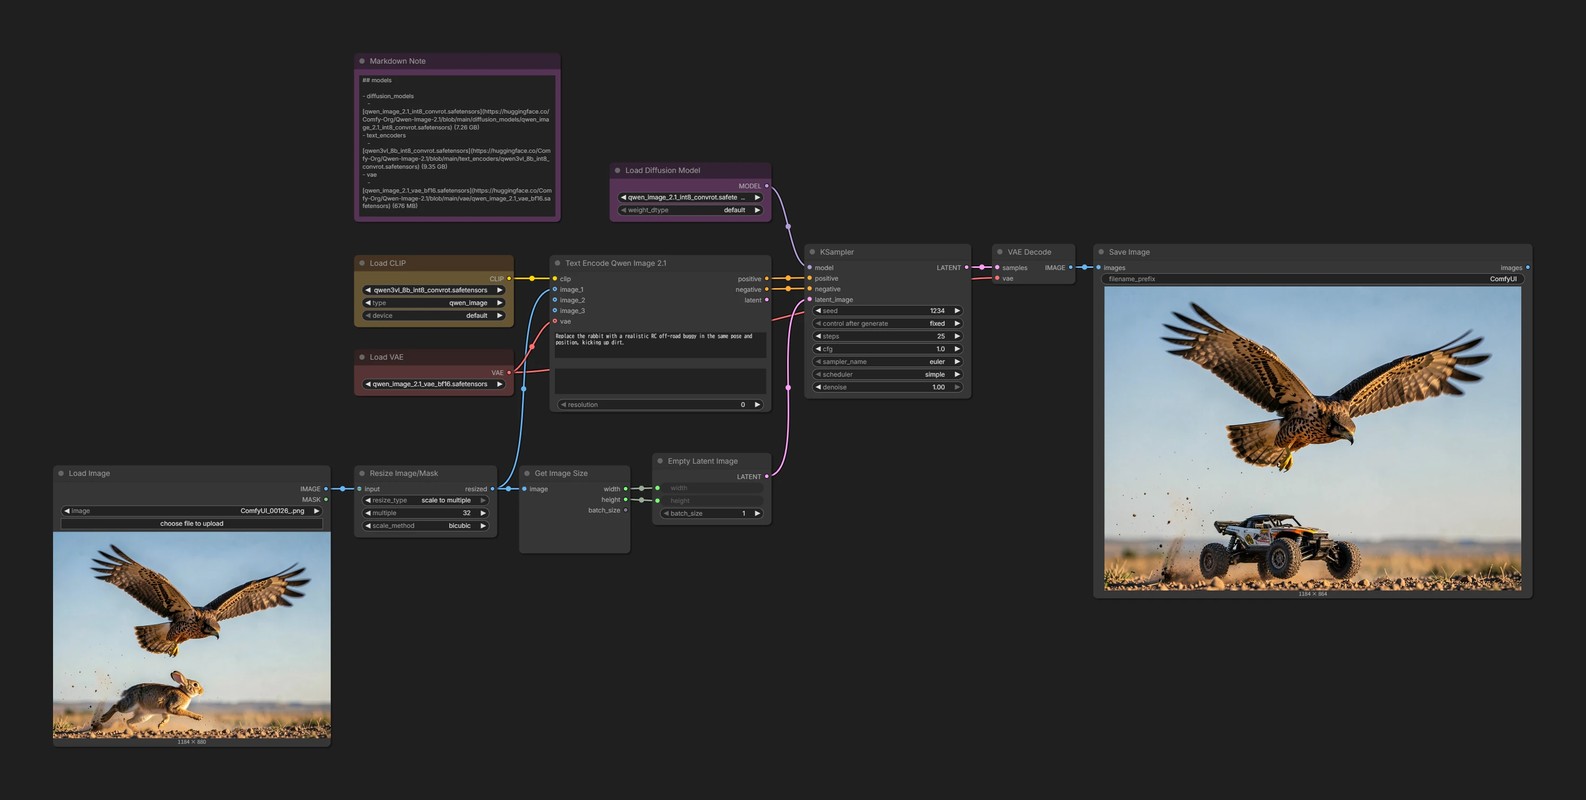
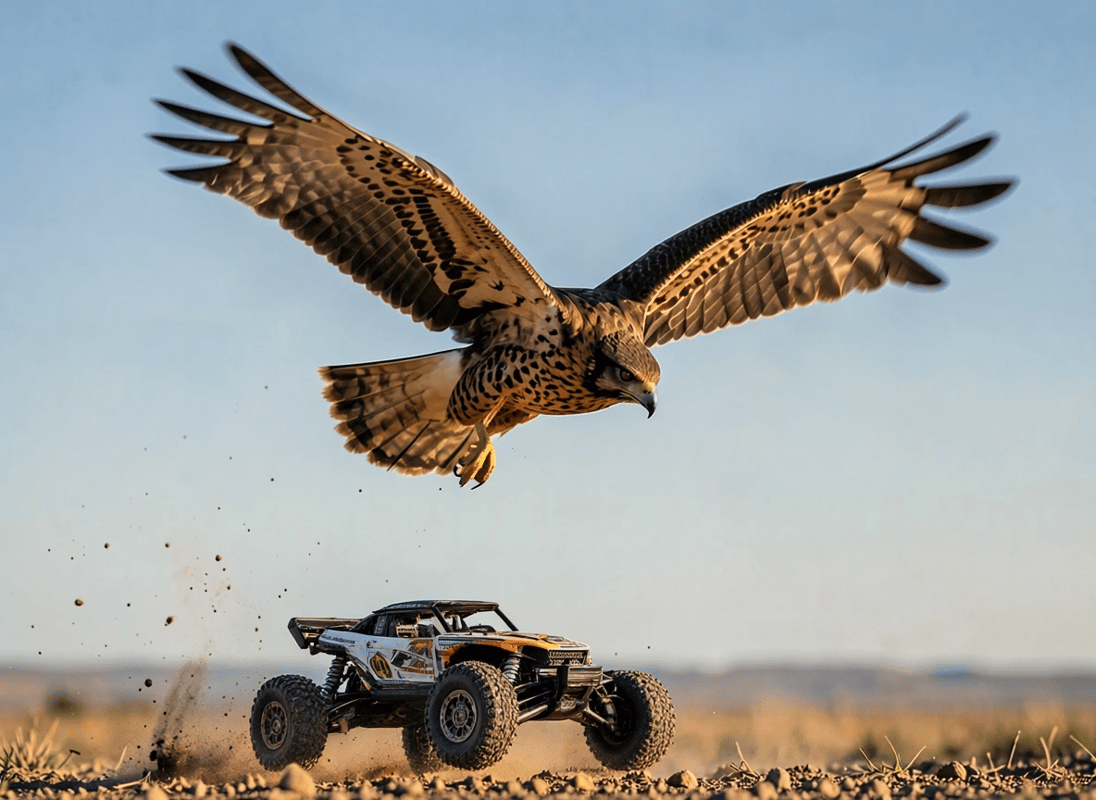
The workflow is almost the same as Ref2Image. The only difference is that the output size is matched to the first image.
For editing, it would be inconvenient if the result came back at a different size. This workflow reads the first image dimensions with Get Image Size and passes them to Empty Latent Image.
The second and subsequent images can be used as references, just as in Ref2Image.
Basic image editing
{
"id": "179e9c66-d274-4857-bcd9-34408448057b",
"revision": 0,
"last_node_id": 78,
"last_link_id": 172,
"nodes": [
{
"id": 8,
"type": "VAEDecode",
"pos": [
1252.432861328125,
188.1918182373047
],
"size": [
157.56002807617188,
46
],
"flags": {},
"order": 10,
"mode": 0,
"inputs": [
{
"name": "samples",
"type": "LATENT",
"link": 35
},
{
"name": "vae",
"type": "VAE",
"link": 76
}
],
"outputs": [
{
"name": "IMAGE",
"type": "IMAGE",
"slot_index": 0,
"links": [
101
]
}
],
"properties": {
"Node name for S&R": "VAEDecode",
"cnr_id": "comfy-core",
"ver": "0.3.33"
}
},
{
"id": 37,
"type": "UNETLoader",
"pos": [
531.6217956542969,
34.805270385742176
],
"size": [
305.3782043457031,
82
],
"flags": {},
"order": 0,
"mode": 0,
"inputs": [],
"outputs": [
{
"name": "MODEL",
"type": "MODEL",
"slot_index": 0,
"links": [
105
]
}
],
"properties": {
"Node name for S&R": "UNETLoader",
"cnr_id": "comfy-core",
"ver": "0.3.33"
},
"widgets_values": [
"qwen_image_2.1_int8_convrot.safetensors",
"default"
],
"widgets_values_named": {
"unet_name": "qwen_image_2.1_int8_convrot.safetensors",
"weight_dtype": "default"
},
"color": "#323",
"bgcolor": "#535"
},
{
"id": 38,
"type": "CLIPLoader",
"pos": [
49.87187153979269,
209.35653307788294
],
"size": [
301.3524169921875,
106
],
"flags": {},
"order": 1,
"mode": 0,
"inputs": [],
"outputs": [
{
"name": "CLIP",
"type": "CLIP",
"slot_index": 0,
"links": [
115
]
}
],
"properties": {
"Node name for S&R": "CLIPLoader",
"cnr_id": "comfy-core",
"ver": "0.3.33"
},
"widgets_values": [
"qwen3vl_8b_int8_convrot.safetensors",
"qwen_image",
"default"
],
"widgets_values_named": {
"clip_name": "qwen3vl_8b_int8_convrot.safetensors",
"type": "qwen_image",
"device": "default"
},
"color": "#432",
"bgcolor": "#653"
},
{
"id": 62,
"type": "EmptyLatentImage",
"pos": [
611.918176537727,
582.327293849093
],
"size": [
225.08182346227295,
106
],
"flags": {},
"order": 8,
"mode": 0,
"inputs": [
{
"name": "width",
"type": "INT",
"widget": {
"name": "width"
},
"link": 171
},
{
"name": "height",
"type": "INT",
"widget": {
"name": "height"
},
"link": 172
}
],
"outputs": [
{
"name": "LATENT",
"type": "LATENT",
"links": [
148
]
}
],
"properties": {
"Node name for S&R": "EmptyLatentImage",
"cnr_id": "comfy-core",
"ver": "0.26.0"
},
"widgets_values": [
512,
512,
1
],
"widgets_values_named": {
"width": 512,
"height": 512,
"batch_size": 1
}
},
{
"id": 3,
"type": "KSampler",
"pos": [
898.7548217773438,
188.1918182373047
],
"size": [
315,
262
],
"flags": {},
"order": 9,
"mode": 0,
"inputs": [
{
"name": "model",
"type": "MODEL",
"link": 105
},
{
"name": "positive",
"type": "CONDITIONING",
"link": 157
},
{
"name": "negative",
"type": "CONDITIONING",
"link": 158
},
{
"name": "latent_image",
"type": "LATENT",
"link": 148
}
],
"outputs": [
{
"name": "LATENT",
"type": "LATENT",
"slot_index": 0,
"links": [
35
]
}
],
"properties": {
"Node name for S&R": "KSampler",
"cnr_id": "comfy-core",
"ver": "0.3.33"
},
"widgets_values": [
1234,
"fixed",
25,
1,
"euler",
"simple",
1
],
"widgets_values_named": {
"seed": 1234,
"control_after_generate": "fixed",
"steps": 25,
"cfg": 1,
"sampler_name": "euler",
"scheduler": "simple",
"denoise": 1
}
},
{
"id": 56,
"type": "SaveImage",
"pos": [
1443.3798111474612,
188.1918182373047
],
"size": [
828.4570568413153,
638.4712083438695
],
"flags": {},
"order": 11,
"mode": 0,
"inputs": [
{
"name": "images",
"type": "IMAGE",
"link": 101
}
],
"outputs": [
{
"name": "images",
"type": "IMAGE",
"links": null
}
],
"properties": {
"cnr_id": "comfy-core",
"ver": "0.3.75"
},
"widgets_values": [
"ComfyUI"
],
"widgets_values_named": {
"filename_prefix": "ComfyUI"
}
},
{
"id": 55,
"type": "MarkdownNote",
"pos": [
49.87187153979269,
-171.34464343616293
],
"size": [
389.61380077225,
288.1499138219051
],
"flags": {},
"order": 2,
"mode": 0,
"inputs": [],
"outputs": [],
"properties": {},
"widgets_values": [
"## models\n\n- diffusion_models\n - [qwen_image_2.1_int8_convrot.safetensors](https://huggingface.co/Comfy-Org/Qwen-Image-2.1/blob/main/diffusion_models/qwen_image_2.1_int8_convrot.safetensors) (7.26 GB)\n- text_encoders\n - [qwen3vl_8b_int8_convrot.safetensors](https://huggingface.co/Comfy-Org/Qwen-Image-2.1/blob/main/text_encoders/qwen3vl_8b_int8_convrot.safetensors) (9.35 GB)\n- vae\n - [qwen_image_2.1_vae_bf16.safetensors](https://huggingface.co/Comfy-Org/Qwen-Image-2.1/blob/main/vae/qwen_image_2.1_vae_bf16.safetensors) (676 MB)\n\n```text\n📂ComfyUI/\n└── 📂models/\n ├── 📂diffusion_models/\n │ └── qwen_image_2.1_int8_convrot.safetensors \n ├── 📂text_encoders/\n │ └── qwen3vl_8b_int8_convrot.safetensors \n └── 📂vae/\n └── qwen_image_2.1_vae_bf16.safetensors \n```"
],
"widgets_values_named": {
"text": "## models\n\n- diffusion_models\n - [qwen_image_2.1_int8_convrot.safetensors](https://huggingface.co/Comfy-Org/Qwen-Image-2.1/blob/main/diffusion_models/qwen_image_2.1_int8_convrot.safetensors) (7.26 GB)\n- text_encoders\n - [qwen3vl_8b_int8_convrot.safetensors](https://huggingface.co/Comfy-Org/Qwen-Image-2.1/blob/main/text_encoders/qwen3vl_8b_int8_convrot.safetensors) (9.35 GB)\n- vae\n - [qwen_image_2.1_vae_bf16.safetensors](https://huggingface.co/Comfy-Org/Qwen-Image-2.1/blob/main/vae/qwen_image_2.1_vae_bf16.safetensors) (676 MB)\n\n```text\n📂ComfyUI/\n└── 📂models/\n ├── 📂diffusion_models/\n │ └── qwen_image_2.1_int8_convrot.safetensors \n ├── 📂text_encoders/\n │ └── qwen3vl_8b_int8_convrot.safetensors \n └── 📂vae/\n └── qwen_image_2.1_vae_bf16.safetensors \n```"
},
"color": "#323",
"bgcolor": "#535"
},
{
"id": 39,
"type": "VAELoader",
"pos": [
49.87187153979269,
386.79138870487407
],
"size": [
301.3524169921875,
58
],
"flags": {},
"order": 3,
"mode": 0,
"inputs": [],
"outputs": [
{
"name": "VAE",
"type": "VAE",
"slot_index": 0,
"links": [
76,
159
]
}
],
"properties": {
"Node name for S&R": "VAELoader",
"cnr_id": "comfy-core",
"ver": "0.3.33"
},
"widgets_values": [
"qwen_image_2.1_vae_bf16.safetensors"
],
"widgets_values_named": {
"vae_name": "qwen_image_2.1_vae_bf16.safetensors"
},
"color": "#322",
"bgcolor": "#533"
},
{
"id": 64,
"type": "TextEncodeQwenImage21",
"pos": [
418.4816950017755,
209.35653307788294
],
"size": [
418.5183049982245,
266
],
"flags": {},
"order": 7,
"mode": 0,
"inputs": [
{
"name": "clip",
"type": "CLIP",
"link": 115
},
{
"name": "images.image_1",
"shape": 7,
"type": "IMAGE",
"link": 170
},
{
"name": "images.image_2",
"shape": 7,
"type": "IMAGE",
"link": null
},
{
"name": "images.image_3",
"shape": 7,
"type": "IMAGE",
"link": null
},
{
"name": "vae",
"shape": 7,
"type": "VAE",
"link": 159
}
],
"outputs": [
{
"name": "positive",
"type": "CONDITIONING",
"links": [
157
]
},
{
"name": "negative",
"type": "CONDITIONING",
"links": [
158
]
},
{
"name": "latent",
"type": "LATENT",
"links": null
}
],
"properties": {
"Node name for S&R": "TextEncodeQwenImage21"
},
"widgets_values": [
"Replace the rabbit with a realistic RC off-road buggy in the same pose and position, kicking up dirt.",
"",
0
],
"widgets_values_named": {
"prompt": "Replace the rabbit with a realistic RC off-road buggy in the same pose and position, kicking up dirt.",
"negative_prompt": "",
"resolution": 0
}
},
{
"id": 76,
"type": "GetImageSize",
"pos": [
360.89502403875986,
605.8810723145949
],
"size": [
210,
136
],
"flags": {},
"order": 6,
"mode": 0,
"inputs": [
{
"name": "image",
"type": "IMAGE",
"link": 168
}
],
"outputs": [
{
"name": "width",
"type": "INT",
"links": [
171
]
},
{
"name": "height",
"type": "INT",
"links": [
172
]
},
{
"name": "batch_size",
"type": "INT",
"links": []
}
],
"properties": {
"Node name for S&R": "GetImageSize"
},
"widgets_values": [],
"widgets_values_named": {}
},
{
"id": 77,
"type": "ResizeImageMaskNode",
"pos": [
49.87187153979269,
605.8810723145949
],
"size": [
270,
106
],
"flags": {},
"order": 5,
"mode": 0,
"inputs": [
{
"name": "input",
"type": "IMAGE,MASK",
"link": 169
}
],
"outputs": [
{
"name": "resized",
"type": "IMAGE",
"links": [
168,
170
]
}
],
"properties": {
"Node name for S&R": "ResizeImageMaskNode"
},
"widgets_values": [
"scale to multiple",
32,
"bicubic"
],
"widgets_values_named": {
"resize_type": "scale to multiple",
"resize_type.multiple": 32,
"scale_method": "bicubic"
}
},
{
"id": 78,
"type": "LoadImage",
"pos": [
-517.569453752291,
605.8810723145949
],
"size": [
523.5197171826428,
500.54000580850084
],
"flags": {},
"order": 4,
"mode": 0,
"inputs": [],
"outputs": [
{
"name": "IMAGE",
"type": "IMAGE",
"links": [
169
]
},
{
"name": "MASK",
"type": "MASK",
"links": []
}
],
"properties": {
"Node name for S&R": "LoadImage"
},
"widgets_values": [
"ComfyUI_00126_.png",
"image"
],
"widgets_values_named": {
"image": "ComfyUI_00126_.png",
"upload": "image"
}
}
],
"links": [
[
35,
3,
0,
8,
0,
"LATENT"
],
[
76,
39,
0,
8,
1,
"VAE"
],
[
101,
8,
0,
56,
0,
"IMAGE"
],
[
105,
37,
0,
3,
0,
"MODEL"
],
[
148,
62,
0,
3,
3,
"LATENT"
],
[
157,
64,
0,
3,
1,
"CONDITIONING"
],
[
158,
64,
1,
3,
2,
"CONDITIONING"
],
[
168,
77,
0,
76,
0,
"IMAGE"
],
[
171,
76,
0,
62,
0,
"INT"
],
[
172,
76,
1,
62,
1,
"INT"
],
[
115,
38,
0,
64,
0,
"CLIP"
],
[
170,
77,
0,
64,
1,
"IMAGE"
],
[
169,
78,
0,
77,
0,
"IMAGE"
],
[
159,
39,
0,
64,
4,
"VAE"
]
],
"groups": [],
"config": {},
"extra": {
"ds": {
"scale": 0.6303940863128661,
"offset": [
506.46105682025967,
444.33822231871767
]
},
"frontendVersion": "1.53.6",
"VHS_latentpreview": false,
"VHS_latentpreviewrate": 0,
"VHS_MetadataImage": true,
"VHS_KeepIntermediate": true
},
"version": 0.4
}
As with other image-editing models, simply give an instruction such as “remove the man,” “make the clothes red,” or “turn this into a watercolor painting.”
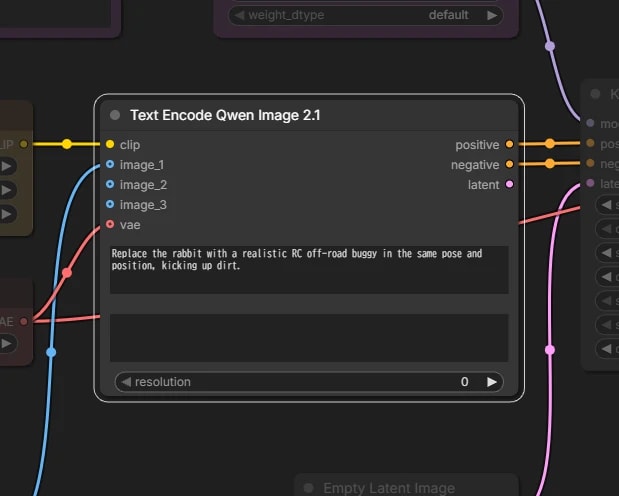
Text Encode Qwen Image 2.1
resolution- Unlike Ref2Image, set this to
0. The image is not scaled; its dimensions are only rounded to multiples of 32 (I resize the image beforehand, so in practice nothing changes) - It is still a good idea to match the size seen by the model to the output size
- Unlike Ref2Image, set this to
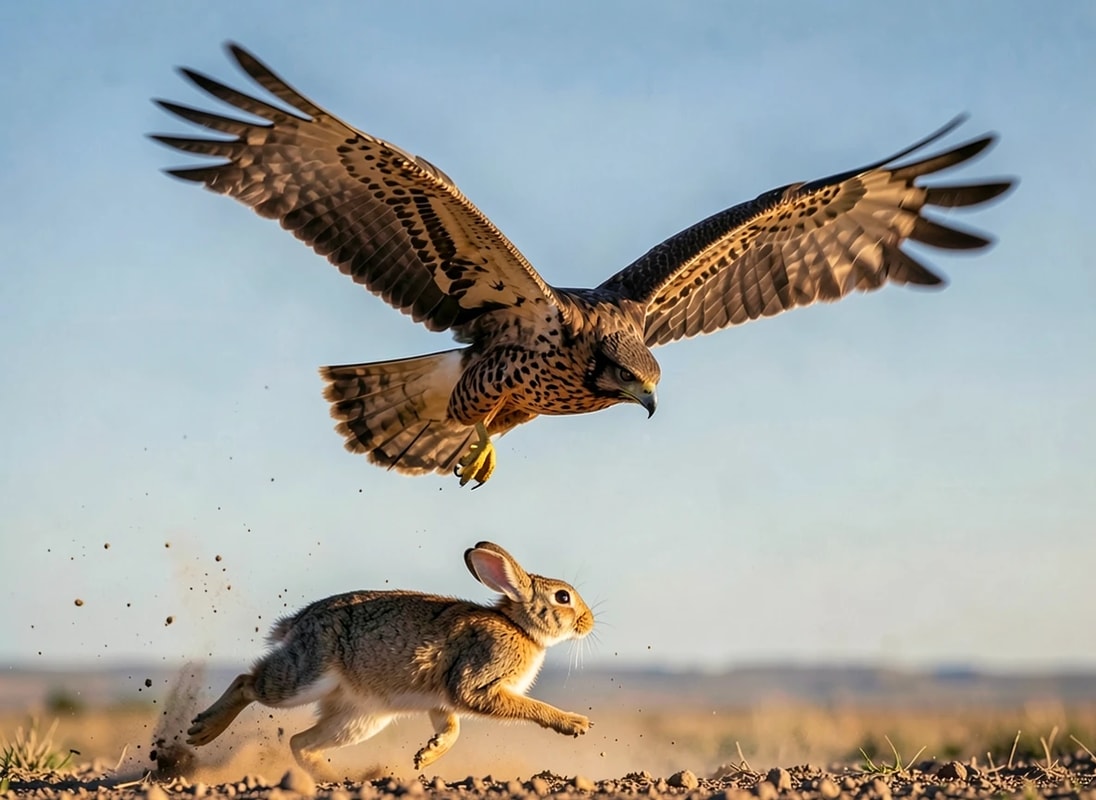
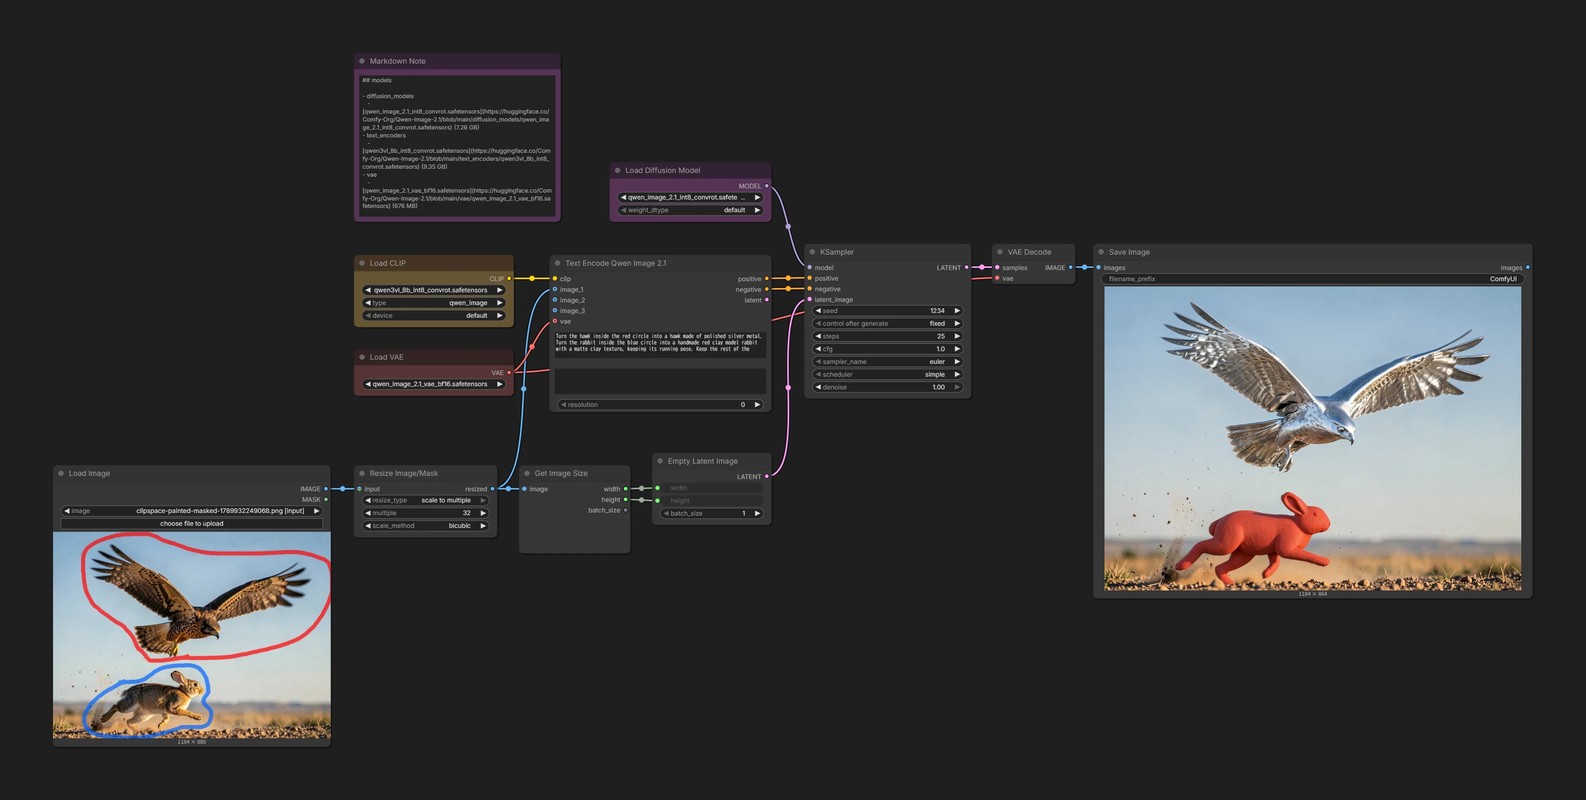
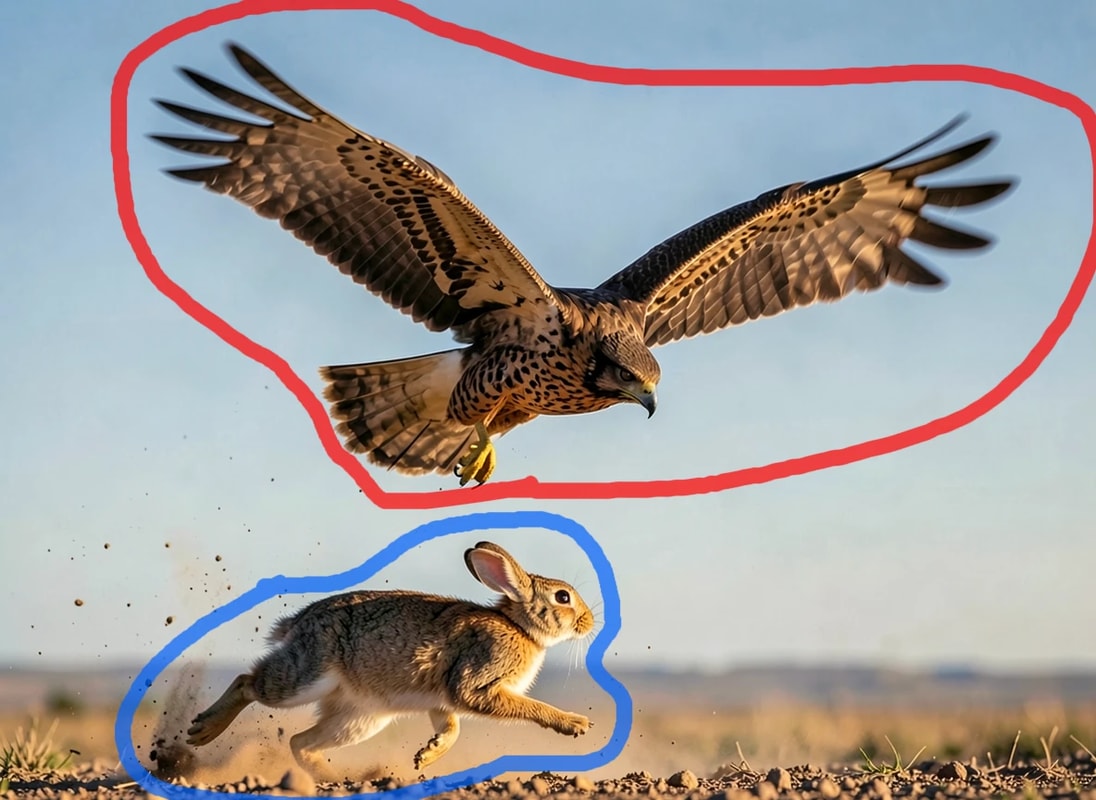
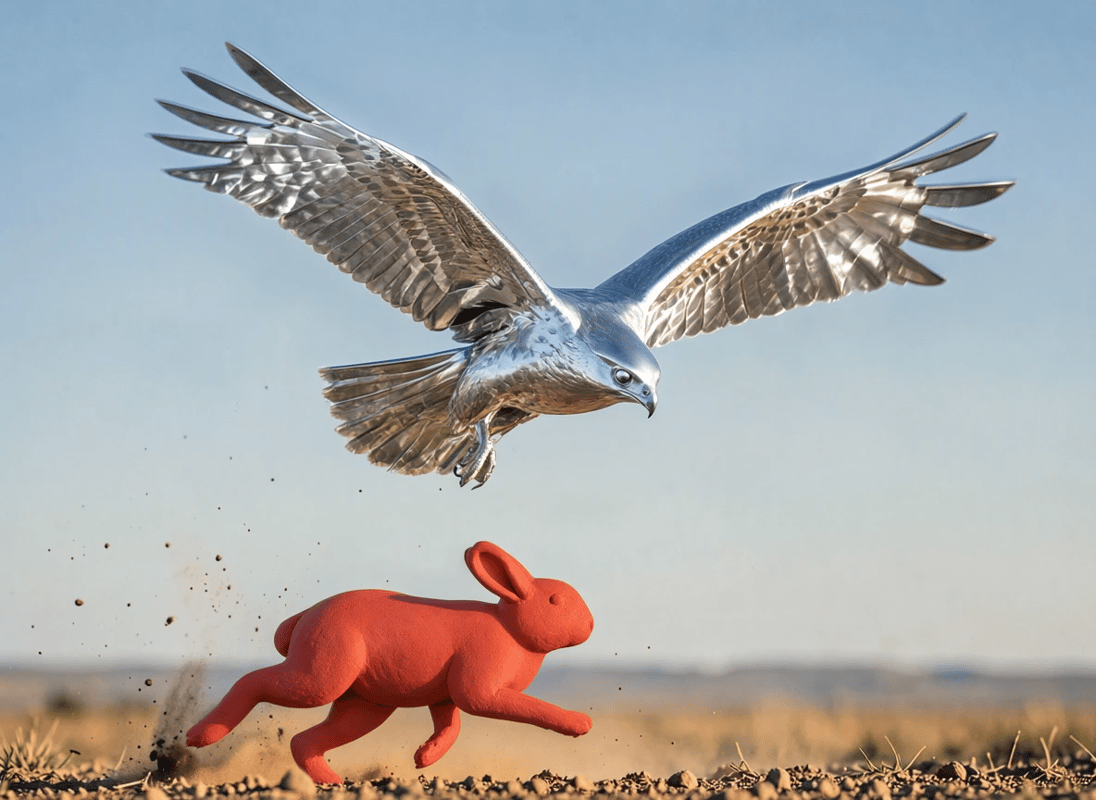
Specify the location with colored circles
Draw colored circles around the areas you want to edit.
{
"id": "179e9c66-d274-4857-bcd9-34408448057b",
"revision": 0,
"last_node_id": 78,
"last_link_id": 174,
"nodes": [
{
"id": 8,
"type": "VAEDecode",
"pos": [
1252.432861328125,
188.1918182373047
],
"size": [
157.56002807617188,
46
],
"flags": {},
"order": 10,
"mode": 0,
"inputs": [
{
"name": "samples",
"type": "LATENT",
"link": 35
},
{
"name": "vae",
"type": "VAE",
"link": 76
}
],
"outputs": [
{
"name": "IMAGE",
"type": "IMAGE",
"slot_index": 0,
"links": [
174
]
}
],
"properties": {
"Node name for S&R": "VAEDecode",
"cnr_id": "comfy-core",
"ver": "0.3.33"
}
},
{
"id": 37,
"type": "UNETLoader",
"pos": [
531.6217956542969,
34.805270385742176
],
"size": [
305.3782043457031,
82
],
"flags": {},
"order": 0,
"mode": 0,
"inputs": [],
"outputs": [
{
"name": "MODEL",
"type": "MODEL",
"slot_index": 0,
"links": [
105
]
}
],
"properties": {
"Node name for S&R": "UNETLoader",
"cnr_id": "comfy-core",
"ver": "0.3.33"
},
"widgets_values": [
"qwen_image_2.1_int8_convrot.safetensors",
"default"
],
"widgets_values_named": {
"unet_name": "qwen_image_2.1_int8_convrot.safetensors",
"weight_dtype": "default"
},
"color": "#323",
"bgcolor": "#535"
},
{
"id": 38,
"type": "CLIPLoader",
"pos": [
49.87187153979269,
209.35653307788294
],
"size": [
301.3524169921875,
106
],
"flags": {},
"order": 1,
"mode": 0,
"inputs": [],
"outputs": [
{
"name": "CLIP",
"type": "CLIP",
"slot_index": 0,
"links": [
115
]
}
],
"properties": {
"Node name for S&R": "CLIPLoader",
"cnr_id": "comfy-core",
"ver": "0.3.33"
},
"widgets_values": [
"qwen3vl_8b_int8_convrot.safetensors",
"qwen_image",
"default"
],
"widgets_values_named": {
"clip_name": "qwen3vl_8b_int8_convrot.safetensors",
"type": "qwen_image",
"device": "default"
},
"color": "#432",
"bgcolor": "#653"
},
{
"id": 62,
"type": "EmptyLatentImage",
"pos": [
611.918176537727,
582.327293849093
],
"size": [
225.08182346227295,
106
],
"flags": {},
"order": 8,
"mode": 0,
"inputs": [
{
"name": "width",
"type": "INT",
"widget": {
"name": "width"
},
"link": 171
},
{
"name": "height",
"type": "INT",
"widget": {
"name": "height"
},
"link": 172
}
],
"outputs": [
{
"name": "LATENT",
"type": "LATENT",
"links": [
148
]
}
],
"properties": {
"Node name for S&R": "EmptyLatentImage",
"cnr_id": "comfy-core",
"ver": "0.26.0"
},
"widgets_values": [
512,
512,
1
],
"widgets_values_named": {
"width": 512,
"height": 512,
"batch_size": 1
}
},
{
"id": 3,
"type": "KSampler",
"pos": [
898.7548217773438,
188.1918182373047
],
"size": [
315,
262
],
"flags": {},
"order": 9,
"mode": 0,
"inputs": [
{
"name": "model",
"type": "MODEL",
"link": 105
},
{
"name": "positive",
"type": "CONDITIONING",
"link": 157
},
{
"name": "negative",
"type": "CONDITIONING",
"link": 158
},
{
"name": "latent_image",
"type": "LATENT",
"link": 148
}
],
"outputs": [
{
"name": "LATENT",
"type": "LATENT",
"slot_index": 0,
"links": [
35
]
}
],
"properties": {
"Node name for S&R": "KSampler",
"cnr_id": "comfy-core",
"ver": "0.3.33"
},
"widgets_values": [
1234,
"fixed",
25,
1,
"euler",
"simple",
1
],
"widgets_values_named": {
"seed": 1234,
"control_after_generate": "fixed",
"steps": 25,
"cfg": 1,
"sampler_name": "euler",
"scheduler": "simple",
"denoise": 1
}
},
{
"id": 56,
"type": "SaveImage",
"pos": [
1443.3798111474612,
188.1918182373047
],
"size": [
828.4570568413153,
638.4712083438695
],
"flags": {},
"order": 11,
"mode": 0,
"inputs": [
{
"name": "images",
"type": "IMAGE",
"link": 174
}
],
"outputs": [
{
"name": "images",
"type": "IMAGE",
"links": null
}
],
"properties": {
"cnr_id": "comfy-core",
"ver": "0.3.75"
},
"widgets_values": [
"ComfyUI"
],
"widgets_values_named": {
"filename_prefix": "ComfyUI"
}
},
{
"id": 55,
"type": "MarkdownNote",
"pos": [
49.87187153979269,
-171.34464343616293
],
"size": [
389.61380077225,
288.1499138219051
],
"flags": {},
"order": 2,
"mode": 0,
"inputs": [],
"outputs": [],
"properties": {},
"widgets_values": [
"## models\n\n- diffusion_models\n - [qwen_image_2.1_int8_convrot.safetensors](https://huggingface.co/Comfy-Org/Qwen-Image-2.1/blob/main/diffusion_models/qwen_image_2.1_int8_convrot.safetensors) (7.26 GB)\n- text_encoders\n - [qwen3vl_8b_int8_convrot.safetensors](https://huggingface.co/Comfy-Org/Qwen-Image-2.1/blob/main/text_encoders/qwen3vl_8b_int8_convrot.safetensors) (9.35 GB)\n- vae\n - [qwen_image_2.1_vae_bf16.safetensors](https://huggingface.co/Comfy-Org/Qwen-Image-2.1/blob/main/vae/qwen_image_2.1_vae_bf16.safetensors) (676 MB)\n\n```text\n📂ComfyUI/\n└── 📂models/\n ├── 📂diffusion_models/\n │ └── qwen_image_2.1_int8_convrot.safetensors \n ├── 📂text_encoders/\n │ └── qwen3vl_8b_int8_convrot.safetensors \n └── 📂vae/\n └── qwen_image_2.1_vae_bf16.safetensors \n```"
],
"widgets_values_named": {
"text": "## models\n\n- diffusion_models\n - [qwen_image_2.1_int8_convrot.safetensors](https://huggingface.co/Comfy-Org/Qwen-Image-2.1/blob/main/diffusion_models/qwen_image_2.1_int8_convrot.safetensors) (7.26 GB)\n- text_encoders\n - [qwen3vl_8b_int8_convrot.safetensors](https://huggingface.co/Comfy-Org/Qwen-Image-2.1/blob/main/text_encoders/qwen3vl_8b_int8_convrot.safetensors) (9.35 GB)\n- vae\n - [qwen_image_2.1_vae_bf16.safetensors](https://huggingface.co/Comfy-Org/Qwen-Image-2.1/blob/main/vae/qwen_image_2.1_vae_bf16.safetensors) (676 MB)\n\n```text\n📂ComfyUI/\n└── 📂models/\n ├── 📂diffusion_models/\n │ └── qwen_image_2.1_int8_convrot.safetensors \n ├── 📂text_encoders/\n │ └── qwen3vl_8b_int8_convrot.safetensors \n └── 📂vae/\n └── qwen_image_2.1_vae_bf16.safetensors \n```"
},
"color": "#323",
"bgcolor": "#535"
},
{
"id": 39,
"type": "VAELoader",
"pos": [
49.87187153979269,
386.79138870487407
],
"size": [
301.3524169921875,
58
],
"flags": {},
"order": 3,
"mode": 0,
"inputs": [],
"outputs": [
{
"name": "VAE",
"type": "VAE",
"slot_index": 0,
"links": [
76,
159
]
}
],
"properties": {
"Node name for S&R": "VAELoader",
"cnr_id": "comfy-core",
"ver": "0.3.33"
},
"widgets_values": [
"qwen_image_2.1_vae_bf16.safetensors"
],
"widgets_values_named": {
"vae_name": "qwen_image_2.1_vae_bf16.safetensors"
},
"color": "#322",
"bgcolor": "#533"
},
{
"id": 64,
"type": "TextEncodeQwenImage21",
"pos": [
418.4816950017755,
209.35653307788294
],
"size": [
418.5183049982245,
266
],
"flags": {},
"order": 7,
"mode": 0,
"inputs": [
{
"name": "clip",
"type": "CLIP",
"link": 115
},
{
"name": "images.image_1",
"shape": 7,
"type": "IMAGE",
"link": 170
},
{
"name": "images.image_2",
"shape": 7,
"type": "IMAGE",
"link": null
},
{
"name": "images.image_3",
"shape": 7,
"type": "IMAGE",
"link": null
},
{
"name": "vae",
"shape": 7,
"type": "VAE",
"link": 159
}
],
"outputs": [
{
"name": "positive",
"type": "CONDITIONING",
"links": [
157
]
},
{
"name": "negative",
"type": "CONDITIONING",
"links": [
158
]
},
{
"name": "latent",
"type": "LATENT",
"links": null
}
],
"properties": {
"Node name for S&R": "TextEncodeQwenImage21"
},
"widgets_values": [
"Turn the hawk inside the red circle into a hawk made of polished silver metal. Turn the rabbit inside the blue circle into a handmade red clay model rabbit with a matte clay texture, keeping its running pose. Keep the rest of the image unchanged, and remove the colored annotation circles in the final image.",
"",
0
],
"widgets_values_named": {
"prompt": "Turn the hawk inside the red circle into a hawk made of polished silver metal. Turn the rabbit inside the blue circle into a handmade red clay model rabbit with a matte clay texture, keeping its running pose. Keep the rest of the image unchanged, and remove the colored annotation circles in the final image.",
"negative_prompt": "",
"resolution": 0
}
},
{
"id": 76,
"type": "GetImageSize",
"pos": [
360.89502403875986,
605.8810723145949
],
"size": [
210,
136
],
"flags": {},
"order": 6,
"mode": 0,
"inputs": [
{
"name": "image",
"type": "IMAGE",
"link": 168
}
],
"outputs": [
{
"name": "width",
"type": "INT",
"links": [
171
]
},
{
"name": "height",
"type": "INT",
"links": [
172
]
},
{
"name": "batch_size",
"type": "INT",
"links": []
}
],
"properties": {
"Node name for S&R": "GetImageSize"
},
"widgets_values": [],
"widgets_values_named": {}
},
{
"id": 77,
"type": "ResizeImageMaskNode",
"pos": [
49.87187153979269,
605.8810723145949
],
"size": [
270,
106
],
"flags": {},
"order": 5,
"mode": 0,
"inputs": [
{
"name": "input",
"type": "IMAGE,MASK",
"link": 169
}
],
"outputs": [
{
"name": "resized",
"type": "IMAGE",
"links": [
168,
170
]
}
],
"properties": {
"Node name for S&R": "ResizeImageMaskNode"
},
"widgets_values": [
"scale to multiple",
32,
"bicubic"
],
"widgets_values_named": {
"resize_type": "scale to multiple",
"resize_type.multiple": 32,
"scale_method": "bicubic"
}
},
{
"id": 78,
"type": "LoadImage",
"pos": [
-517.569453752291,
605.8810723145949
],
"size": [
523.5197171826428,
500.54000580850084
],
"flags": {},
"order": 4,
"mode": 0,
"inputs": [],
"outputs": [
{
"name": "IMAGE",
"type": "IMAGE",
"links": [
169
]
},
{
"name": "MASK",
"type": "MASK",
"links": []
}
],
"properties": {
"Node name for S&R": "LoadImage",
"image": "clipspace-painted-masked-1789932249068.png [input]"
},
"widgets_values": [
"clipspace-painted-masked-1789932249068.png [input]",
"image"
],
"widgets_values_named": {
"image": "clipspace-painted-masked-1789932249068.png [input]",
"upload": "image"
}
}
],
"links": [
[
35,
3,
0,
8,
0,
"LATENT"
],
[
76,
39,
0,
8,
1,
"VAE"
],
[
105,
37,
0,
3,
0,
"MODEL"
],
[
148,
62,
0,
3,
3,
"LATENT"
],
[
157,
64,
0,
3,
1,
"CONDITIONING"
],
[
158,
64,
1,
3,
2,
"CONDITIONING"
],
[
168,
77,
0,
76,
0,
"IMAGE"
],
[
171,
76,
0,
62,
0,
"INT"
],
[
172,
76,
1,
62,
1,
"INT"
],
[
174,
8,
0,
56,
0,
"IMAGE"
],
[
115,
38,
0,
64,
0,
"CLIP"
],
[
170,
77,
0,
64,
1,
"IMAGE"
],
[
169,
78,
0,
77,
0,
"IMAGE"
],
[
159,
39,
0,
64,
4,
"VAE"
]
],
"groups": [],
"config": {},
"extra": {
"ds": {
"scale": 0.5209868481924512,
"offset": [
944.2547404172284,
438.80668597953695
]
},
"frontendVersion": "1.53.6",
"VHS_latentpreview": false,
"VHS_latentpreviewrate": 0,
"VHS_MetadataImage": true,
"VHS_KeepIntermediate": true
},
"version": 0.4
}
Draw directly on the image to mark the objects you want to edit.
- You can also use the
Mask Editorattached to theLoad Imagenode
Then simply give an instruction such as “remove the wristwatch inside the red circle.”
You can use several colors for separate instructions, which is handy when the location is difficult to describe in words.
Specify the location with a mask
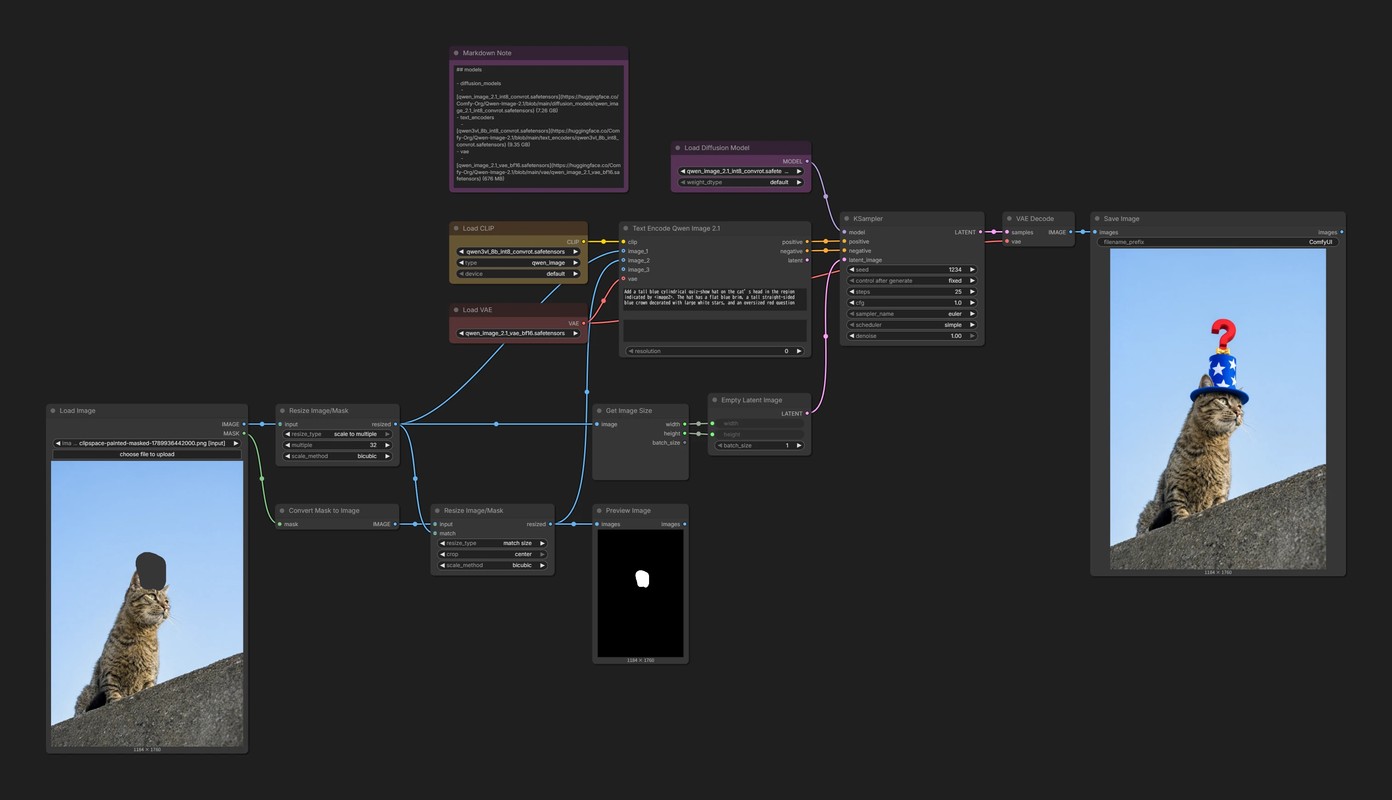
{
"id": "179e9c66-d274-4857-bcd9-34408448057b",
"revision": 0,
"last_node_id": 82,
"last_link_id": 185,
"nodes": [
{
"id": 8,
"type": "VAEDecode",
"pos": [
1252.432861328125,
188.1918182373047
],
"size": [
157.56002807617188,
46
],
"flags": {},
"order": 13,
"mode": 0,
"inputs": [
{
"name": "samples",
"type": "LATENT",
"link": 35
},
{
"name": "vae",
"type": "VAE",
"link": 76
}
],
"outputs": [
{
"name": "IMAGE",
"type": "IMAGE",
"slot_index": 0,
"links": [
180
]
}
],
"properties": {
"Node name for S&R": "VAEDecode",
"cnr_id": "comfy-core",
"ver": "0.3.33"
}
},
{
"id": 37,
"type": "UNETLoader",
"pos": [
531.6217956542969,
34.805270385742176
],
"size": [
305.3782043457031,
82
],
"flags": {},
"order": 0,
"mode": 0,
"inputs": [],
"outputs": [
{
"name": "MODEL",
"type": "MODEL",
"slot_index": 0,
"links": [
105
]
}
],
"properties": {
"Node name for S&R": "UNETLoader",
"cnr_id": "comfy-core",
"ver": "0.3.33"
},
"widgets_values": [
"qwen_image_2.1_int8_convrot.safetensors",
"default"
],
"widgets_values_named": {
"unet_name": "qwen_image_2.1_int8_convrot.safetensors",
"weight_dtype": "default"
},
"color": "#323",
"bgcolor": "#535"
},
{
"id": 38,
"type": "CLIPLoader",
"pos": [
49.87187153979269,
209.35653307788294
],
"size": [
301.3524169921875,
106
],
"flags": {},
"order": 1,
"mode": 0,
"inputs": [],
"outputs": [
{
"name": "CLIP",
"type": "CLIP",
"slot_index": 0,
"links": [
115
]
}
],
"properties": {
"Node name for S&R": "CLIPLoader",
"cnr_id": "comfy-core",
"ver": "0.3.33"
},
"widgets_values": [
"qwen3vl_8b_int8_convrot.safetensors",
"qwen_image",
"default"
],
"widgets_values_named": {
"clip_name": "qwen3vl_8b_int8_convrot.safetensors",
"type": "qwen_image",
"device": "default"
},
"color": "#432",
"bgcolor": "#653"
},
{
"id": 62,
"type": "EmptyLatentImage",
"pos": [
611.918176537727,
582.327293849093
],
"size": [
225.08182346227295,
106
],
"flags": {},
"order": 9,
"mode": 0,
"inputs": [
{
"name": "width",
"type": "INT",
"widget": {
"name": "width"
},
"link": 171
},
{
"name": "height",
"type": "INT",
"widget": {
"name": "height"
},
"link": 172
}
],
"outputs": [
{
"name": "LATENT",
"type": "LATENT",
"links": [
148
]
}
],
"properties": {
"Node name for S&R": "EmptyLatentImage",
"cnr_id": "comfy-core",
"ver": "0.26.0"
},
"widgets_values": [
512,
512,
1
],
"widgets_values_named": {
"width": 512,
"height": 512,
"batch_size": 1
}
},
{
"id": 3,
"type": "KSampler",
"pos": [
898.7548217773438,
188.1918182373047
],
"size": [
315,
262
],
"flags": {},
"order": 12,
"mode": 0,
"inputs": [
{
"name": "model",
"type": "MODEL",
"link": 105
},
{
"name": "positive",
"type": "CONDITIONING",
"link": 157
},
{
"name": "negative",
"type": "CONDITIONING",
"link": 158
},
{
"name": "latent_image",
"type": "LATENT",
"link": 148
}
],
"outputs": [
{
"name": "LATENT",
"type": "LATENT",
"slot_index": 0,
"links": [
35
]
}
],
"properties": {
"Node name for S&R": "KSampler",
"cnr_id": "comfy-core",
"ver": "0.3.33"
},
"widgets_values": [
1234,
"fixed",
25,
1,
"euler",
"simple",
1
],
"widgets_values_named": {
"seed": 1234,
"control_after_generate": "fixed",
"steps": 25,
"cfg": 1,
"sampler_name": "euler",
"scheduler": "simple",
"denoise": 1
}
},
{
"id": 56,
"type": "SaveImage",
"pos": [
1443.3798111474612,
188.1918182373047
],
"size": [
555.9002776000395,
762.4917533954552
],
"flags": {},
"order": 14,
"mode": 0,
"inputs": [
{
"name": "images",
"type": "IMAGE",
"link": 180
}
],
"outputs": [
{
"name": "images",
"type": "IMAGE",
"links": null
}
],
"properties": {
"cnr_id": "comfy-core",
"ver": "0.3.75"
},
"widgets_values": [
"ComfyUI"
],
"widgets_values_named": {
"filename_prefix": "ComfyUI"
}
},
{
"id": 55,
"type": "MarkdownNote",
"pos": [
49.87187153979269,
-171.34464343616293
],
"size": [
389.61380077225,
288.1499138219051
],
"flags": {},
"order": 2,
"mode": 0,
"inputs": [],
"outputs": [],
"properties": {},
"widgets_values": [
"## models\n\n- diffusion_models\n - [qwen_image_2.1_int8_convrot.safetensors](https://huggingface.co/Comfy-Org/Qwen-Image-2.1/blob/main/diffusion_models/qwen_image_2.1_int8_convrot.safetensors) (7.26 GB)\n- text_encoders\n - [qwen3vl_8b_int8_convrot.safetensors](https://huggingface.co/Comfy-Org/Qwen-Image-2.1/blob/main/text_encoders/qwen3vl_8b_int8_convrot.safetensors) (9.35 GB)\n- vae\n - [qwen_image_2.1_vae_bf16.safetensors](https://huggingface.co/Comfy-Org/Qwen-Image-2.1/blob/main/vae/qwen_image_2.1_vae_bf16.safetensors) (676 MB)\n\n```text\n📂ComfyUI/\n└── 📂models/\n ├── 📂diffusion_models/\n │ └── qwen_image_2.1_int8_convrot.safetensors \n ├── 📂text_encoders/\n │ └── qwen3vl_8b_int8_convrot.safetensors \n └── 📂vae/\n └── qwen_image_2.1_vae_bf16.safetensors \n```"
],
"widgets_values_named": {
"text": "## models\n\n- diffusion_models\n - [qwen_image_2.1_int8_convrot.safetensors](https://huggingface.co/Comfy-Org/Qwen-Image-2.1/blob/main/diffusion_models/qwen_image_2.1_int8_convrot.safetensors) (7.26 GB)\n- text_encoders\n - [qwen3vl_8b_int8_convrot.safetensors](https://huggingface.co/Comfy-Org/Qwen-Image-2.1/blob/main/text_encoders/qwen3vl_8b_int8_convrot.safetensors) (9.35 GB)\n- vae\n - [qwen_image_2.1_vae_bf16.safetensors](https://huggingface.co/Comfy-Org/Qwen-Image-2.1/blob/main/vae/qwen_image_2.1_vae_bf16.safetensors) (676 MB)\n\n```text\n📂ComfyUI/\n└── 📂models/\n ├── 📂diffusion_models/\n │ └── qwen_image_2.1_int8_convrot.safetensors \n ├── 📂text_encoders/\n │ └── qwen3vl_8b_int8_convrot.safetensors \n └── 📂vae/\n └── qwen_image_2.1_vae_bf16.safetensors \n```"
},
"color": "#323",
"bgcolor": "#535"
},
{
"id": 39,
"type": "VAELoader",
"pos": [
49.87187153979269,
386.79138870487407
],
"size": [
301.3524169921875,
58
],
"flags": {},
"order": 3,
"mode": 0,
"inputs": [],
"outputs": [
{
"name": "VAE",
"type": "VAE",
"slot_index": 0,
"links": [
76,
159
]
}
],
"properties": {
"Node name for S&R": "VAELoader",
"cnr_id": "comfy-core",
"ver": "0.3.33"
},
"widgets_values": [
"qwen_image_2.1_vae_bf16.safetensors"
],
"widgets_values_named": {
"vae_name": "qwen_image_2.1_vae_bf16.safetensors"
},
"color": "#322",
"bgcolor": "#533"
},
{
"id": 64,
"type": "TextEncodeQwenImage21",
"pos": [
418.4816950017755,
209.35653307788294
],
"size": [
418.5183049982245,
266
],
"flags": {},
"order": 10,
"mode": 0,
"inputs": [
{
"name": "clip",
"type": "CLIP",
"link": 115
},
{
"name": "images.image_1",
"shape": 7,
"type": "IMAGE",
"link": 170
},
{
"name": "images.image_2",
"shape": 7,
"type": "IMAGE",
"link": 179
},
{
"name": "images.image_3",
"shape": 7,
"type": "IMAGE",
"link": null
},
{
"name": "vae",
"shape": 7,
"type": "VAE",
"link": 159
}
],
"outputs": [
{
"name": "positive",
"type": "CONDITIONING",
"links": [
157
]
},
{
"name": "negative",
"type": "CONDITIONING",
"links": [
158
]
},
{
"name": "latent",
"type": "LATENT",
"links": null
}
],
"properties": {
"Node name for S&R": "TextEncodeQwenImage21"
},
"widgets_values": [
"Add a tall blue cylindrical quiz-show hat on the cat’s head in the region indicated by <image2>. The hat has a flat blue brim, a tall straight-sided blue crown decorated with large white stars, and an oversized red question mark standing upright above the top of the hat. A small gold ribbon-shaped ornament sits beneath the question mark. Keep the rest of <image1> unchanged.",
"",
0
],
"widgets_values_named": {
"prompt": "Add a tall blue cylindrical quiz-show hat on the cat’s head in the region indicated by <image2>. The hat has a flat blue brim, a tall straight-sided blue crown decorated with large white stars, and an oversized red question mark standing upright above the top of the hat. A small gold ribbon-shaped ornament sits beneath the question mark. Keep the rest of <image1> unchanged.",
"negative_prompt": "",
"resolution": 0
}
},
{
"id": 76,
"type": "GetImageSize",
"pos": [
360.89502403875986,
605.8810723145949
],
"size": [
210,
136
],
"flags": {},
"order": 7,
"mode": 0,
"inputs": [
{
"name": "image",
"type": "IMAGE",
"link": 168
}
],
"outputs": [
{
"name": "width",
"type": "INT",
"links": [
171
]
},
{
"name": "height",
"type": "INT",
"links": [
172
]
},
{
"name": "batch_size",
"type": "INT",
"links": []
}
],
"properties": {
"Node name for S&R": "GetImageSize"
},
"widgets_values": [],
"widgets_values_named": {}
},
{
"id": 77,
"type": "ResizeImageMaskNode",
"pos": [
-327.79925016722655,
605.8810723145949
],
"size": [
270,
106
],
"flags": {},
"order": 5,
"mode": 0,
"inputs": [
{
"name": "input",
"type": "IMAGE,MASK",
"link": 169
}
],
"outputs": [
{
"name": "resized",
"type": "IMAGE",
"links": [
168,
170,
185
]
}
],
"properties": {
"Node name for S&R": "ResizeImageMaskNode"
},
"widgets_values": [
"scale to multiple",
32,
"bicubic"
],
"widgets_values_named": {
"resize_type": "scale to multiple",
"resize_type.multiple": 32,
"scale_method": "bicubic"
}
},
{
"id": 78,
"type": "LoadImage",
"pos": [
-826.6792493924607,
605.8810723145949
],
"size": [
439.6157543570455,
729.9649041597434
],
"flags": {},
"order": 4,
"mode": 0,
"inputs": [],
"outputs": [
{
"name": "IMAGE",
"type": "IMAGE",
"links": [
169
]
},
{
"name": "MASK",
"type": "MASK",
"links": [
176
]
}
],
"properties": {
"Node name for S&R": "LoadImage",
"image": "clipspace-painted-masked-1789936442000.png [input]"
},
"widgets_values": [
"clipspace-painted-masked-1789936442000.png [input]",
"image"
],
"widgets_values_named": {
"image": "clipspace-painted-masked-1789936442000.png [input]",
"upload": "image"
}
},
{
"id": 79,
"type": "MaskToImage",
"pos": [
-328.69468041048174,
823.1309190004421
],
"size": [
270,
26
],
"flags": {},
"order": 6,
"mode": 0,
"inputs": [
{
"name": "mask",
"type": "MASK",
"link": 176
}
],
"outputs": [
{
"name": "IMAGE",
"type": "IMAGE",
"links": [
177
]
}
],
"properties": {
"Node name for S&R": "MaskToImage"
}
},
{
"id": 80,
"type": "ResizeImageMaskNode",
"pos": [
8.994366894467351,
823.1309190004421
],
"size": [
270,
126
],
"flags": {},
"order": 8,
"mode": 0,
"inputs": [
{
"name": "input",
"type": "IMAGE,MASK",
"link": 177
},
{
"name": "resize_type.match",
"type": "IMAGE,MASK",
"link": 185
}
],
"outputs": [
{
"name": "resized",
"type": "IMAGE",
"links": [
179,
181
]
}
],
"properties": {
"Node name for S&R": "ResizeImageMaskNode"
},
"widgets_values": [
"match size",
"center",
"bicubic"
],
"widgets_values_named": {
"resize_type": "match size",
"resize_type.crop": "center",
"scale_method": "bicubic"
}
},
{
"id": 81,
"type": "PreviewImage",
"pos": [
360.89502403875986,
823.1309190004421
],
"size": [
210,
318.1049680532474
],
"flags": {},
"order": 11,
"mode": 0,
"inputs": [
{
"name": "images",
"type": "IMAGE",
"link": 181
}
],
"outputs": [
{
"name": "images",
"type": "IMAGE",
"links": null
}
],
"properties": {
"Node name for S&R": "PreviewImage"
},
"widgets_values": [],
"widgets_values_named": {}
}
],
"links": [
[
35,
3,
0,
8,
0,
"LATENT"
],
[
76,
39,
0,
8,
1,
"VAE"
],
[
105,
37,
0,
3,
0,
"MODEL"
],
[
148,
62,
0,
3,
3,
"LATENT"
],
[
157,
64,
0,
3,
1,
"CONDITIONING"
],
[
158,
64,
1,
3,
2,
"CONDITIONING"
],
[
168,
77,
0,
76,
0,
"IMAGE"
],
[
171,
76,
0,
62,
0,
"INT"
],
[
172,
76,
1,
62,
1,
"INT"
],
[
176,
78,
1,
79,
0,
"MASK"
],
[
180,
8,
0,
56,
0,
"IMAGE"
],
[
181,
80,
0,
81,
0,
"IMAGE"
],
[
169,
78,
0,
77,
0,
"IMAGE"
],
[
177,
79,
0,
80,
0,
"IMAGE"
],
[
115,
38,
0,
64,
0,
"CLIP"
],
[
170,
77,
0,
64,
1,
"IMAGE"
],
[
179,
80,
0,
64,
2,
"IMAGE"
],
[
159,
39,
0,
64,
4,
"VAE"
],
[
185,
77,
0,
80,
1,
"IMAGE"
]
],
"groups": [],
"config": {},
"extra": {
"ds": {
"scale": 0.5730855330117001,
"offset": [
1024.7602694453924,
310.4788179272078
]
},
"frontendVersion": "1.53.6",
"VHS_latentpreview": false,
"VHS_latentpreviewrate": 0,
"VHS_MetadataImage": true,
"VHS_KeepIntermediate": true
},
"version": 0.4
}
The idea is the same as using a colored circle, but here a black-and-white image that marks the location is supplied separately from the original image.
The nice part is that you do not have to draw directly on and alter the original image.
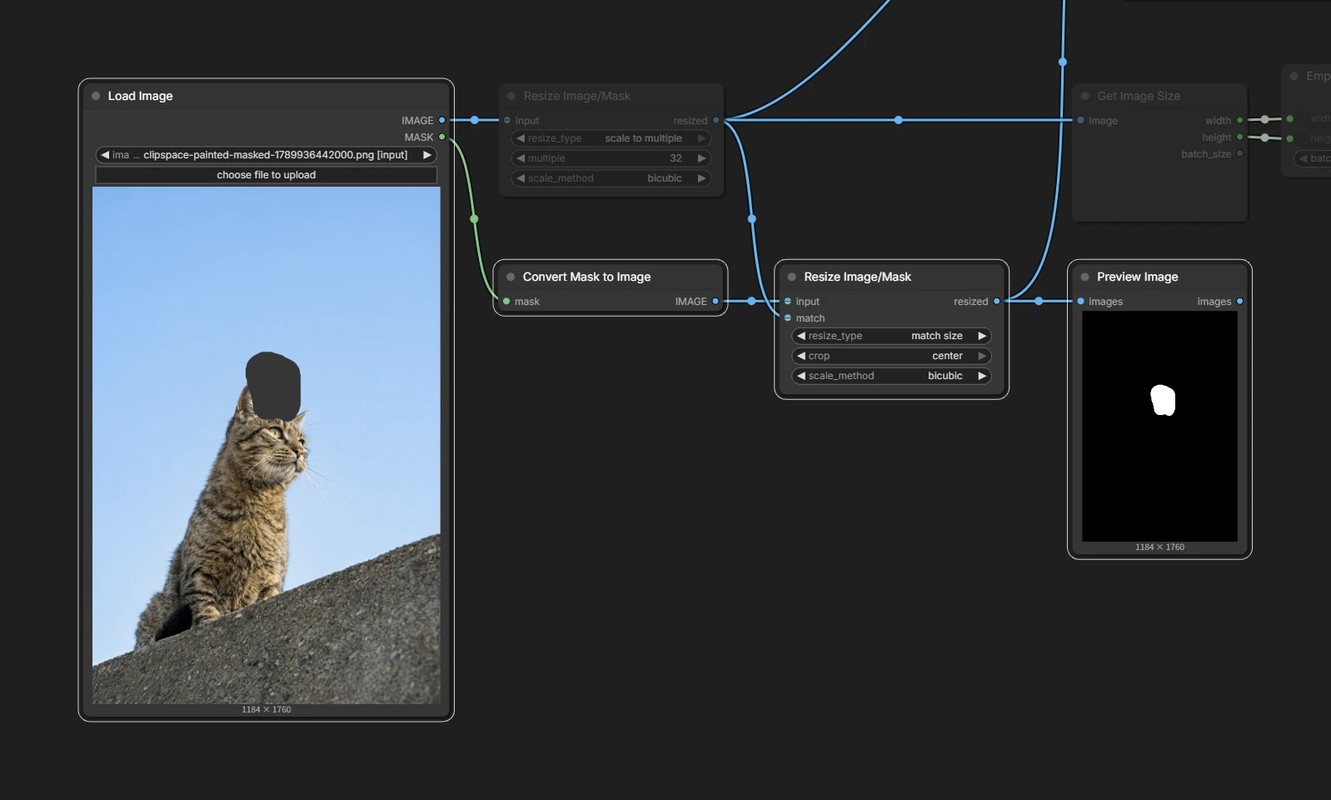
Convert the mask to an image
Convert the MASK output from Load Image into a black-and-white image with Convert Mask to Image, then connect it to image_2.
In fact, the model only receives an ordinary black-and-white image. You can skip the mask conversion and prepare an image painted white over a black background instead.
This works very differently from inpainting.
Inpainting has a mechanism that prevents edits outside the mask, while this is only a location guide.
The edit may therefore spill outside the specified area.
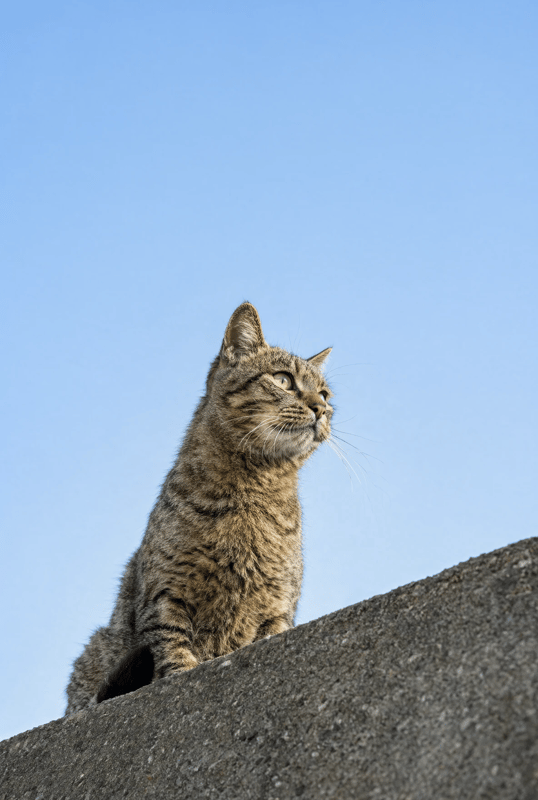
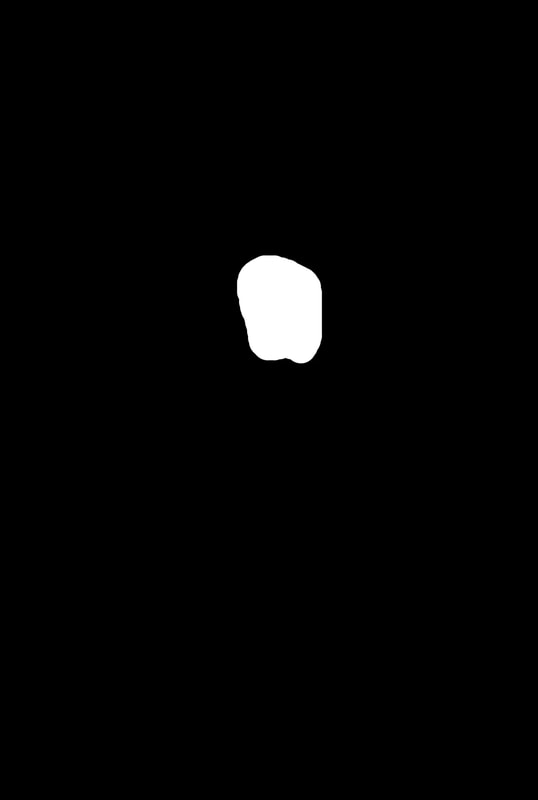
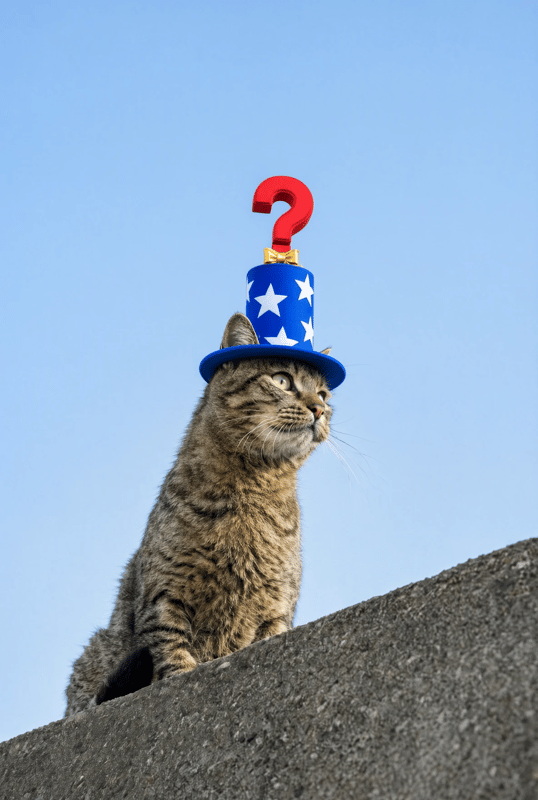
Outpainting
This works very differently from ordinary Outpainting, where padding is added and then inpainted.
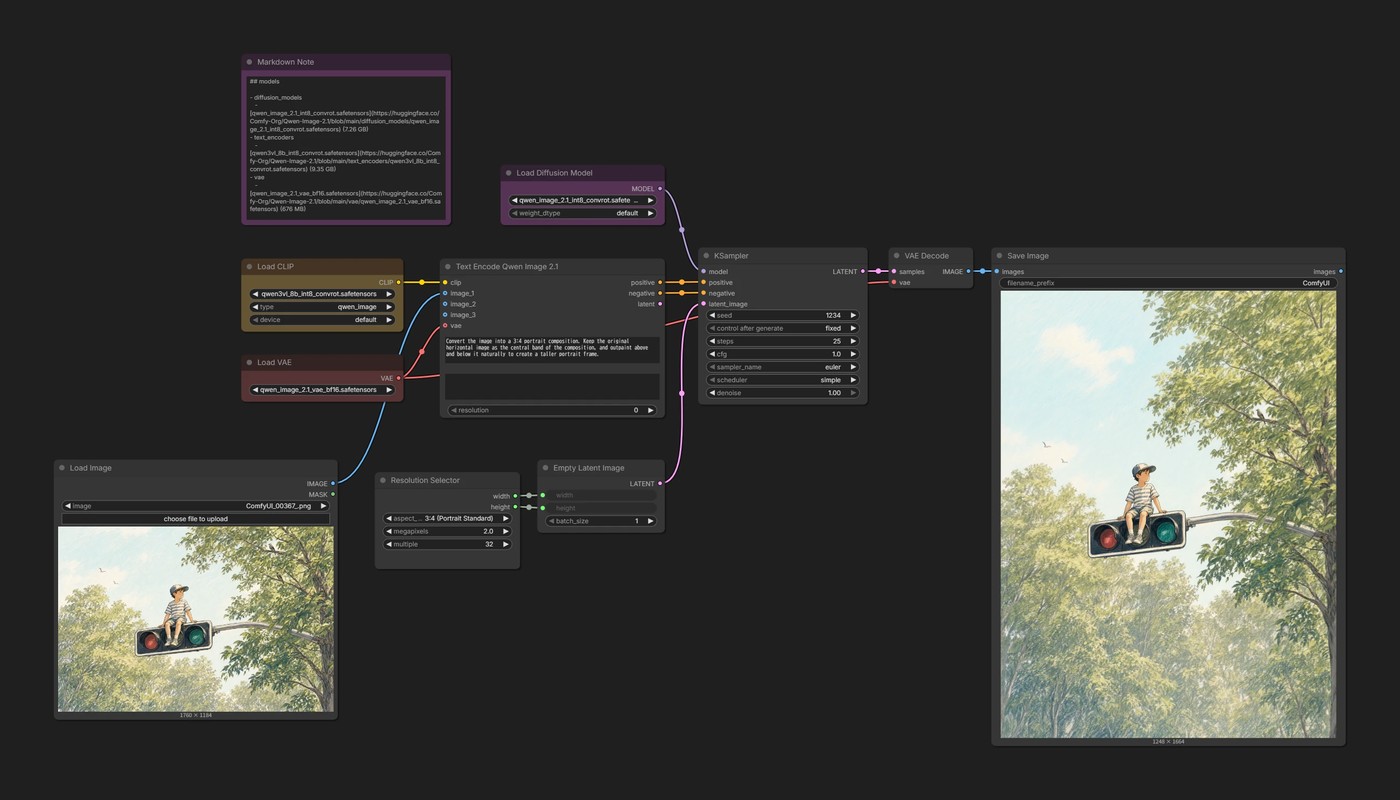
{
  "id": "179e9c66-d274-4857-bcd9-34408448057b",
  "revision": 0,
  "last_node_id": 75,
  "last_link_id": 165,
  "nodes": [
    {
      "id": 8,
      "type": "VAEDecode",
      "pos": [
        1252.432861328125,
        188.1918182373047
      ],
      "size": [
        157.56002807617188,
        46
      ],
      "flags": {},
      "order": 9,
      "mode": 0,
      "inputs": [
        {
          "name": "samples",
          "type": "LATENT",
          "link": 35
        },
        {
          "name": "vae",
          "type": "VAE",
          "link": 76
        }
      ],
      "outputs": [
        {
          "name": "IMAGE",
          "type": "IMAGE",
          "slot_index": 0,
          "links": [
            101
          ]
        }
      ],
      "properties": {
        "Node name for S&R": "VAEDecode",
        "cnr_id": "comfy-core",
        "ver": "0.3.33"
      }
    },
    {
      "id": 37,
      "type": "UNETLoader",
      "pos": [
        531.6217956542969,
        34.805270385742176
      ],
      "size": [
        305.3782043457031,
        82
      ],
      "flags": {},
      "order": 0,
      "mode": 0,
      "inputs": [],
      "outputs": [
        {
          "name": "MODEL",
          "type": "MODEL",
          "slot_index": 0,
          "links": [
            105
          ]
        }
      ],
      "properties": {
        "Node name for S&R": "UNETLoader",
        "cnr_id": "comfy-core",
        "ver": "0.3.33"
      },
      "widgets_values": [
        "qwen_image_2.1_int8_convrot.safetensors",
        "default"
      ],
      "widgets_values_named": {
        "unet_name": "qwen_image_2.1_int8_convrot.safetensors",
        "weight_dtype": "default"
      },
      "color": "#323",
      "bgcolor": "#535"
    },
    {
      "id": 38,
      "type": "CLIPLoader",
      "pos": [
        49.87187153979269,
        208.91730307788293
      ],
      "size": [
        301.3524169921875,
        106
      ],
      "flags": {},
      "order": 1,
      "mode": 0,
      "inputs": [],
      "outputs": [
        {
          "name": "CLIP",
          "type": "CLIP",
          "slot_index": 0,
          "links": [
            115
          ]
        }
      ],
      "properties": {
        "Node name for S&R": "CLIPLoader",
        "cnr_id": "comfy-core",
        "ver": "0.3.33"
      },
      "widgets_values": [
        "qwen3vl_8b_int8_convrot.safetensors",
        "qwen_image",
        "default"
      ],
      "widgets_values_named": {
        "clip_name": "qwen3vl_8b_int8_convrot.safetensors",
        "type": "qwen_image",
        "device": "default"
      },
      "color": "#432",
      "bgcolor": "#653"
    },
    {
      "id": 62,
      "type": "EmptyLatentImage",
      "pos": [
        600,
        582.327293849093
      ],
      "size": [
        237,
        106
      ],
      "flags": {},
      "order": 7,
      "mode": 0,
      "inputs": [
        {
          "name": "width",
          "type": "INT",
          "widget": {
            "name": "width"
          },
          "link": 162
        },
        {
          "name": "height",
          "type": "INT",
          "widget": {
            "name": "height"
          },
          "link": 163
        }
      ],
      "outputs": [
        {
          "name": "LATENT",
          "type": "LATENT",
          "links": [
            148
          ]
        }
      ],
      "properties": {
        "Node name for S&R": "EmptyLatentImage",
        "cnr_id": "comfy-core",
        "ver": "0.26.0"
      },
      "widgets_values": [
        512,
        512,
        1
      ],
      "widgets_values_named": {
        "width": 512,
        "height": 512,
        "batch_size": 1
      }
    },
    {
      "id": 3,
      "type": "KSampler",
      "pos": [
        898.7548217773438,
        188.1918182373047
      ],
      "size": [
        315,
        262
      ],
      "flags": {},
      "order": 8,
      "mode": 0,
      "inputs": [
        {
          "name": "model",
          "type": "MODEL",
          "link": 105
        },
        {
          "name": "positive",
          "type": "CONDITIONING",
          "link": 157
        },
        {
          "name": "negative",
          "type": "CONDITIONING",
          "link": 158
        },
        {
          "name": "latent_image",
          "type": "LATENT",
          "link": 148
        }
      ],
      "outputs": [
        {
          "name": "LATENT",
          "type": "LATENT",
          "slot_index": 0,
          "links": [
            35
          ]
        }
      ],
      "properties": {
        "Node name for S&R": "KSampler",
        "cnr_id": "comfy-core",
        "ver": "0.3.33"
      },
      "widgets_values": [
        1234,
        "fixed",
        25,
        1,
        "euler",
        "simple",
        1
      ],
      "widgets_values_named": {
        "seed": 1234,
        "control_after_generate": "fixed",
        "steps": 25,
        "cfg": 1,
        "sampler_name": "euler",
        "scheduler": "simple",
        "denoise": 1
      }
    },
    {
      "id": 56,
      "type": "SaveImage",
      "pos": [
        1443.3798111474612,
        188.1918182373047
      ],
      "size": [
        658.5240513653155,
        896.1980330737965
      ],
      "flags": {},
      "order": 10,
      "mode": 0,
      "inputs": [
        {
          "name": "images",
          "type": "IMAGE",
          "link": 101
        }
      ],
      "outputs": [
        {
          "name": "images",
          "type": "IMAGE",
          "links": null
        }
      ],
      "properties": {
        "cnr_id": "comfy-core",
        "ver": "0.3.75"
      },
      "widgets_values": [
        "ComfyUI"
      ],
      "widgets_values_named": {
        "filename_prefix": "ComfyUI"
      }
    },
    {
      "id": 55,
      "type": "MarkdownNote",
      "pos": [
        49.87187153979269,
        -171.34464343616293
      ],
      "size": [
        389.61380077225,
        288.1499138219051
      ],
      "flags": {},
      "order": 2,
      "mode": 0,
      "inputs": [],
      "outputs": [],
      "properties": {},
      "widgets_values": [
        "## models\n\n- diffusion_models\n  - [qwen_image_2.1_int8_convrot.safetensors](https://huggingface.co/Comfy-Org/Qwen-Image-2.1/blob/main/diffusion_models/qwen_image_2.1_int8_convrot.safetensors) (7.26 GB)\n- text_encoders\n  - [qwen3vl_8b_int8_convrot.safetensors](https://huggingface.co/Comfy-Org/Qwen-Image-2.1/blob/main/text_encoders/qwen3vl_8b_int8_convrot.safetensors) (9.35 GB)\n- vae\n  - [qwen_image_2.1_vae_bf16.safetensors](https://huggingface.co/Comfy-Org/Qwen-Image-2.1/blob/main/vae/qwen_image_2.1_vae_bf16.safetensors) (676 MB)\n\n```text\n📂ComfyUI/\n└── 📂models/\n    ├── 📂diffusion_models/\n    │   └── qwen_image_2.1_int8_convrot.safetensors \n    ├── 📂text_encoders/\n    │   └── qwen3vl_8b_int8_convrot.safetensors \n    └── 📂vae/\n        └── qwen_image_2.1_vae_bf16.safetensors \n```"
      ],
      "widgets_values_named": {
        "text": "## models\n\n- diffusion_models\n  - [qwen_image_2.1_int8_convrot.safetensors](https://huggingface.co/Comfy-Org/Qwen-Image-2.1/blob/main/diffusion_models/qwen_image_2.1_int8_convrot.safetensors) (7.26 GB)\n- text_encoders\n  - [qwen3vl_8b_int8_convrot.safetensors](https://huggingface.co/Comfy-Org/Qwen-Image-2.1/blob/main/text_encoders/qwen3vl_8b_int8_convrot.safetensors) (9.35 GB)\n- vae\n  - [qwen_image_2.1_vae_bf16.safetensors](https://huggingface.co/Comfy-Org/Qwen-Image-2.1/blob/main/vae/qwen_image_2.1_vae_bf16.safetensors) (676 MB)\n\n```text\n📂ComfyUI/\n└── 📂models/\n    ├── 📂diffusion_models/\n    │   └── qwen_image_2.1_int8_convrot.safetensors \n    ├── 📂text_encoders/\n    │   └── qwen3vl_8b_int8_convrot.safetensors \n    └── 📂vae/\n        └── qwen_image_2.1_vae_bf16.safetensors \n```"
      },
      "color": "#323",
      "bgcolor": "#535"
    },
    {
      "id": 39,
      "type": "VAELoader",
      "pos": [
        49.87187153979269,
        386.79138870487407
      ],
      "size": [
        301.3524169921875,
        58
      ],
      "flags": {},
      "order": 3,
      "mode": 0,
      "inputs": [],
      "outputs": [
        {
          "name": "VAE",
          "type": "VAE",
          "slot_index": 0,
          "links": [
            76,
            159
          ]
        }
      ],
      "properties": {
        "Node name for S&R": "VAELoader",
        "cnr_id": "comfy-core",
        "ver": "0.3.33"
      },
      "widgets_values": [
        "qwen_image_2.1_vae_bf16.safetensors"
      ],
      "widgets_values_named": {
        "vae_name": "qwen_image_2.1_vae_bf16.safetensors"
      },
      "color": "#322",
      "bgcolor": "#533"
    },
    {
      "id": 64,
      "type": "TextEncodeQwenImage21",
      "pos": [
        418.6281050017755,
        208.91730307788293
      ],
      "size": [
        418.5183049982245,
        266
      ],
      "flags": {},
      "order": 6,
      "mode": 0,
      "inputs": [
        {
          "name": "clip",
          "type": "CLIP",
          "link": 115
        },
        {
          "name": "images.image_1",
          "shape": 7,
          "type": "IMAGE",
          "link": 161
        },
        {
          "name": "images.image_2",
          "shape": 7,
          "type": "IMAGE",
          "link": null
        },
        {
          "name": "images.image_3",
          "shape": 7,
          "type": "IMAGE",
          "link": null
        },
        {
          "name": "vae",
          "shape": 7,
          "type": "VAE",
          "link": 159
        }
      ],
      "outputs": [
        {
          "name": "positive",
          "type": "CONDITIONING",
          "links": [
            157
          ]
        },
        {
          "name": "negative",
          "type": "CONDITIONING",
          "links": [
            158
          ]
        },
        {
          "name": "latent",
          "type": "LATENT",
          "links": null
        }
      ],
      "properties": {
        "Node name for S&R": "TextEncodeQwenImage21"
      },
      "widgets_values": [
        "Convert the image into a 3:4 portrait composition. Keep the original horizontal image as the central band of the composition, and outpaint above and below it naturally to create a taller portrait frame.",
        "",
        0
      ],
      "widgets_values_named": {
        "prompt": "Convert the image into a 3:4 portrait composition. Keep the original horizontal image as the central band of the composition, and outpaint above and below it naturally to create a taller portrait frame.",
        "negative_prompt": "",
        "resolution": 0
      }
    },
    {
      "id": 65,
      "type": "LoadImage",
      "pos": [
        -298.3234143554099,
        582.327293849093
      ],
      "size": [
        527.6082516733466,
        453.2297698200616
      ],
      "flags": {},
      "order": 4,
      "mode": 0,
      "inputs": [],
      "outputs": [
        {
          "name": "IMAGE",
          "type": "IMAGE",
          "links": [
            161
          ]
        },
        {
          "name": "MASK",
          "type": "MASK",
          "links": null
        }
      ],
      "properties": {
        "Node name for S&R": "LoadImage"
      },
      "widgets_values": [
        "ComfyUI_00367_.png",
        "image"
      ],
      "widgets_values_named": {
        "image": "ComfyUI_00367_.png",
        "upload": "image"
      }
    },
    {
      "id": 73,
      "type": "ResolutionSelector",
      "pos": [
        298.0452682548206,
        605.7203578308751
      ],
      "size": [
        270,
        150
      ],
      "flags": {},
      "order": 5,
      "mode": 0,
      "inputs": [],
      "outputs": [
        {
          "name": "width",
          "type": "INT",
          "links": [
            162
          ]
        },
        {
          "name": "height",
          "type": "INT",
          "links": [
            163
          ]
        }
      ],
      "properties": {
        "Node name for S&R": "ResolutionSelector",
        "cnr_id": "comfy-core",
        "ver": "0.25.0"
      },
      "widgets_values": [
        "3:4 (Portrait Standard)",
        2,
        32
      ],
      "widgets_values_named": {
        "aspect_ratio": "3:4 (Portrait Standard)",
        "megapixels": 2,
        "multiple": 32
      }
    }
  ],
  "links": [
    [
      35,
      3,
      0,
      8,
      0,
      "LATENT"
    ],
    [
      76,
      39,
      0,
      8,
      1,
      "VAE"
    ],
    [
      101,
      8,
      0,
      56,
      0,
      "IMAGE"
    ],
    [
      105,
      37,
      0,
      3,
      0,
      "MODEL"
    ],
    [
      148,
      62,
      0,
      3,
      3,
      "LATENT"
    ],
    [
      157,
      64,
      0,
      3,
      1,
      "CONDITIONING"
    ],
    [
      158,
      64,
      1,
      3,
      2,
      "CONDITIONING"
    ],
    [
      162,
      73,
      0,
      62,
      0,
      "INT"
    ],
    [
      163,
      73,
      1,
      62,
      1,
      "INT"
    ],
    [
      115,
      38,
      0,
      64,
      0,
      "CLIP"
    ],
    [
      161,
      65,
      0,
      64,
      1,
      "IMAGE"
    ],
    [
      159,
      39,
      0,
      64,
      4,
      "VAE"
    ]
  ],
  "groups": [],
  "config": {},
  "extra": {
    "ds": {
      "scale": 0.5730855330116964,
      "offset": [
        793.1375818581982,
        452.54848706621476
      ]
    },
    "frontendVersion": "1.53.6",
    "VHS_latentpreview": false,
    "VHS_latentpreviewrate": 0,
    "VHS_MetadataImage": true,
    "VHS_KeepIntermediate": true
  },
  "version": 0.4
}
What happens if you provide a wide image as a reference, but generate a portrait image?
Qwen-Image-2.1 creates a new image that fills in the space above and below.
It redraws the whole image rather than only the added space, so the original area will also change slightly.
This is not a way to preserve the source image precisely, but it is wonderfully simple.
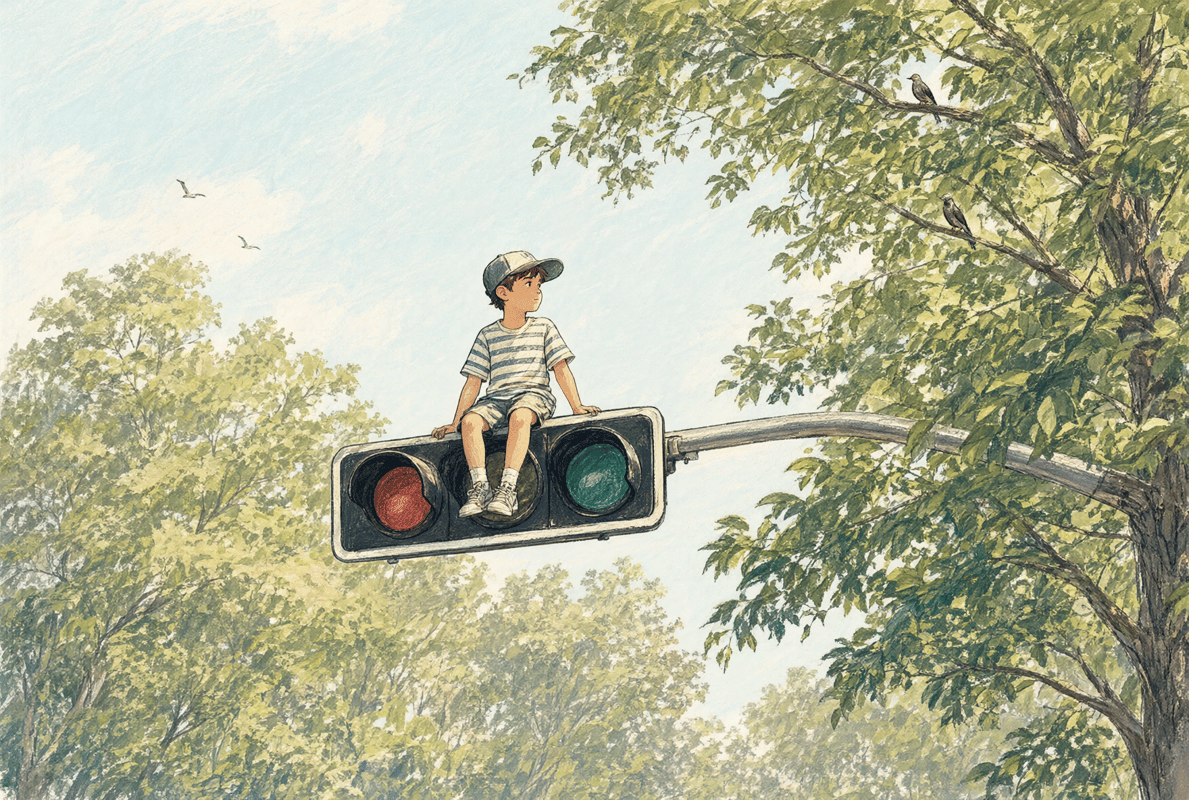
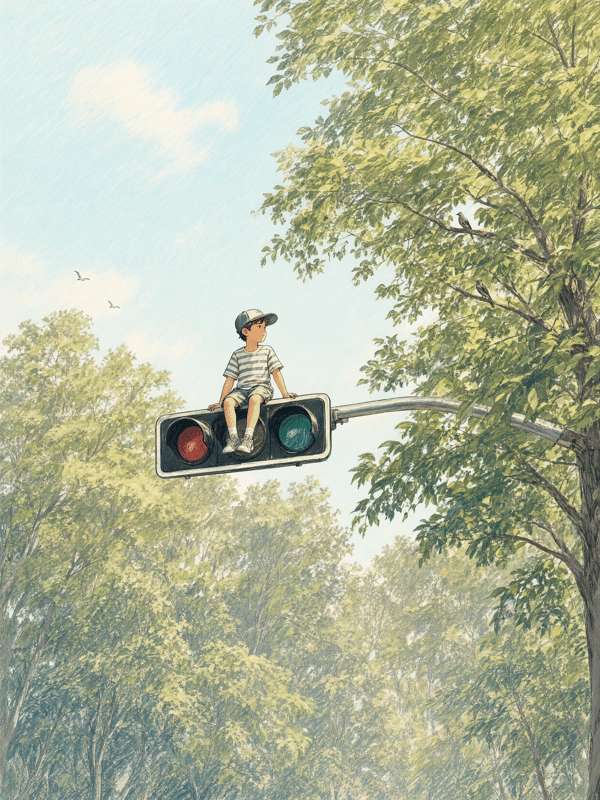
Transparent images
Qwen-Image-2.1 can generate transparent images with only a small change to the prompt.
No special nodes are required. It produces an RGBA image with an Alpha Channel from the start.
Generate a transparent image
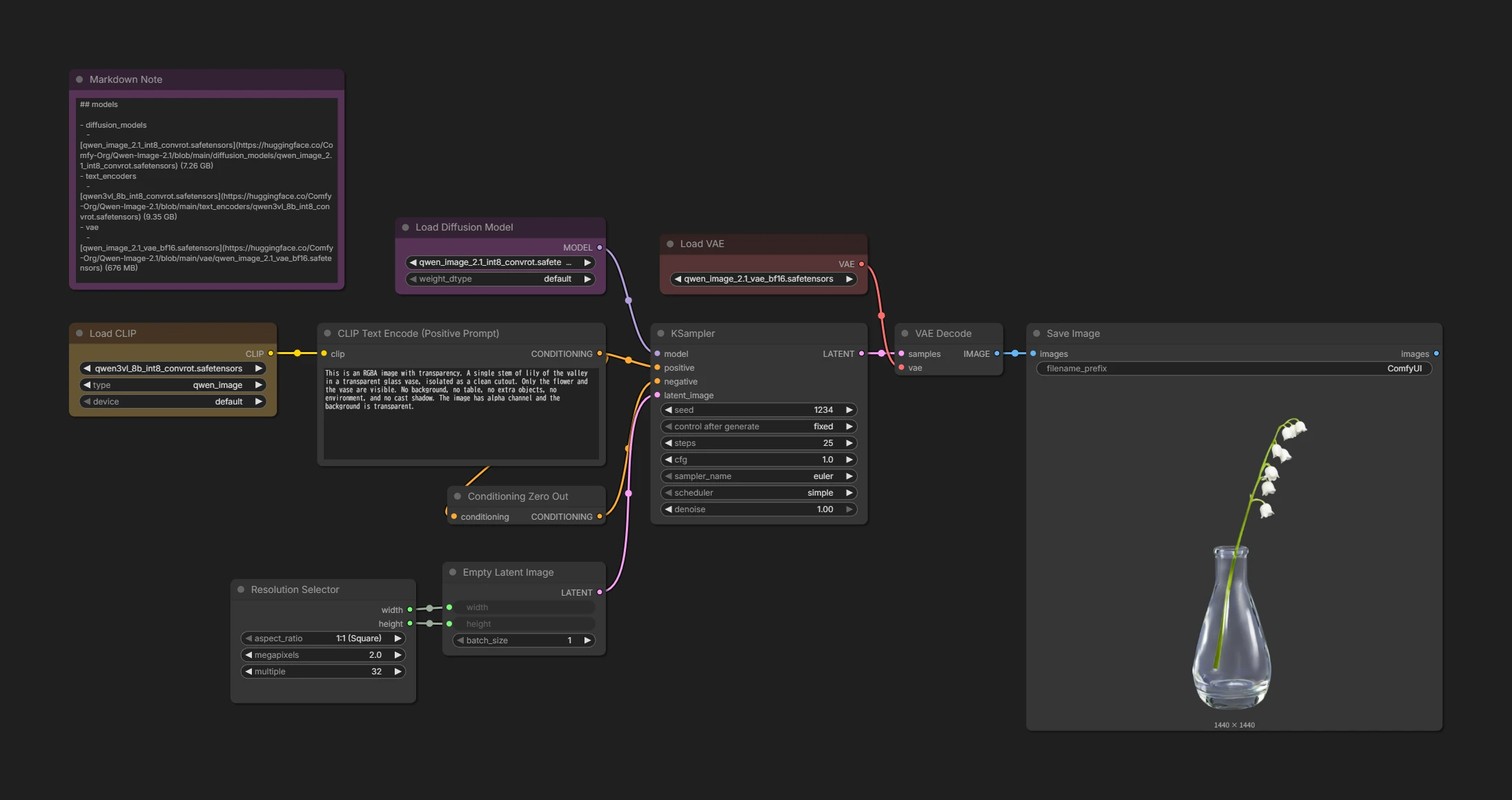
{
  "id": "d8034549-7e0a-40f1-8c2e-de3ffc6f1cae",
  "revision": 0,
  "last_node_id": 72,
  "last_link_id": 159,
  "nodes": [
    {
      "id": 8,
      "type": "VAEDecode",
      "pos": [
        1252.432861328125,
        188.1918182373047
      ],
      "size": [
        157.56002807617188,
        46
      ],
      "flags": {},
      "order": 9,
      "mode": 0,
      "inputs": [
        {
          "name": "samples",
          "type": "LATENT",
          "link": 35
        },
        {
          "name": "vae",
          "type": "VAE",
          "link": 76
        }
      ],
      "outputs": [
        {
          "name": "IMAGE",
          "type": "IMAGE",
          "slot_index": 0,
          "links": [
            101
          ]
        }
      ],
      "properties": {
        "Node name for S&R": "VAEDecode",
        "cnr_id": "comfy-core",
        "ver": "0.3.33"
      }
    },
    {
      "id": 37,
      "type": "UNETLoader",
      "pos": [
        528.8914031982422,
        34.805270385742176
      ],
      "size": [
        305.3782043457031,
        82
      ],
      "flags": {},
      "order": 0,
      "mode": 0,
      "inputs": [],
      "outputs": [
        {
          "name": "MODEL",
          "type": "MODEL",
          "slot_index": 0,
          "links": [
            105
          ]
        }
      ],
      "properties": {
        "Node name for S&R": "UNETLoader",
        "cnr_id": "comfy-core",
        "ver": "0.3.33"
      },
      "widgets_values": [
        "qwen_image_2.1_int8_convrot.safetensors",
        "default"
      ],
      "widgets_values_named": {
        "unet_name": "qwen_image_2.1_int8_convrot.safetensors",
        "weight_dtype": "default"
      },
      "color": "#323",
      "bgcolor": "#535"
    },
    {
      "id": 38,
      "type": "CLIPLoader",
      "pos": [
        56.288665771484375,
        187.93908374218398
      ],
      "size": [
        301.3524169921875,
        106
      ],
      "flags": {},
      "order": 1,
      "mode": 0,
      "inputs": [],
      "outputs": [
        {
          "name": "CLIP",
          "type": "CLIP",
          "slot_index": 0,
          "links": [
            74
          ]
        }
      ],
      "properties": {
        "Node name for S&R": "CLIPLoader",
        "cnr_id": "comfy-core",
        "ver": "0.3.33"
      },
      "widgets_values": [
        "qwen3vl_8b_int8_convrot.safetensors",
        "qwen_image",
        "default"
      ],
      "widgets_values_named": {
        "clip_name": "qwen3vl_8b_int8_convrot.safetensors",
        "type": "qwen_image",
        "device": "default"
      },
      "color": "#432",
      "bgcolor": "#653"
    },
    {
      "id": 62,
      "type": "EmptyLatentImage",
      "pos": [
        597.2696075439453,
        533.9984804443335
      ],
      "size": [
        237,
        106
      ],
      "flags": {},
      "order": 6,
      "mode": 0,
      "inputs": [
        {
          "name": "width",
          "type": "INT",
          "widget": {
            "name": "width"
          },
          "link": 149
        },
        {
          "name": "height",
          "type": "INT",
          "widget": {
            "name": "height"
          },
          "link": 150
        }
      ],
      "outputs": [
        {
          "name": "LATENT",
          "type": "LATENT",
          "links": [
            148
          ]
        }
      ],
      "properties": {
        "Node name for S&R": "EmptyLatentImage",
        "cnr_id": "comfy-core",
        "ver": "0.26.0"
      },
      "widgets_values": [
        512,
        512,
        1
      ],
      "widgets_values_named": {
        "width": 512,
        "height": 512,
        "batch_size": 1
      }
    },
    {
      "id": 3,
      "type": "KSampler",
      "pos": [
        898.7548217773438,
        188.1918182373047
      ],
      "size": [
        315,
        262
      ],
      "flags": {},
      "order": 8,
      "mode": 0,
      "inputs": [
        {
          "name": "model",
          "type": "MODEL",
          "link": 105
        },
        {
          "name": "positive",
          "type": "CONDITIONING",
          "link": 152
        },
        {
          "name": "negative",
          "type": "CONDITIONING",
          "link": 153
        },
        {
          "name": "latent_image",
          "type": "LATENT",
          "link": 148
        }
      ],
      "outputs": [
        {
          "name": "LATENT",
          "type": "LATENT",
          "slot_index": 0,
          "links": [
            35
          ]
        }
      ],
      "properties": {
        "Node name for S&R": "KSampler",
        "cnr_id": "comfy-core",
        "ver": "0.3.33"
      },
      "widgets_values": [
        1234,
        "fixed",
        25,
        1,
        "euler",
        "simple",
        1
      ],
      "widgets_values_named": {
        "seed": 1234,
        "control_after_generate": "fixed",
        "steps": 25,
        "cfg": 1,
        "sampler_name": "euler",
        "scheduler": "simple",
        "denoise": 1
      }
    },
    {
      "id": 60,
      "type": "ResolutionSelector",
      "pos": [
        290.29125126341165,
        559.1854465782014
      ],
      "size": [
        269.0150267324193,
        150
      ],
      "flags": {},
      "order": 2,
      "mode": 0,
      "inputs": [],
      "outputs": [
        {
          "name": "width",
          "type": "INT",
          "links": [
            149
          ]
        },
        {
          "name": "height",
          "type": "INT",
          "links": [
            150
          ]
        }
      ],
      "properties": {
        "Node name for S&R": "ResolutionSelector",
        "cnr_id": "comfy-core",
        "ver": "0.25.0"
      },
      "widgets_values": [
        "1:1 (Square)",
        2,
        32
      ],
      "widgets_values_named": {
        "aspect_ratio": "1:1 (Square)",
        "megapixels": 2,
        "multiple": 32
      }
    },
    {
      "id": 6,
      "type": "CLIPTextEncode",
      "pos": [
        415.7513025457208,
        187.93908374218398
      ],
      "size": [
        418.5183049982245,
        177.7917699892659
      ],
      "flags": {},
      "order": 5,
      "mode": 0,
      "inputs": [
        {
          "name": "clip",
          "type": "CLIP",
          "link": 74
        }
      ],
      "outputs": [
        {
          "name": "CONDITIONING",
          "type": "CONDITIONING",
          "slot_index": 0,
          "links": [
            113,
            152
          ]
        }
      ],
      "title": "CLIP Text Encode (Positive Prompt)",
      "properties": {
        "Node name for S&R": "CLIPTextEncode",
        "cnr_id": "comfy-core",
        "ver": "0.3.33"
      },
      "widgets_values": [
        "This is an RGBA image with transparency. A single stem of lily of the valley in a transparent glass vase, isolated as a clean cutout. Only the flower and the vase are visible. No background, no table, no extra objects, no environment, and no cast shadow. The image has alpha channel and the background is transparent."
      ],
      "widgets_values_named": {
        "text": "This is an RGBA image with transparency. A single stem of lily of the valley in a transparent glass vase, isolated as a clean cutout. Only the flower and the vase are visible. No background, no table, no extra objects, no environment, and no cast shadow. The image has alpha channel and the background is transparent."
      }
    },
    {
      "id": 56,
      "type": "SaveImage",
      "pos": [
        1443.3798111474612,
        188.1918182373047
      ],
      "size": [
        603.355482491254,
        560.8538694550092
      ],
      "flags": {},
      "order": 10,
      "mode": 0,
      "inputs": [
        {
          "name": "images",
          "type": "IMAGE",
          "link": 101
        }
      ],
      "outputs": [
        {
          "name": "images",
          "type": "IMAGE",
          "links": null
        }
      ],
      "properties": {
        "cnr_id": "comfy-core",
        "ver": "0.3.75"
      },
      "widgets_values": [
        "ComfyUI"
      ],
      "widgets_values_named": {
        "filename_prefix": "ComfyUI"
      }
    },
    {
      "id": 55,
      "type": "MarkdownNote",
      "pos": [
        56.288665771484375,
        -179.6421198702247
      ],
      "size": [
        399.21729431373655,
        289.666254907403
      ],
      "flags": {},
      "order": 3,
      "mode": 0,
      "inputs": [],
      "outputs": [],
      "properties": {},
      "widgets_values": [
        "## models\n\n- diffusion_models\n  - [qwen_image_2.1_int8_convrot.safetensors](https://huggingface.co/Comfy-Org/Qwen-Image-2.1/blob/main/diffusion_models/qwen_image_2.1_int8_convrot.safetensors) (7.26 GB)\n- text_encoders\n  - [qwen3vl_8b_int8_convrot.safetensors](https://huggingface.co/Comfy-Org/Qwen-Image-2.1/blob/main/text_encoders/qwen3vl_8b_int8_convrot.safetensors) (9.35 GB)\n- vae\n  - [qwen_image_2.1_vae_bf16.safetensors](https://huggingface.co/Comfy-Org/Qwen-Image-2.1/blob/main/vae/qwen_image_2.1_vae_bf16.safetensors) (676 MB)\n\n```text\n📂ComfyUI/\n└── 📂models/\n    ├── 📂diffusion_models/\n    │   └── qwen_image_2.1_int8_convrot.safetensors \n    ├── 📂text_encoders/\n    │   └── qwen3vl_8b_int8_convrot.safetensors \n    └── 📂vae/\n        └── qwen_image_2.1_vae_bf16.safetensors \n```"
      ],
      "widgets_values_named": {
        "text": "## models\n\n- diffusion_models\n  - [qwen_image_2.1_int8_convrot.safetensors](https://huggingface.co/Comfy-Org/Qwen-Image-2.1/blob/main/diffusion_models/qwen_image_2.1_int8_convrot.safetensors) (7.26 GB)\n- text_encoders\n  - [qwen3vl_8b_int8_convrot.safetensors](https://huggingface.co/Comfy-Org/Qwen-Image-2.1/blob/main/text_encoders/qwen3vl_8b_int8_convrot.safetensors) (9.35 GB)\n- vae\n  - [qwen_image_2.1_vae_bf16.safetensors](https://huggingface.co/Comfy-Org/Qwen-Image-2.1/blob/main/vae/qwen_image_2.1_vae_bf16.safetensors) (676 MB)\n\n```text\n📂ComfyUI/\n└── 📂models/\n    ├── 📂diffusion_models/\n    │   └── qwen_image_2.1_int8_convrot.safetensors \n    ├── 📂text_encoders/\n    │   └── qwen3vl_8b_int8_convrot.safetensors \n    └── 📂vae/\n        └── qwen_image_2.1_vae_bf16.safetensors \n```"
      },
      "color": "#323",
      "bgcolor": "#535"
    },
    {
      "id": 39,
      "type": "VAELoader",
      "pos": [
        912.4024047851562,
        58.805270385742176
      ],
      "size": [
        301.3524169921875,
        58
      ],
      "flags": {},
      "order": 4,
      "mode": 0,
      "inputs": [],
      "outputs": [
        {
          "name": "VAE",
          "type": "VAE",
          "slot_index": 0,
          "links": [
            76
          ]
        }
      ],
      "properties": {
        "Node name for S&R": "VAELoader",
        "cnr_id": "comfy-core",
        "ver": "0.3.33"
      },
      "widgets_values": [
        "qwen_image_2.1_vae_bf16.safetensors"
      ],
      "widgets_values_named": {
        "vae_name": "qwen_image_2.1_vae_bf16.safetensors"
      },
      "color": "#322",
      "bgcolor": "#533"
    },
    {
      "id": 63,
      "type": "ConditioningZeroOut",
      "pos": [
        604.1803306150726,
        424.13739436061894
      ],
      "size": [
        230.08927692887266,
        26
      ],
      "flags": {},
      "order": 7,
      "mode": 0,
      "inputs": [
        {
          "name": "conditioning",
          "type": "CONDITIONING",
          "link": 113
        }
      ],
      "outputs": [
        {
          "name": "CONDITIONING",
          "type": "CONDITIONING",
          "links": [
            153
          ]
        }
      ],
      "properties": {
        "Node name for S&R": "ConditioningZeroOut"
      }
    }
  ],
  "links": [
    [
      35,
      3,
      0,
      8,
      0,
      "LATENT"
    ],
    [
      74,
      38,
      0,
      6,
      0,
      "CLIP"
    ],
    [
      76,
      39,
      0,
      8,
      1,
      "VAE"
    ],
    [
      101,
      8,
      0,
      56,
      0,
      "IMAGE"
    ],
    [
      105,
      37,
      0,
      3,
      0,
      "MODEL"
    ],
    [
      113,
      6,
      0,
      63,
      0,
      "CONDITIONING"
    ],
    [
      148,
      62,
      0,
      3,
      3,
      "LATENT"
    ],
    [
      149,
      60,
      0,
      62,
      0,
      "INT"
    ],
    [
      150,
      60,
      1,
      62,
      1,
      "INT"
    ],
    [
      152,
      6,
      0,
      3,
      1,
      "CONDITIONING"
    ],
    [
      153,
      63,
      0,
      3,
      2,
      "CONDITIONING"
    ]
  ],
  "groups": [],
  "config": {},
  "extra": {
    "ds": {
      "scale": 0.6934334949441481,
      "offset": [
        343.6075544426403,
        435.95511691699716
      ]
    },
    "frontendVersion": "1.53.6",
    "VHS_latentpreview": false,
    "VHS_latentpreviewrate": 0,
    "VHS_MetadataImage": true,
    "VHS_KeepIntermediate": true
  },
  "version": 0.4
}
Write the prompt in this format:
This is an RGBA image with transparency. <your prompt here>. The image has alpha channel and the background is transparent.
The beginning and ending are fixed phrases, so you can copy them as-is and replace only the middle.
Save the output as PNG to preserve transparency. JPEG would discard the Alpha Channel.
Output example
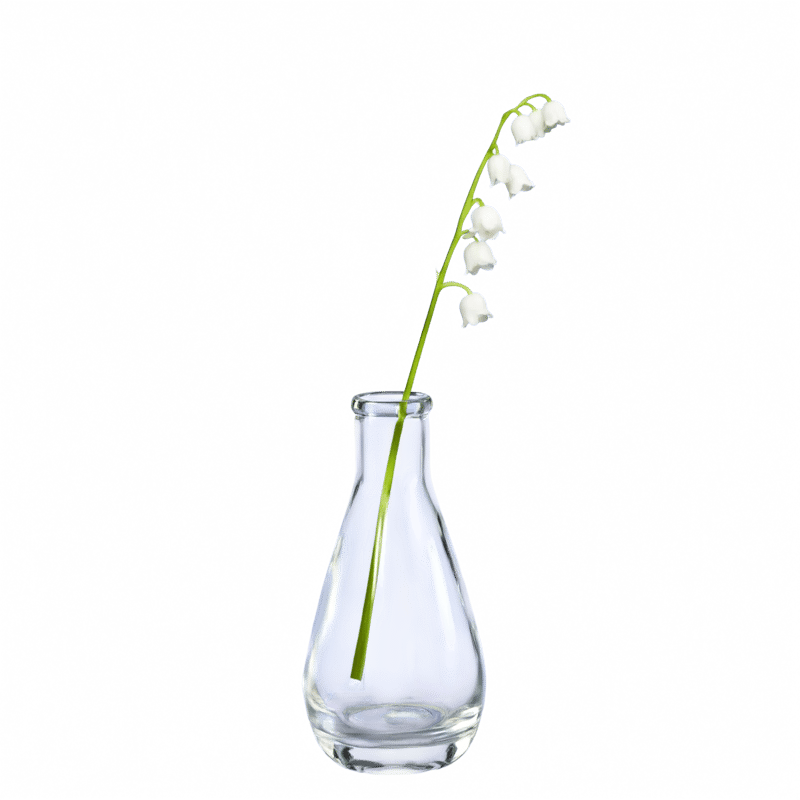
Subject extraction
Combine transparent generation with image editing and—yes—you can pull a subject out of an image too.
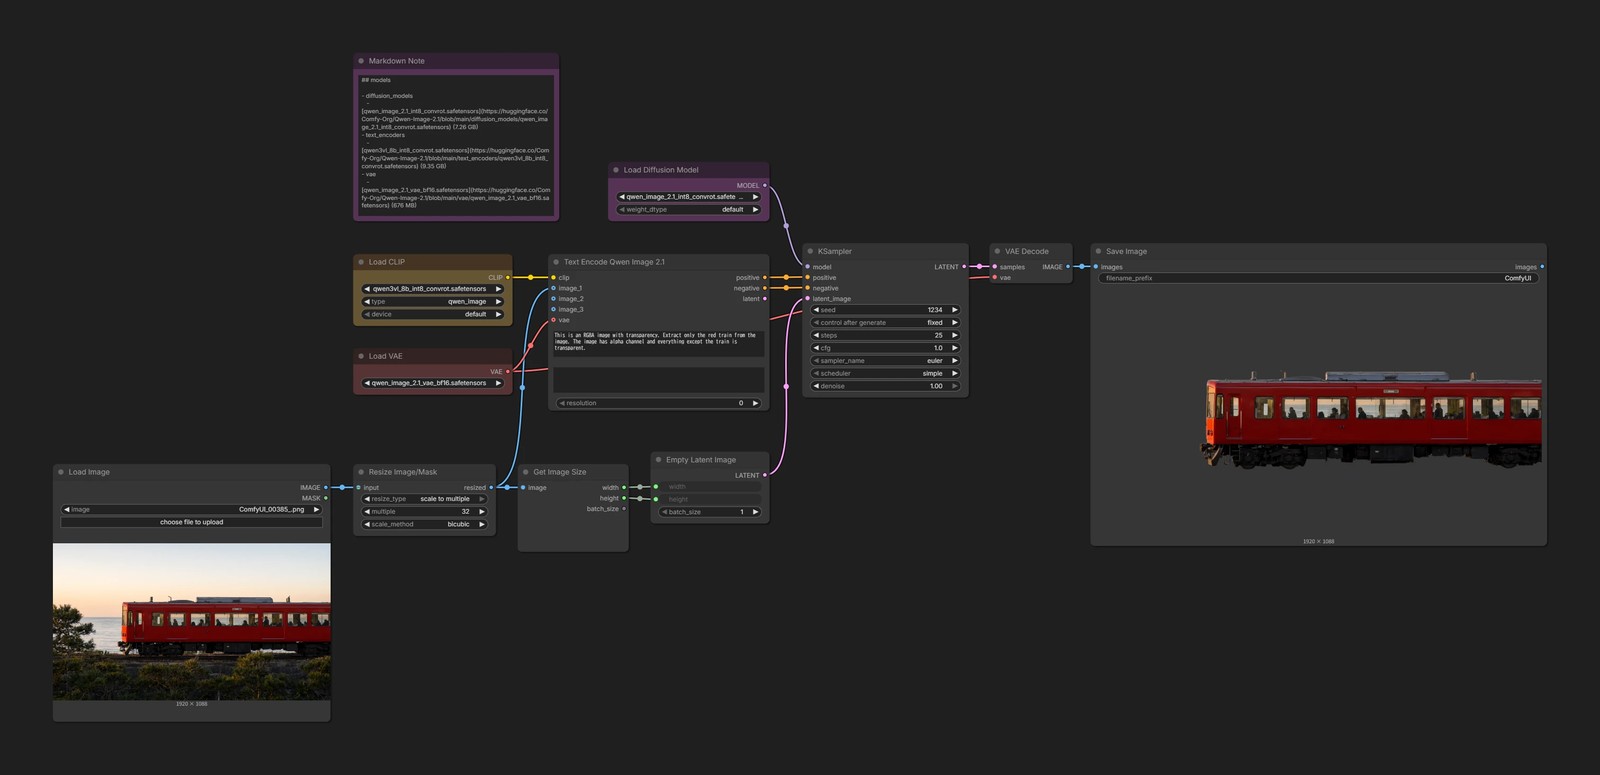
{
"id": "179e9c66-d274-4857-bcd9-34408448057b",
"revision": 0,
"last_node_id": 78,
"last_link_id": 174,
"nodes": [
{
"id": 8,
"type": "VAEDecode",
"pos": [
1252.432861328125,
188.1918182373047
],
"size": [
157.56002807617188,
46
],
"flags": {},
"order": 10,
"mode": 0,
"inputs": [
{
"name": "samples",
"type": "LATENT",
"link": 35
},
{
"name": "vae",
"type": "VAE",
"link": 76
}
],
"outputs": [
{
"name": "IMAGE",
"type": "IMAGE",
"slot_index": 0,
"links": [
174
]
}
],
"properties": {
"Node name for S&R": "VAEDecode",
"cnr_id": "comfy-core",
"ver": "0.3.33"
}
},
{
"id": 37,
"type": "UNETLoader",
"pos": [
531.6217956542969,
34.805270385742176
],
"size": [
305.3782043457031,
82
],
"flags": {},
"order": 0,
"mode": 0,
"inputs": [],
"outputs": [
{
"name": "MODEL",
"type": "MODEL",
"slot_index": 0,
"links": [
105
]
}
],
"properties": {
"Node name for S&R": "UNETLoader",
"cnr_id": "comfy-core",
"ver": "0.3.33"
},
"widgets_values": [
"qwen_image_2.1_int8_convrot.safetensors",
"default"
],
"widgets_values_named": {
"unet_name": "qwen_image_2.1_int8_convrot.safetensors",
"weight_dtype": "default"
},
"color": "#323",
"bgcolor": "#535"
},
{
"id": 38,
"type": "CLIPLoader",
"pos": [
49.87187153979269,
208.97678324429972
],
"size": [
301.3524169921875,
106
],
"flags": {},
"order": 1,
"mode": 0,
"inputs": [],
"outputs": [
{
"name": "CLIP",
"type": "CLIP",
"slot_index": 0,
"links": [
115
]
}
],
"properties": {
"Node name for S&R": "CLIPLoader",
"cnr_id": "comfy-core",
"ver": "0.3.33"
},
"widgets_values": [
"qwen3vl_8b_int8_convrot.safetensors",
"qwen_image",
"default"
],
"widgets_values_named": {
"clip_name": "qwen3vl_8b_int8_convrot.safetensors",
"type": "qwen_image",
"device": "default"
},
"color": "#432",
"bgcolor": "#653"
},
{
"id": 62,
"type": "EmptyLatentImage",
"pos": [
611.918176537727,
582.327293849093
],
"size": [
225.08182346227295,
106
],
"flags": {},
"order": 8,
"mode": 0,
"inputs": [
{
"name": "width",
"type": "INT",
"widget": {
"name": "width"
},
"link": 171
},
{
"name": "height",
"type": "INT",
"widget": {
"name": "height"
},
"link": 172
}
],
"outputs": [
{
"name": "LATENT",
"type": "LATENT",
"links": [
148
]
}
],
"properties": {
"Node name for S&R": "EmptyLatentImage",
"cnr_id": "comfy-core",
"ver": "0.26.0"
},
"widgets_values": [
512,
512,
1
],
"widgets_values_named": {
"width": 512,
"height": 512,
"batch_size": 1
}
},
{
"id": 3,
"type": "KSampler",
"pos": [
898.7548217773438,
188.1918182373047
],
"size": [
315,
262
],
"flags": {},
"order": 9,
"mode": 0,
"inputs": [
{
"name": "model",
"type": "MODEL",
"link": 105
},
{
"name": "positive",
"type": "CONDITIONING",
"link": 157
},
{
"name": "negative",
"type": "CONDITIONING",
"link": 158
},
{
"name": "latent_image",
"type": "LATENT",
"link": 148
}
],
"outputs": [
{
"name": "LATENT",
"type": "LATENT",
"slot_index": 0,
"links": [
35
]
}
],
"properties": {
"Node name for S&R": "KSampler",
"cnr_id": "comfy-core",
"ver": "0.3.33"
},
"widgets_values": [
1234,
"fixed",
25,
1,
"euler",
"simple",
1
],
"widgets_values_named": {
"seed": 1234,
"control_after_generate": "fixed",
"steps": 25,
"cfg": 1,
"sampler_name": "euler",
"scheduler": "simple",
"denoise": 1
}
},
{
"id": 56,
"type": "SaveImage",
"pos": [
1443.3798111474612,
188.1918182373047
],
"size": [
863.0068733337096,
542.4994958649971
],
"flags": {},
"order": 11,
"mode": 0,
"inputs": [
{
"name": "images",
"type": "IMAGE",
"link": 174
}
],
"outputs": [
{
"name": "images",
"type": "IMAGE",
"links": null
}
],
"properties": {
"cnr_id": "comfy-core",
"ver": "0.3.75"
},
"widgets_values": [
"ComfyUI"
],
"widgets_values_named": {
"filename_prefix": "ComfyUI"
}
},
{
"id": 55,
"type": "MarkdownNote",
"pos": [
49.87187153979269,
-171.34464343616293
],
"size": [
389.61380077225,
288.1499138219051
],
"flags": {},
"order": 2,
"mode": 0,
"inputs": [],
"outputs": [],
"properties": {},
"widgets_values": [
"## models\n\n- diffusion_models\n - [qwen_image_2.1_int8_convrot.safetensors](https://huggingface.co/Comfy-Org/Qwen-Image-2.1/blob/main/diffusion_models/qwen_image_2.1_int8_convrot.safetensors) (7.26 GB)\n- text_encoders\n - [qwen3vl_8b_int8_convrot.safetensors](https://huggingface.co/Comfy-Org/Qwen-Image-2.1/blob/main/text_encoders/qwen3vl_8b_int8_convrot.safetensors) (9.35 GB)\n- vae\n - [qwen_image_2.1_vae_bf16.safetensors](https://huggingface.co/Comfy-Org/Qwen-Image-2.1/blob/main/vae/qwen_image_2.1_vae_bf16.safetensors) (676 MB)\n\n```text\n📂ComfyUI/\n└── 📂models/\n ├── 📂diffusion_models/\n │ └── qwen_image_2.1_int8_convrot.safetensors \n ├── 📂text_encoders/\n │ └── qwen3vl_8b_int8_convrot.safetensors \n └── 📂vae/\n └── qwen_image_2.1_vae_bf16.safetensors \n```"
],
"widgets_values_named": {
"text": "## models\n\n- diffusion_models\n - [qwen_image_2.1_int8_convrot.safetensors](https://huggingface.co/Comfy-Org/Qwen-Image-2.1/blob/main/diffusion_models/qwen_image_2.1_int8_convrot.safetensors) (7.26 GB)\n- text_encoders\n - [qwen3vl_8b_int8_convrot.safetensors](https://huggingface.co/Comfy-Org/Qwen-Image-2.1/blob/main/text_encoders/qwen3vl_8b_int8_convrot.safetensors) (9.35 GB)\n- vae\n - [qwen_image_2.1_vae_bf16.safetensors](https://huggingface.co/Comfy-Org/Qwen-Image-2.1/blob/main/vae/qwen_image_2.1_vae_bf16.safetensors) (676 MB)\n\n```text\n📂ComfyUI/\n└── 📂models/\n ├── 📂diffusion_models/\n │ └── qwen_image_2.1_int8_convrot.safetensors \n ├── 📂text_encoders/\n │ └── qwen3vl_8b_int8_convrot.safetensors \n └── 📂vae/\n └── qwen_image_2.1_vae_bf16.safetensors \n```"
},
"color": "#323",
"bgcolor": "#535"
},
{
"id": 39,
"type": "VAELoader",
"pos": [
49.87187153979269,
386.79138870487407
],
"size": [
301.3524169921875,
58
],
"flags": {},
"order": 3,
"mode": 0,
"inputs": [],
"outputs": [
{
"name": "VAE",
"type": "VAE",
"slot_index": 0,
"links": [
76,
159
]
}
],
"properties": {
"Node name for S&R": "VAELoader",
"cnr_id": "comfy-core",
"ver": "0.3.33"
},
"widgets_values": [
"qwen_image_2.1_vae_bf16.safetensors"
],
"widgets_values_named": {
"vae_name": "qwen_image_2.1_vae_bf16.safetensors"
},
"color": "#322",
"bgcolor": "#533"
},
{
"id": 64,
"type": "TextEncodeQwenImage21",
"pos": [
418.4816950017755,
208.97678324429972
],
"size": [
418.5183049982245,
266
],
"flags": {},
"order": 7,
"mode": 0,
"inputs": [
{
"name": "clip",
"type": "CLIP",
"link": 115
},
{
"name": "images.image_1",
"shape": 7,
"type": "IMAGE",
"link": 170
},
{
"name": "images.image_2",
"shape": 7,
"type": "IMAGE",
"link": null
},
{
"name": "images.image_3",
"shape": 7,
"type": "IMAGE",
"link": null
},
{
"name": "vae",
"shape": 7,
"type": "VAE",
"link": 159
}
],
"outputs": [
{
"name": "positive",
"type": "CONDITIONING",
"links": [
157
]
},
{
"name": "negative",
"type": "CONDITIONING",
"links": [
158
]
},
{
"name": "latent",
"type": "LATENT",
"links": null
}
],
"properties": {
"Node name for S&R": "TextEncodeQwenImage21"
},
"widgets_values": [
"This is an RGBA image with transparency. Extract only the red train from the image. The image has alpha channel and everything except the train is transparent.",
"",
0
],
"widgets_values_named": {
"prompt": "This is an RGBA image with transparency. Extract only the red train from the image. The image has alpha channel and everything except the train is transparent.",
"negative_prompt": "",
"resolution": 0
}
},
{
"id": 76,
"type": "GetImageSize",
"pos": [
360.89502403875986,
605.8810723145949
],
"size": [
210,
136
],
"flags": {},
"order": 6,
"mode": 0,
"inputs": [
{
"name": "image",
"type": "IMAGE",
"link": 168
}
],
"outputs": [
{
"name": "width",
"type": "INT",
"links": [
171
]
},
{
"name": "height",
"type": "INT",
"links": [
172
]
},
{
"name": "batch_size",
"type": "INT",
"links": []
}
],
"properties": {
"Node name for S&R": "GetImageSize"
},
"widgets_values": [],
"widgets_values_named": {}
},
{
"id": 77,
"type": "ResizeImageMaskNode",
"pos": [
49.87187153979269,
605.8810723145949
],
"size": [
270,
106
],
"flags": {},
"order": 5,
"mode": 0,
"inputs": [
{
"name": "input",
"type": "IMAGE,MASK",
"link": 169
}
],
"outputs": [
{
"name": "resized",
"type": "IMAGE",
"links": [
168,
170
]
}
],
"properties": {
"Node name for S&R": "ResizeImageMaskNode"
},
"widgets_values": [
"scale to multiple",
32,
"bicubic"
],
"widgets_values_named": {
"resize_type": "scale to multiple",
"resize_type.multiple": 32,
"scale_method": "bicubic"
}
},
{
"id": 78,
"type": "LoadImage",
"pos": [
-517.569453752291,
605.8810723145949
],
"size": [
524.8307166017928,
457.2770249765524
],
"flags": {},
"order": 4,
"mode": 0,
"inputs": [],
"outputs": [
{
"name": "IMAGE",
"type": "IMAGE",
"links": [
169
]
},
{
"name": "MASK",
"type": "MASK",
"links": []
}
],
"properties": {
"Node name for S&R": "LoadImage",
"image": "clipspace-painted-masked-1789932249068.png [input]"
},
"widgets_values": [
"ComfyUI_00385_.png",
"image"
],
"widgets_values_named": {
"image": "ComfyUI_00385_.png",
"upload": "image"
}
}
],
"links": [
[
35,
3,
0,
8,
0,
"LATENT"
],
[
76,
39,
0,
8,
1,
"VAE"
],
[
105,
37,
0,
3,
0,
"MODEL"
],
[
148,
62,
0,
3,
3,
"LATENT"
],
[
157,
64,
0,
3,
1,
"CONDITIONING"
],
[
158,
64,
1,
3,
2,
"CONDITIONING"
],
[
168,
77,
0,
76,
0,
"IMAGE"
],
[
171,
76,
0,
62,
0,
"INT"
],
[
172,
76,
1,
62,
1,
"INT"
],
[
174,
8,
0,
56,
0,
"IMAGE"
],
[
115,
38,
0,
64,
0,
"CLIP"
],
[
170,
77,
0,
64,
1,
"IMAGE"
],
[
169,
78,
0,
77,
0,
"IMAGE"
],
[
159,
39,
0,
64,
4,
"VAE"
]
],
"groups": [],
"config": {},
"extra": {
"ds": {
"scale": 0.6934334949441548,
"offset": [
558.9792808339873,
267.8571497445022
]
},
"frontendVersion": "1.53.6",
"VHS_latentpreview": false,
"VHS_latentpreviewrate": 0,
"VHS_MetadataImage": true,
"VHS_KeepIntermediate": true
},
"version": 0.4
}
Use the same format as above and tell it what to extract with Extract ....
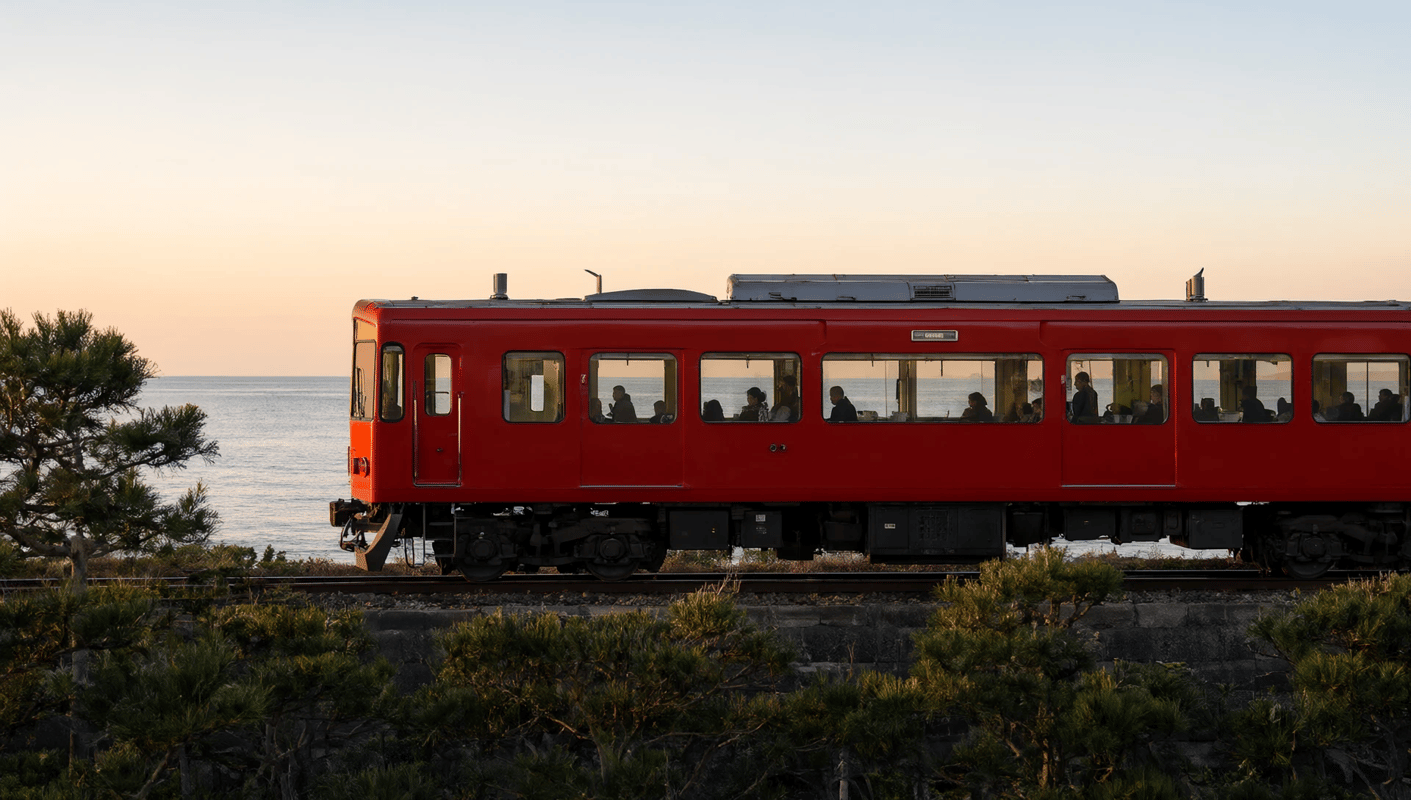
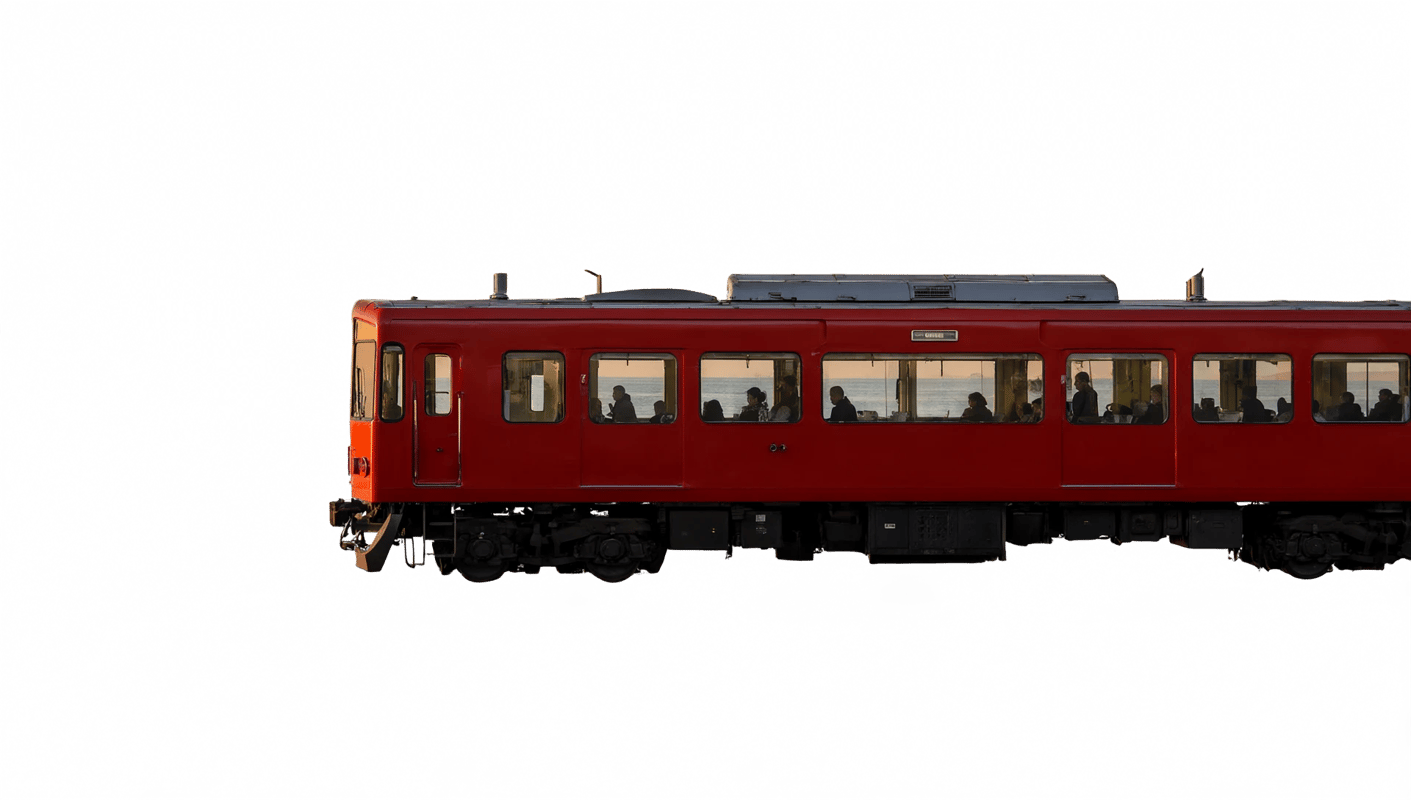
Applications
Panorama generation
Give it any reference image and ask for an ERP image at a 2:1 resolution. That alone is enough to generate a 360-degree panorama. Almost too easy...
Custom node
- nomadoor/ComfyUI-Panorama-Stickers
- A little self-promotion: this is my custom node for previewing panoramas and taking shots inside a panorama. Give it a try if it sounds useful.
{
  "id": "179e9c66-d274-4857-bcd9-34408448057b",
  "revision": 0,
  "last_node_id": 84,
  "last_link_id": 191,
  "nodes": [
    {
      "id": 8,
      "type": "VAEDecode",
      "pos": [
        1252.432861328125,
        188.1918182373047
      ],
      "size": [
        157.56002807617188,
        46
      ],
      "flags": {},
      "order": 8,
      "mode": 0,
      "inputs": [
        {
          "name": "samples",
          "type": "LATENT",
          "link": 35
        },
        {
          "name": "vae",
          "type": "VAE",
          "link": 188
        }
      ],
      "outputs": [
        {
          "name": "IMAGE",
          "type": "IMAGE",
          "slot_index": 0,
          "links": [
            101,
            184
          ]
        }
      ],
      "properties": {
        "Node name for S&R": "VAEDecode",
        "cnr_id": "comfy-core",
        "ver": "0.3.33"
      }
    },
    {
      "id": 37,
      "type": "UNETLoader",
      "pos": [
        531.6217956542969,
        34.805270385742176
      ],
      "size": [
        305.3782043457031,
        82
      ],
      "flags": {},
      "order": 0,
      "mode": 0,
      "inputs": [],
      "outputs": [
        {
          "name": "MODEL",
          "type": "MODEL",
          "slot_index": 0,
          "links": [
            191
          ]
        }
      ],
      "properties": {
        "Node name for S&R": "UNETLoader",
        "cnr_id": "comfy-core",
        "ver": "0.3.33"
      },
      "widgets_values": [
        "qwen_image_2.1_int8_convrot.safetensors",
        "default"
      ],
      "widgets_values_named": {
        "unet_name": "qwen_image_2.1_int8_convrot.safetensors",
        "weight_dtype": "default"
      },
      "color": "#323",
      "bgcolor": "#535"
    },
    {
      "id": 38,
      "type": "CLIPLoader",
      "pos": [
        49.87187153979269,
        209.35653307788294
      ],
      "size": [
        301.3524169921875,
        106
      ],
      "flags": {},
      "order": 1,
      "mode": 0,
      "inputs": [],
      "outputs": [
        {
          "name": "CLIP",
          "type": "CLIP",
          "slot_index": 0,
          "links": [
            115
          ]
        }
      ],
      "properties": {
        "Node name for S&R": "CLIPLoader",
        "cnr_id": "comfy-core",
        "ver": "0.3.33"
      },
      "widgets_values": [
        "qwen3vl_8b_int8_convrot.safetensors",
        "qwen_image",
        "default"
      ],
      "widgets_values_named": {
        "clip_name": "qwen3vl_8b_int8_convrot.safetensors",
        "type": "qwen_image",
        "device": "default"
      },
      "color": "#432",
      "bgcolor": "#653"
    },
    {
      "id": 62,
      "type": "EmptyLatentImage",
      "pos": [
        592.1202138593541,
        570.5076146381241
      ],
      "size": [
        244.87978614064593,
        106
      ],
      "flags": {},
      "order": 2,
      "mode": 0,
      "inputs": [],
      "outputs": [
        {
          "name": "LATENT",
          "type": "LATENT",
          "links": [
            181
          ]
        }
      ],
      "properties": {
        "Node name for S&R": "EmptyLatentImage",
        "cnr_id": "comfy-core",
        "ver": "0.26.0"
      },
      "widgets_values": [
        2880,
        1440,
        1
      ],
      "widgets_values_named": {
        "width": 2880,
        "height": 1440,
        "batch_size": 1
      }
    },
    {
      "id": 3,
      "type": "KSampler",
      "pos": [
        898.7548217773438,
        188.1918182373047
      ],
      "size": [
        315,
        262
      ],
      "flags": {},
      "order": 7,
      "mode": 0,
      "inputs": [
        {
          "name": "model",
          "type": "MODEL",
          "link": 191
        },
        {
          "name": "positive",
          "type": "CONDITIONING",
          "link": 157
        },
        {
          "name": "negative",
          "type": "CONDITIONING",
          "link": 158
        },
        {
          "name": "latent_image",
          "type": "LATENT",
          "link": 181
        }
      ],
      "outputs": [
        {
          "name": "LATENT",
          "type": "LATENT",
          "slot_index": 0,
          "links": [
            35
          ]
        }
      ],
      "properties": {
        "Node name for S&R": "KSampler",
        "cnr_id": "comfy-core",
        "ver": "0.3.33"
      },
      "widgets_values": [
        1235,
        "fixed",
        25,
        1,
        "euler",
        "simple",
        1
      ],
      "widgets_values_named": {
        "seed": 1235,
        "control_after_generate": "fixed",
        "steps": 25,
        "cfg": 1,
        "sampler_name": "euler",
        "scheduler": "simple",
        "denoise": 1
      }
    },
    {
      "id": 56,
      "type": "SaveImage",
      "pos": [
        1443.3798111474612,
        188.1918182373047
      ],
      "size": [
        441.0803264720478,
        287.73822273926237
      ],
      "flags": {},
      "order": 9,
      "mode": 0,
      "inputs": [
        {
          "name": "images",
          "type": "IMAGE",
          "link": 101
        }
      ],
      "outputs": [
        {
          "name": "images",
          "type": "IMAGE",
          "links": null
        }
      ],
      "properties": {
        "cnr_id": "comfy-core",
        "ver": "0.3.75"
      },
      "widgets_values": [
        "ComfyUI"
      ],
      "widgets_values_named": {
        "filename_prefix": "ComfyUI"
      }
    },
    {
      "id": 55,
      "type": "MarkdownNote",
      "pos": [
        49.87187153979269,
        -171.34464343616293
      ],
      "size": [
        389.61380077225,
        288.1499138219051
      ],
      "flags": {},
      "order": 3,
      "mode": 0,
      "inputs": [],
      "outputs": [],
      "properties": {},
      "widgets_values": [
        "## models\n\n- diffusion_models\n  - [qwen_image_2.1_int8_convrot.safetensors](https://huggingface.co/Comfy-Org/Qwen-Image-2.1/blob/main/diffusion_models/qwen_image_2.1_int8_convrot.safetensors) (7.26 GB)\n- text_encoders\n  - [qwen3vl_8b_int8_convrot.safetensors](https://huggingface.co/Comfy-Org/Qwen-Image-2.1/blob/main/text_encoders/qwen3vl_8b_int8_convrot.safetensors) (9.35 GB)\n- vae\n  - [qwen_image_2.1_vae_bf16.safetensors](https://huggingface.co/Comfy-Org/Qwen-Image-2.1/blob/main/vae/qwen_image_2.1_vae_bf16.safetensors) (676 MB)\n\n```text\n📂ComfyUI/\n└── 📂models/\n    ├── 📂diffusion_models/\n    │   └── qwen_image_2.1_int8_convrot.safetensors \n    ├── 📂text_encoders/\n    │   └── qwen3vl_8b_int8_convrot.safetensors \n    └── 📂vae/\n        └── qwen_image_2.1_vae_bf16.safetensors \n```"
      ],
      "widgets_values_named": {
        "text": "## models\n\n- diffusion_models\n  - [qwen_image_2.1_int8_convrot.safetensors](https://huggingface.co/Comfy-Org/Qwen-Image-2.1/blob/main/diffusion_models/qwen_image_2.1_int8_convrot.safetensors) (7.26 GB)\n- text_encoders\n  - [qwen3vl_8b_int8_convrot.safetensors](https://huggingface.co/Comfy-Org/Qwen-Image-2.1/blob/main/text_encoders/qwen3vl_8b_int8_convrot.safetensors) (9.35 GB)\n- vae\n  - [qwen_image_2.1_vae_bf16.safetensors](https://huggingface.co/Comfy-Org/Qwen-Image-2.1/blob/main/vae/qwen_image_2.1_vae_bf16.safetensors) (676 MB)\n\n```text\n📂ComfyUI/\n└── 📂models/\n    ├── 📂diffusion_models/\n    │   └── qwen_image_2.1_int8_convrot.safetensors \n    ├── 📂text_encoders/\n    │   └── qwen3vl_8b_int8_convrot.safetensors \n    └── 📂vae/\n        └── qwen_image_2.1_vae_bf16.safetensors \n```"
      },
      "color": "#323",
      "bgcolor": "#535"
    },
    {
      "id": 39,
      "type": "VAELoader",
      "pos": [
        49.871871539792664,
        386.79138870487407
      ],
      "size": [
        301.3524169921875,
        58
      ],
      "flags": {},
      "order": 4,
      "mode": 0,
      "inputs": [],
      "outputs": [
        {
          "name": "VAE",
          "type": "VAE",
          "slot_index": 0,
          "links": [
            159,
            188
          ]
        }
      ],
      "properties": {
        "Node name for S&R": "VAELoader",
        "cnr_id": "comfy-core",
        "ver": "0.3.33"
      },
      "widgets_values": [
        "qwen_image_2.1_vae_bf16.safetensors"
      ],
      "widgets_values_named": {
        "vae_name": "qwen_image_2.1_vae_bf16.safetensors"
      },
      "color": "#322",
      "bgcolor": "#533"
    },
    {
      "id": 64,
      "type": "TextEncodeQwenImage21",
      "pos": [
        418.4816950017755,
        209.35653307788294
      ],
      "size": [
        418.5183049982245,
        266
      ],
      "flags": {},
      "order": 6,
      "mode": 0,
      "inputs": [
        {
          "name": "clip",
          "type": "CLIP",
          "link": 115
        },
        {
          "name": "images.image_1",
          "shape": 7,
          "type": "IMAGE",
          "link": 182
        },
        {
          "name": "images.image_2",
          "shape": 7,
          "type": "IMAGE",
          "link": null
        },
        {
          "name": "images.image_3",
          "shape": 7,
          "type": "IMAGE",
          "link": null
        },
        {
          "name": "vae",
          "shape": 7,
          "type": "VAE",
          "link": 159
        }
      ],
      "outputs": [
        {
          "name": "positive",
          "type": "CONDITIONING",
          "links": [
            157
          ]
        },
        {
          "name": "negative",
          "type": "CONDITIONING",
          "links": [
            158
          ]
        },
        {
          "name": "latent",
          "type": "LATENT",
          "links": null
        }
      ],
      "properties": {
        "Node name for S&R": "TextEncodeQwenImage21"
      },
      "widgets_values": [
        "Convert this image into a coherent 360-degree equirectangular panorama. Extend the scene naturally in all directions while preserving the original content and style.",
        "",
        0
      ],
      "widgets_values_named": {
        "prompt": "Convert this image into a coherent 360-degree equirectangular panorama. Extend the scene naturally in all directions while preserving the original content and style.",
        "negative_prompt": "",
        "resolution": 0
      }
    },
    {
      "id": 65,
      "type": "LoadImage",
      "pos": [
        -3.837045457592773,
        570.5076146381241
      ],
      "size": [
        357.4884066182186,
        611.1969457516495
      ],
      "flags": {},
      "order": 5,
      "mode": 0,
      "inputs": [],
      "outputs": [
        {
          "name": "IMAGE",
          "type": "IMAGE",
          "links": [
            182
          ]
        },
        {
          "name": "MASK",
          "type": "MASK",
          "links": null
        }
      ],
      "properties": {
        "Node name for S&R": "LoadImage"
      },
      "widgets_values": [
        "ComfyUI_00407_.png",
        "image"
      ],
      "widgets_values_named": {
        "image": "ComfyUI_00407_.png",
        "upload": "image"
      }
    },
    {
      "id": 82,
      "type": "PanoramaPreview",
      "pos": [
        1441.836822831056,
        549.3250454621971
      ],
      "size": [
        841.6280183103911,
        566.8715335378172
      ],
      "flags": {},
      "order": 10,
      "mode": 0,
      "inputs": [
        {
          "name": "erp_image",
          "type": "IMAGE",
          "link": 184
        },
        {
          "name": "audio",
          "shape": 7,
          "type": "AUDIO",
          "link": null
        }
      ],
      "outputs": [
        {
          "name": "image",
          "type": "IMAGE",
          "links": []
        }
      ],
      "properties": {
        "Node name for S&R": "PanoramaPreview"
      },
      "widgets_values": [
        "360",
        24
      ],
      "widgets_values_named": {
        "coverage": "360",
        "fps": 24
      }
    }
  ],
  "links": [
    [
      35,
      3,
      0,
      8,
      0,
      "LATENT"
    ],
    [
      101,
      8,
      0,
      56,
      0,
      "IMAGE"
    ],
    [
      157,
      64,
      0,
      3,
      1,
      "CONDITIONING"
    ],
    [
      158,
      64,
      1,
      3,
      2,
      "CONDITIONING"
    ],
    [
      181,
      62,
      0,
      3,
      3,
      "LATENT"
    ],
    [
      184,
      8,
      0,
      82,
      0,
      "IMAGE"
    ],
    [
      188,
      39,
      0,
      8,
      1,
      "VAE"
    ],
    [
      115,
      38,
      0,
      64,
      0,
      "CLIP"
    ],
    [
      182,
      65,
      0,
      64,
      1,
      "IMAGE"
    ],
    [
      159,
      39,
      0,
      64,
      4,
      "VAE"
    ],
    [
      191,
      37,
      0,
      3,
      0,
      "MODEL"
    ]
  ],
  "groups": [],
  "config": {},
  "extra": {
    "ds": {
      "scale": 0.6303940863128672,
      "offset": [
        1068.9459254260585,
        313.8314430684178
      ]
    },
    "frontendVersion": "1.53.6",
    "VHS_latentpreview": false,
    "VHS_latentpreviewrate": 0,
    "VHS_MetadataImage": true,
    "VHS_KeepIntermediate": true
  },
  "version": 0.4
}
This workflow generates a wide 2:1 image while using the source image as a reference.
Rather than strictly outpainting the left and right sides, it redraws the full ERP image so everything fits naturally into the panoramic space.