What is inpainting?
Inpainting is a technique for redrawing only part of an image.
Removing an unwanted object, redrawing one area, replacing something with something else... These are just some of the many things it can do, and there is more than one way to do them.
- Apply image2image to only part of an image
- Use a dedicated inpainting model
- Use ControlNet
- Use an image editing model
- etc.
Applying image2image to only part of an image
Standard image2image regenerates the entire image. If you limit the generation area to the mask, you can regenerate only part of it.
workflow
The base is the usual image2image workflow. Add a mask to decide where to redraw.
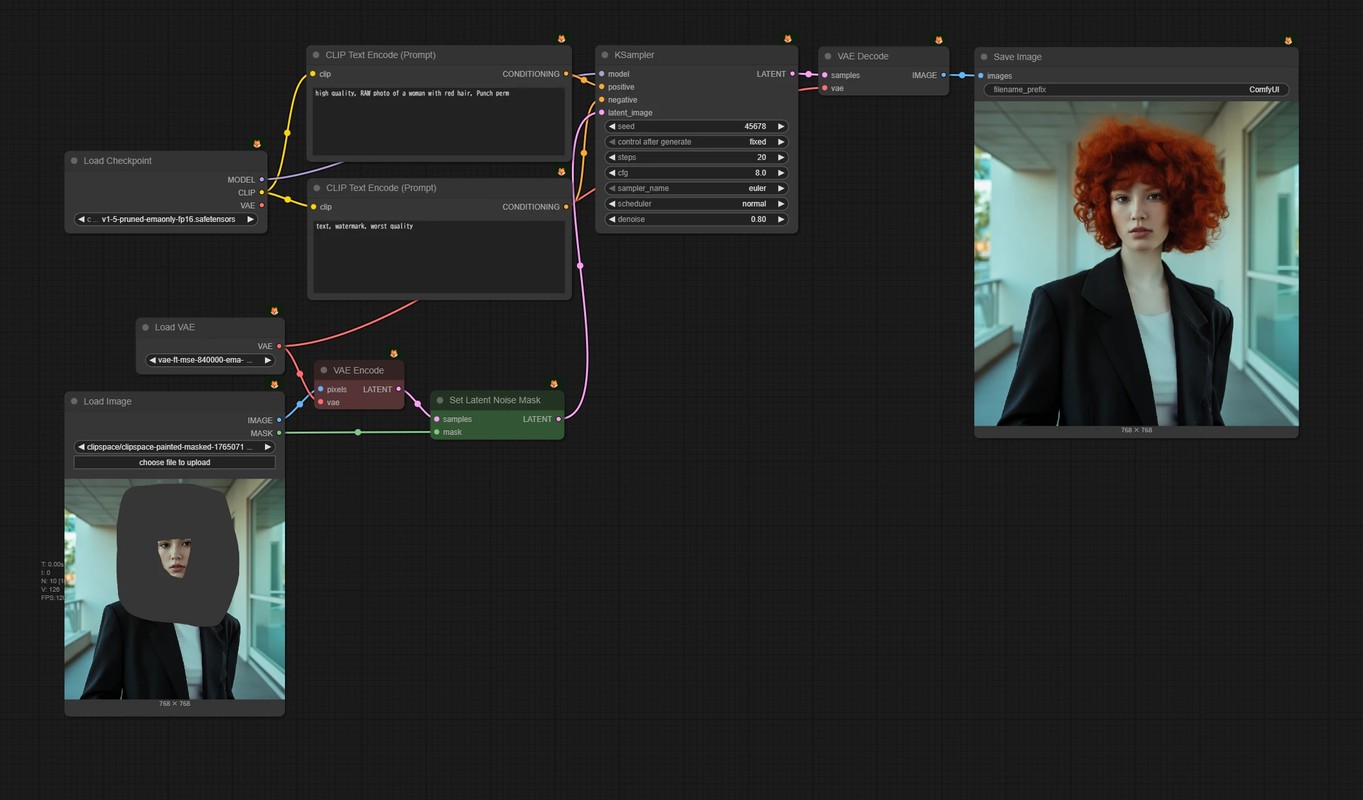
- 🟥 Convert the original image to latent with the
VAE Encodenode - 🟩 Combine the latent and mask with the
Set Latent Noise Masknode
Set Latent Noise Mask tells KSampler which area it is allowed to redraw.
Internally, each step applies image2image to the entire image, then restores the area outside the mask to the original image (latent).
As a result, it looks as if image2image was applied only inside the mask.
For details on creating and editing masks, see Mask Operations and AI Mask Generation.
The problem: Higher denoise stops matching the surroundings
Its basic behavior is the same as standard image2image.
The higher the denoise, the more freedom the model has, but the more it forgets the original image.
Try setting denoise to 1.00 in the workflow above.
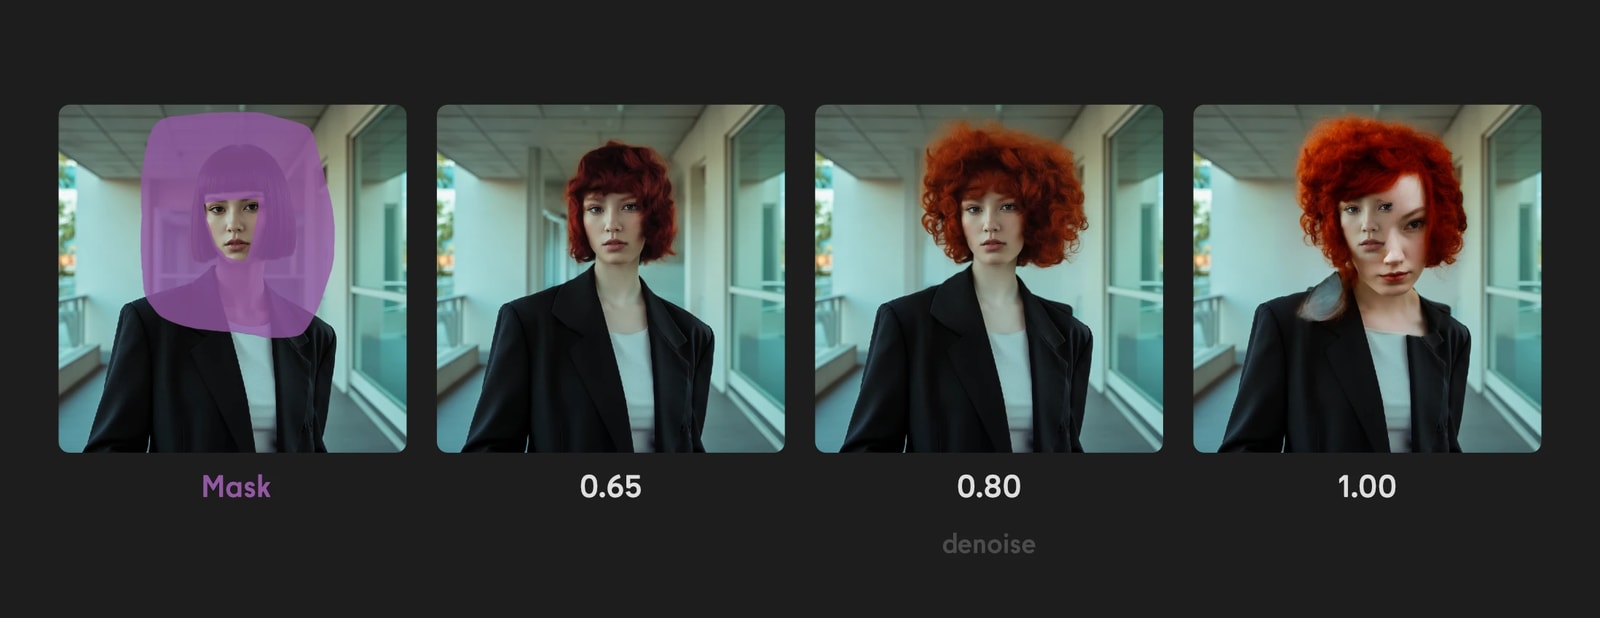
With image2image over the whole image, even a large change can be fun in its own way.
With image2image applied to only one part, however, the area outside the mask stays unchanged. The inside and outside of the mask can lose consistency.
This method is fine for a small change to the shape of a flower. A major change is more difficult.
Turning a red flower blue or replacing it with a musical instrument requires a higher denoise. But then the edited area may no longer blend with its surroundings...
So, what can we do in a case like this? 🤔
Inpainting models
One answer is a dedicated inpainting model.
In the previous method, the mask was used only to apply image2image to one part of the image. The model itself was not told which area was masked.
An inpainting model is also told "where to redraw" and "what is visible outside that area."
It creates an image with the masked area covered in gray and passes that image to the model. The old contents are hidden, so the model fills the area using only the surroundings as its guide.
Downloading the model
📂ComfyUI/
  └── 📂models/
      └── 📂checkpoints/
          └── sd-v1-5-inpainting.ckpt
workflow
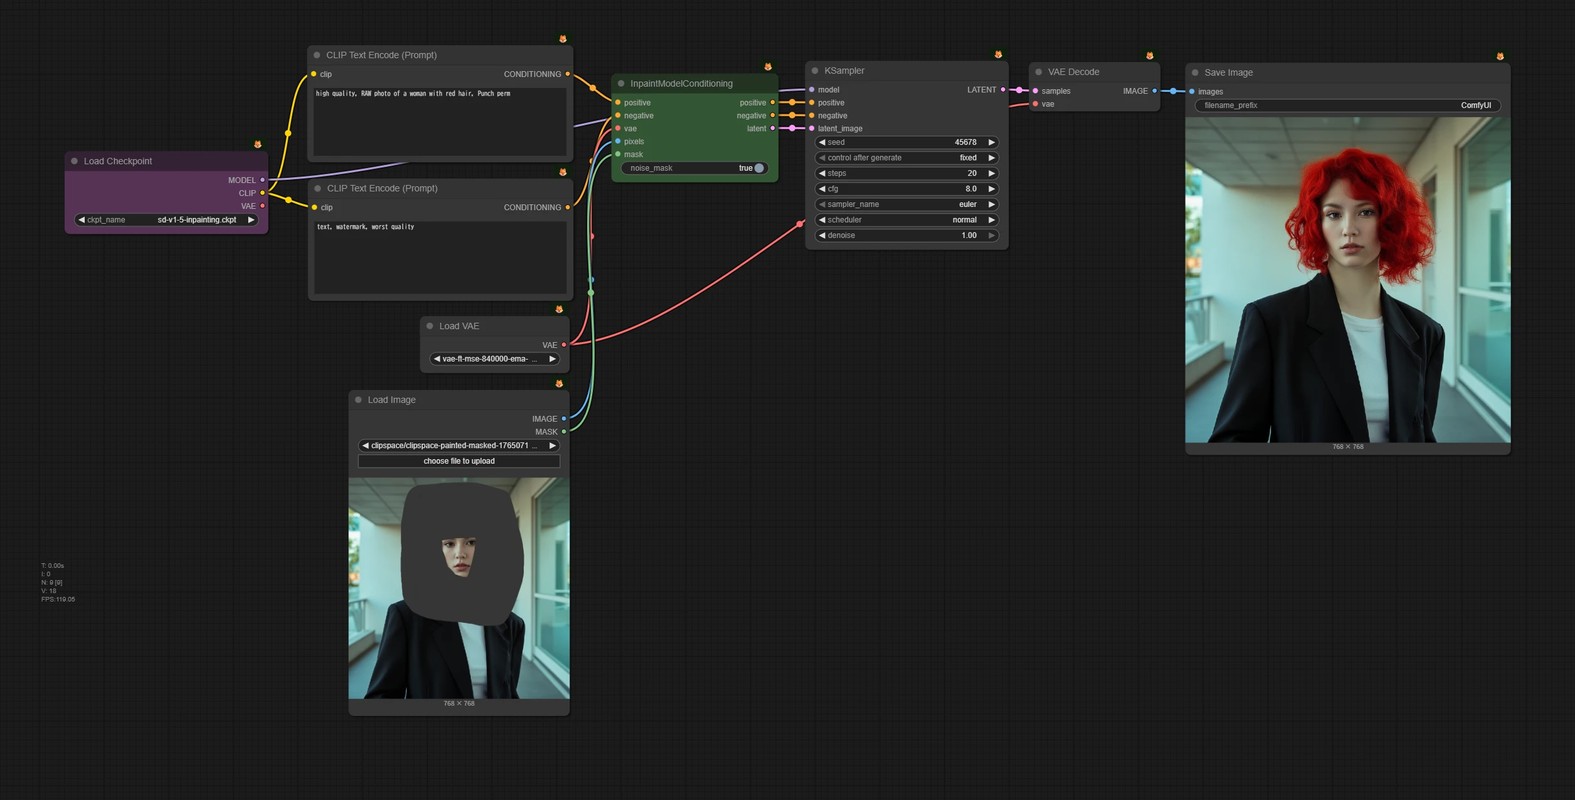
- 🟪 Load the inpainting model.
- 🟩 Replace
VAE EncodeandSet Latent Noise Maskwith theInpaintModelConditioningnode.
InpaintModelConditioning has two roles.
- Apply image2image to only one part, just like
Set Latent Noise Mask - Pass the model the mask and the original image with the masked area covered in gray
noise_mask determines whether the first role is used.
true- Apply image2image only inside the mask, just like
Set Latent Noise Mask. - This normally works fine.
- Apply image2image only inside the mask, just like
false- The model still receives the mask and the original image with the masked area covered in gray, but image2image redraws the entire image rather than only the mask.
- On very rare occasions, a model may behave incorrectly with
true. Try this setting when that happens.
The workflow above uses denoise: 1.00, but it does not produce a different woman. It redraws her hair to match the surroundings.
This shows that the model understands both where to edit and what it should use as a reference.
ControlNet inpaint
A dedicated inpainting model is not the only way to tell a model which area is masked.
Another option is ControlNet inpaint.
ControlNet is explained on another page.
Custom node
Downloading the ControlNet model
- comfyanonymous/control_v11p_sd15_inpaint_fp16.safetensors
-
📂ComfyUI/
  └── 📂models/
      └── 📂controlnet/
          └── control_v11p_sd15_inpaint_fp16.safetensors
workflow
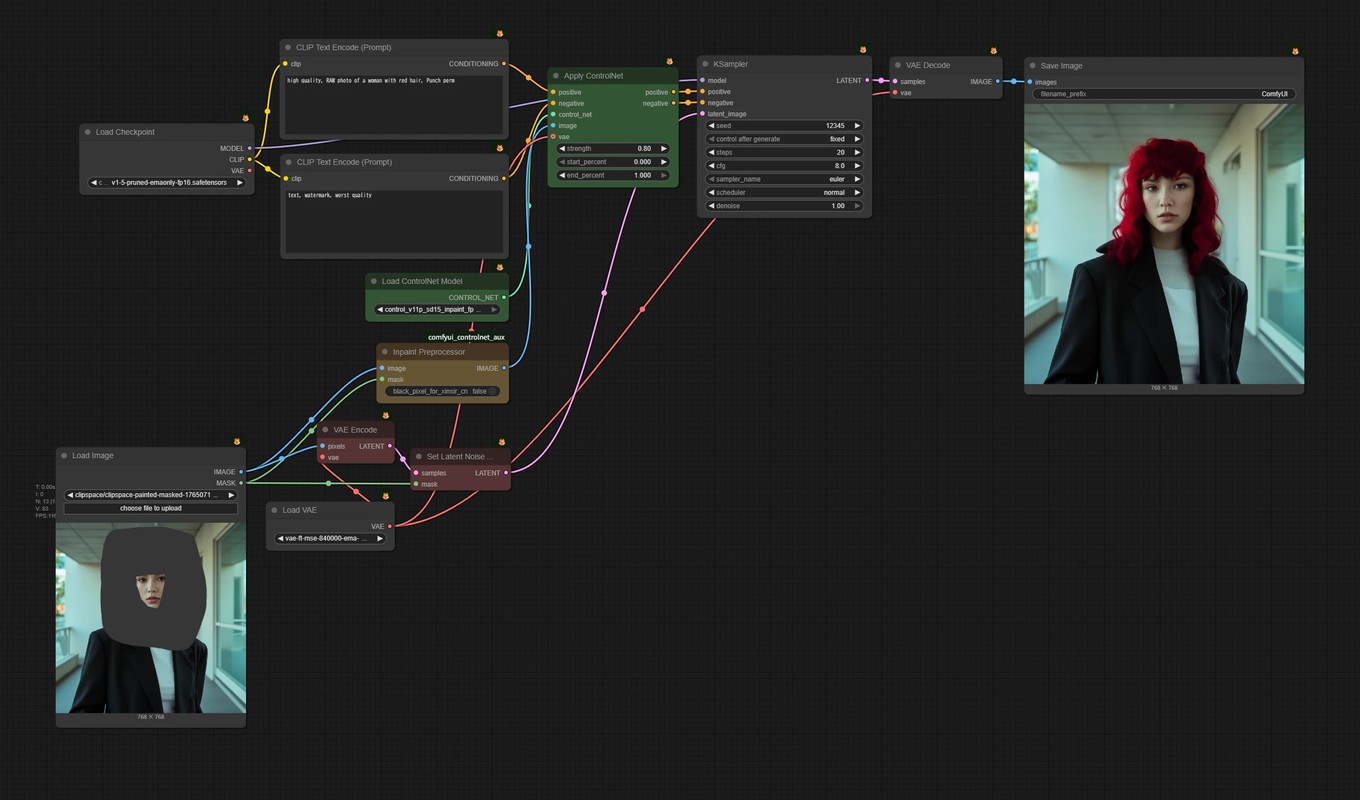
- Load any SD1.5 checkpoint (+ LoRA)
- 🟨 Pass the image and mask to
Inpaint Preprocessorto create an image for ControlNet- Visually, the masked area is painted black.
- 🟩 Pass the ControlNet model, image, and VAE to the
Apply ControlNetnode - 🟥 Use
Set Latent Noise Maskto limit the redrawn area to the mask
The technology is different, but the action is the same as with an inpainting model: pass the model "where to fill" and "what is visible around it."
Other inpainting methods
They are not covered here, but model families released after Stable Diffusion 1.5 offer various other methods.
- Fooocus Inpaint
- FLUX.1 Fill
- etc.
Image editing models
Today, we cannot discuss this subject without mentioning image editing models.
An image editing model can follow a prompt such as "remove the man's hat," or take an image with an area circled in red together with an instruction such as "add a cat here." It does not even need a dedicated mask.
Strictly speaking, these models are not normally discussed in the context of inpainting. But in the sense that they can change only part of an image, they can accomplish the same thing.
FLUX.2 [klein]
As a representative image editing model, let's look at FLUX.2 [klein].
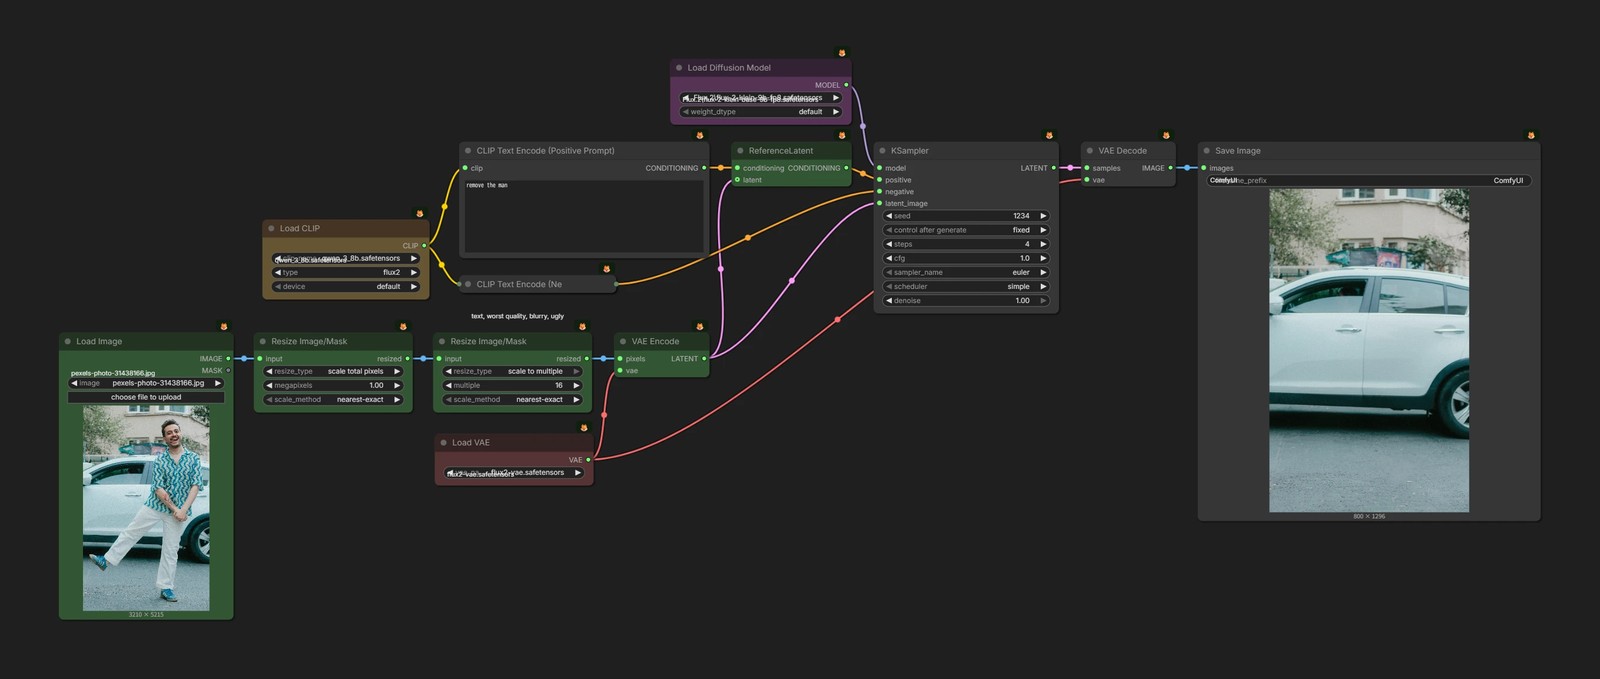
In this workflow, the input image and the prompt remove the man are all that is needed to remove the man from the image.